Is Your Office Chair Causing Back Pain?

Summary

Many people in the IT space suffer from back pains at one point or another. 5-10 years ago I thought back pain was just for those that were unhealthy. Then, earlier this year, it hit me. It was pain like no other. Not just muscle pain but felt like “bone on bone” pain. For the first time, I went to a chiropractor. It helped but depending on that did not seem like the long term solution. Here is my journey and thoughts on back pain. Hopefully it can help you!

Over the Years

Over the years I have had the occasional back pain from tense muscles. It usually came from a stressful day and left a day or two later. Exercise and a good night sleep usually fixed it. Sometimes it was as simple as my body telling me it was time for new shoes! Soles of shoes can wear over time and stop providing the support needed.

Doctor Time?

That was until earlier this year I woke up one morning with some absolutely terrible back pain that caused me to go to the chiropractor. After a few sessions of adjustments and deep tissue massage, I was on my way. It was not completely gone but bearable. I kept asking what I could do differently but was repeatedly told me it was just life and to keep coming back. The chiropractor was a highly reputable one so I believed it. Perhaps he was just tired of giving people advice that they never took.

It came back again a few weeks later until I took a family stay-vacation. Some family came into town and I was off work for a week. My back pain was gone so I realized it had something to do with my work routine.

Change it up!

I decided to rotate my mattress and eventually get a new one. I replaced my shoes to see if that helped. These minor changes were making a dent but still not quite doing it. Then I started looking at my chair. It was a typical adjustable task chair but it was about 15-20 years old. My wife on the other-hand had a nice Serta executive chair she inherited from my father. I swapped chairs for 1 day and felt “cured”. It was a miracle!

The Chair!

Upon investigating chairs and doing my research on my own chair, it had a few issues. The chair was fairly old so the padding was pretty shot. It also did not have any lumbar support. That was the primary area of my back pain. The Serta chair, on the other hand, had copious amounts of lumbar support. Knowing it was my chair that was the issue, I sought out finding an economical replacement.

Chair Qualities

As I would come to find out, there were a few qualities of a chair that would help support the back and help to prevent or mitigate back pain

Lumbar Support

What is lumbar and lumbar support? The lumbar is the lower region of the back. It has a natural curve to it.

Spinal Column Anatomy including Lumbar
Spinal Column Anatomy
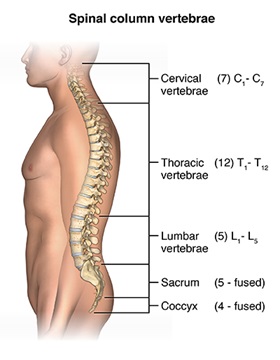
Taken from – https://www.hopkinsmedicine.org/health/conditions-and-diseases/lumbar-strain-weight-lifters-back

In chairs that do not have lumbar support (curved to match to this), we tend to press up to the back and lose that natural curve. This causes the spin to sit in a way that can cause pain over time. The reason for this is muscles are supporting the back that do not usually do so. Then over more time, we tend to hunch or change positions to more unhealthy positions

Lean Back!

No, its not just a song feating Fat Joe! The ability of a chair to tilt and allow you to lean back allows for the back of the chair to take most of the weight of your upper body off your back and place some of it on the chair. This reduces the strain on back and back muscles.

Armwrests

In terms of mitigating back pain, these are fairly terrible if you spend your day typing on a keyboard. The reason for this also goes along with design flaws in desks. Perhaps flaw is not the right word but a choice of aesthetic over function.

An ideal setup allows for your elbows to be parallel to the desk when sitting so that your arms can rest on the desk comfortably without contorting your shoulders and putting strain on them. The problem with armwrests is they typically prevent you from adjusting your chair to a proper height to allow for that. For this reason I typically remove the arm wrests completely when possible.

Some desks come with drawers under the desk, in the sitting area which cause similar issues. Your chair should be adjusted so that there is a minimal amount of space between the top of your legs and the bottom of the desk to best allow your forearms to be parallel to the desk and resting comfortably.

Adjustable Desks

An adjustable desk helps with this greatly too. Sitting all day or standing all day is bad for your posture. Sit all day and your hips get tight or tense and need to be stretched. Stand all day and your back will definitely hurt. I like the flexibility of an adjustable desk so that I can change positions every few hours.

Not everyone can afford a real adjustable desk so there are cheap “hacks” you can find that will allow you to place your keyboard and monitor on a stand that adjusts on top of your desk. IKEA has some “economical” motorized adjustable desks too for $400 USD

Other Remediations

While I did not want to see a chiropractor long term, deep tissue massage is likely a must for me on some sort of schedule and I highly recommend it.

I find that using a foam roller on my upper back helps tremendously as well as tennis ball. These work wonders to help to work out knots if you cannot get to or afford a deep tissue massage.

Please do be careful with these methods though. You can make your back problems much worse if you do them incorrectly. Many times an out of alignment back can cause these issues so I recommend doing the full foam rolling exercise but leave out your lower back.

Final Words

Sometimes resolving back pain is a matter of finding the silver bullet and changing that one thing. Other times you may have a few life circumstances that are causing it. Be persistent though and hopefully this article has given you a few different areas to investigate!

Here is a great video to help visualize some of the chair mistakes we commonly make.

CheckMK Distributed Monitoring

Summary

The purpose of this guide is to show the strength and flexibility of CheckMK’s distributed monitoring. As you add hosts and services, the requirements can grow. It can be easy to get in the rut of adding more CPU and RAM until you have a monstrosity of a server that you cannot expand anymore.

Centrally monitoring all sites may not even work. The central CheckMK server may not have access to all of the remote devices.

Pre-requisites and Installation

To start off, we will need another CheckMK instance. If you do not already have one, check out the Introduction to CheckMK guide. Once you have CheckMK installed and a new unique site setup, the rest is trivial

Distributed monitoring also involves the slave listening on TCP/6557 so we need to open that up

[root@chckmk2 ~]# firewall-cmd --zone=public --add-port=6557/tcp --permanent
[root@chckmk2 ~]# firewall-cmd --reload

[root@chckmk2 ~]# su - second

OMD[second]:~$ omd config

We then enable distributed monitoring and enable livestatus

omd config - Distributed Monitoring
Select “Distributed Monitoring”
omd livestatus
omd livestatus

Enable livestatus which will listen on port 6557

Configure Connection

From the main site, in our series http://chckmk1.woohoosvcs.com/main navigate to Distributed Monitoring

Distributed Monitoring
New Connection
New Connection
Second connection options
Fill out the appropriate options.
Login to second site
Select the credentials that have access to login to the second site.
Login
Login again!
Save changes
Save changes
Activate
Activate!

Use Connection

Now that we have the connection, how do we actually use it? One of the easiest and likely ways is to have a folder configured just with that monitoring site

New Folder
Create a folder with a monitored site

Next I added a host and put it in this new folder. Here you can see CheckMK is smart enough to know only the “second” site needs to be reloaded due to the changes that only affect it.

Activate second site changes

Final Words

This article was mostly pictures but hopefully the point comes across. That point is how flexible and easy it is to setup distributed monitoring via CheckMK.

Upgrading CheckMK

Summary

In this article we will discuss the upgrade process using OMD. We will also go over the “werks” or changes and incompatibilities in the versions after upgrading.

If you have a fully functional environment such as one installed per Introduction to CheckMK – this should be fairly straight forward.

Prerequisites

CheckMK 1.5 RPM – We downloaded this in the previous article

[root@chckmk1 ~]# curl -O https://checkmk.com/support/1.5.0p23/check-mk-raw-1.5.0p23-el7-38.x86_64.rpm

[root@chckmk1 ~]# yum install check-mk-raw-1.5.0p23-el7-38.x86_64.rpm 

Wait, what just happened? Was that it? Did it just get upgraded? Yes and no. CheckMK 1.5 was installed but our instance is not upgraded to it.

[root@chckmk1 ~]# omd sites
SITE             VERSION          COMMENTS
main             1.4.0p38.cre      

[root@chckmk1 ~]# omd versions
1.4.0p38.cre
1.5.0p23.cre (default)

Each omd instance runs as the user so we will su to main to run commands for that instance

[root@chckmk1 ~]# su - main
OMD[main]:~$ omd update
Please completely stop 'main' before updating it.

# Yes that's a great idea!
OMD[main]:~$ omd stop
OMD[main]:~$ omd update

omd update
“omd update”
OMD[main]:~$ omd version
OMD - Open Monitoring Distribution Version 1.5.0p23.cre
OMD[main]:~$ omd start
Version 1.5.0p23 with “57”

Are we there yet?

We most definitely are. We are on 1.5.0p23 and that went fairly well. But what is the “57”.

Werks

From the CheckMK page a Werk is a bug or change that has an affect on the UI – https://checkmk.de/check_mk-werks.php

We can click on the 57 and there are 57 incompatible “werks” that we should be aware of. Many times these are non issues. Other times it is certain metrics that have gone away or configurations that have changed.

Werks / Release Notes
“Werks” AKA Release Notes

This is a huge help when upgrading. Instead of having to dig through text file release notes to see what major changes happened, we have werks! You can see any incompatible changes here and drilling into them will give you details on what to do. Once you have addressed it, you can acknowledge the werk.

Click on the “Show unacknowledged incompatible werks”

Incompatible Werk
Incompatible werk. Address and acknowledge

As we can see here, there is a clear description of what changed. Once we have addressed, you can acknowledge and the 57 will decrement to 56.

You also have the option on the release notes page to “acknowledge all” if you really do not care to work through the werks. for this lab I have gone through this before and I will just acknowledge all.

If you have a large deployment, most of your time will be spent going through the werks and addressing. With that said, going from 1.4 to 1.5 has been a breeze. 1.2.8 to 1.4 was a bit rougher with more incompatible werks that caused issues.

Rollback

The power of OMD lets rollbacks come fairly easy. OMD does not care if an “upgrade” is going forward or backwards. The only issues you may have is if you made a config change only compatible or implemented in 1.5. In that case, 1.4 may have issues with it. Otherwise the rollback is the same as the upgrade. 1) stop the site 2) omd update

Final Words

Now we have a fairly up to date CheckMK. Try doing the same to 1.6.0? For my production deploys I usually wait for a few revisions and 1.6.0 is still very early for my tastes.

Introduction to CheckMK

Summary

The purpose of this guide is to provide a high level overview of CheckMK. CheckMK is a great monitoring tool that has progressed greatly over the years. I have heavily depended on it for at least 3 years now.

Background

I came across CheckMK on a project that required a shot gun replacement of the current monitoring solution. A few solutions were vetted and Nagios was attempted. Unfortunately, the time to tweak and tune it was not compatible with the project timelines.

About CheckMK

CheckMK is an ecosystem that original was built around nagios. Many of the components of Nagios exist. Mathias Kettner is the founder of CheckMK.

There are quite a few editions but the scope of this is for the “Raw” edition. This is essentially the free unlimited tier.

Installation

Enough of the background, let’s get down to the technical installation

Requirements

For the purposes of this installation, we will be using a vanilla “minimal” install of CentOS 7.0. CentOS 7 is the latest supported version CheckMK supports. The VM will have 1 core, 1GB RAM and 8GB HDD. We will first be installing 1.4.0 so that the upgrade process can be shown.

curl -O https://checkmk.com/support/1.4.0p38/check-mk-raw-1.4.0p38-el7-85.x86_64.rpm

curl -O https://checkmk.com/support/1.5.0p23/check-mk-raw-1.5.0p23-el7-38.x86_64.rpm

# Always good to update first!
yum update

# Enable EPEL package repo
yum install https://dl.fedoraproject.org/pub/epel/epel-release-latest-7.noarch.rpm

# Then attempt to install
yum install check-mk-raw-1.4.0p38-el7-85.x86_64.rpm

Ok, great, ran through all of that. What’s next?

Configuration

Open Monitoring Distribution

CheckMK builds upon a framework called Open Monitoring Distribution (OMD). You may be asking, why the complexity? OMD makes upgrades quite useful and can allow you to run multiple versions of CheckMK on the same machine as OMD also allows multiple instances. The CheckMK rpms install this.

The first step after installing CheckMK will be to create an OMD site

# Here you can see there are no sites
[root@chckmk1 ~]# omd sites
SITE             VERSION          COMMENTS

# We then create a site
[root@chckmk1 ~]# omd create main
Adding /opt/omd/sites/main/tmp to /etc/fstab.
Creating temporary filesystem /omd/sites/main/tmp...OK
Restarting Apache...OK
Created new site main with version 1.4.0p38.cre.

  The site can be started with omd start main.
  The default web UI is available at http://chckmk1.woohoosvcs.com/main/

  The admin user for the web applications is cmkadmin with password: OkWZHNQr
  (It can be changed with 'htpasswd -m ~/etc/htpasswd cmkadmin' as site user.
)
  Please do a su - main for administration of this site.


[root@chckmk1 ~]# omd sites
SITE             VERSION          COMMENTS
main             1.4.0p38.cre     default version 

[root@chckmk1 ~]# omd start main
Starting mkeventd...OK
Starting rrdcached...OK
Starting npcd...OK
Starting nagios...2019-11-02 15:43:45 [6] updating log file index
2019-11-02 15:43:45 [6] updating log file index
OK
Starting dedicated Apache for site main...OK
Initializing Crontab...OK

# Open port 80 with firewalld
[root@chckmk1 ~]# firewall-cmd --zone=public --add-service=http --permanent
success
[root@chckmk1 ~]# firewall-cmd --reload

# Set SELINUX

setsebool -P httpd_can_network_connect 1

If everything went well, you should be able to browse to the IP or URL and get a login page.

CheckMK 1.4.0 Login Page

CheckMK 1.4.0 Login Page

It is really that simple. You now have a working CheckMK instance ready to be configured.

CheckMK Main Page

CheckMK Main Page

Configuring CheckMK Application

Now that we have a working instance and want to actually monitor something, why not the CheckMK server itself? There are a few options for this. You can use SNMP, CheckMK Agent or both. We will go over installing and configuring the agent.

Installing the CheckMK Agent

The agent requires xinetd as it essentially ties a script (the agent) to a socket/tcp port (6556). We will put the agent directly on the checkmk server.

The agents can be found in the “Monitoring Agents” section. For RPM based distributions it is easy to just install the RPM.

[root@chckmk1 ~]# curl -O http://chckmk1.woohoosvcs.com/main/check_mk/agents/check-mk-agent-1.4.0p38-1.noarch.rpm

[root@chckmk1 ~]# yum install check-mk-agent-1.4.0p38-1.noarch.rpm

[root@chckmk1 ~]# netstat -an | grep 6556
tcp6       0      0 :::6556                 :::*                    LISTEN     

Adding Host

Now we get to add the host to CheckMK

New hosts
Go to “Hosts” and then “New host”
Select host monitoring configuration
Enter the Hostname or IP. The agent type defaults to Check_MK Agent but I wanted to point it out. You then want to “Save & go to Services”.
Fix all missing/vanished services
This screen shows all of the services it can monitor. We want to “Fix all missing/vanished” and then save “1 change” which should after this actually change to save “2 changes”.
Activate new changes made
At this point we need to activate those changes. This typically requires a reload of Nagios which the activation does.
Host added but stale host and services
But wait, what am I seeing now and why are those hosts stale?
Some activity
Here we go, some activity!

At this point, we added a host and added some metrics to it. It ran through a discovery and found some more. Many times this happens. This is because some checks run asynchronously in the background. The first time you check a host, it does not return all of the services. On the second run they show up. From here you can go through similar steps to click on the host and acknowledge the new services.

In this case I simply forgot to follow my own instructions and click the “fix button”. Likely more services would have shown up later but not as many in the screenshot.

Other Configurations

Just because we have a monitoring system in place does not mean it is fully configured. We still have notifications, alert levels and many other tuning. Those are out of scope of this document but I will likely generate them going forward.

Final Words

We stood up a Check_MK server from scratch and are monitoring one host. At the beginning of the article I discussed upgrading. I will follow up with another article on upgrading. The process is fairly simple but there

Why I Use Keychron For My Mac

Preface

I was not paid by Keychron or anyone else to write this. This is purely my experience of this keyboard. I would not even call this a technical review. I really like the product and wanted to share.

Summary

A while back, my trusty Apple Bluetooth keyboard failed. Ok, not failed. I poured something on it accidentally. It was quickly replaced with a new Apple keyboard. Unfortunately it used the new butterfly keyboard and felt like typing on chalk. A kickstarter for a mechanical keyboard that had Mac layout support came across one of my social feeds. The options were fairly limited for something with Mac compatible layout. This happened circa November 2018.

It was founded by some keyboard enthusiasts with industry knowledge that decided to start their own company. That is definitely something I can buy into and help support. At the time, it was called Keytron. I believe due to some naming issues they then rebranded as Keychron.

What is a Mechanical Keyboard?

A mechanical keyboard uses mechanical switches. Most of the early keyboards were mechanical. We are talking 1980’s timeframe for those under 25. In the early 1990’s, rubber dome keyboards were fairly common. Very likely due to how cheaply they could be manufactured. If you have ever had to open up a keyboard that does not provide some “clickity clackity”, you would find a rubber mat under the keys.

Here is a good article I came across with images – https://mechanicalkeyboards.com/define_mechanical_keyboard.php

Tom’s hardware also has a great article on optical switches which some of these keyboards are or give you the option of. Optical switches can and do have mechanical parts to them.

Noise

Wouldn’t mechanical keyboards be noisy? Yes they can be depending on the type of mechanical switch. For many people that is part of the nostalgia of it. I learned to type on an Apple IIe and electric typewriter. I was very familiar with mechanical keys and knew what I was in for. It is a common complaint though of someone that has not used one before. If you use it at work, your coworkers are likely to complain too.

The K1

The initial keyboard they offered (model K1) had a few features. Some of those features were 87 key versus 104 key and white backlight versus RGB. I opted for the 87 key RGB. Since it was a kickstarter project, I did not have high expectations of ordering and it showing up next week. I would check up on it every few weeks. It finally shipped early January.

K1 87 Key RGB
Taken from https://www.keychron.com/products/keychron-mechanical-keyboard

My K1

Here are some pictures of how my K1 has faired over the past year. As pictured, it is a bit worn and some of the paint is chipping away but I cannot complain. This was the first iteration of the first keyboard they shipped. Since then, this has been dubbed v1. They are now on K1 v3 which I am happily awaiting shipment of.

It is bluetooth capable and has an internal battery, despite the wire depicted below,. I use the USB-C purely for power to my USB power source.

Keychron K1 v1 above view
Above view of my K1 v1
Side view of K1 v1 Keychron
Side view of K1 v1

Other Models

The K1 was a fairly successful release. With that success, Keychron then released the K2 with quite a few mechanical switch options. I do not claim to know all of the various switches and their strengths and weaknesses. The K2 was designed to be a higher profile option. The low profile switches of the K1 were in high demand and difficult to come by.

K2

The K2 is the current production keyboard actively produced on a regular basis. Due to this, the K1 gets manufactured in batches at this point at various times.

With the K1, it only offered one switch. For the K1 v1 it was the blue switch. For the K2 they decided to give options in addition to the blue switches. I imagine this was in part due to the noise with blue.

It is an 84 key only keyboard.

K4

The K4 is a compact keyboard with many of the same switch options as the K2. It is a compact 104 key keyboard.

Community Grumblings

It wouldn’t be fair to completely ignore this. With it being a new startup there have been some frustrated customers. Particularly around communication and shipping. Sometimes it takes weeks to get updates on the status of orders. In some countries there are unexpected customs taxes that can be rather high.

Not to discount those concerns, I completely understand them. Having started a few businesses, I also understand being a startup and the craziness that goes along with that. In today’s world we are so used to buying off Amazon, having it show up fairly immediately with tracking all along the way.

With all of that said, I do see huge improvements in that area. I recently purchased my K1 v3 online. A mere 4 days later, it shipped and I should have it in a few more days.

UPDATE: It has shown up, check it out here – Unboxing My Keychron K1 v3

Kubernetes Dashboard

Summary

Now that we’ve stood up a majority of the framework we can get to some of the fun stuff. Namely Kubernetes Dashboard. Due to compatibility reasons we will be using 2.0beta1. Newer 2.0 betas are not well tested and I ran into some issues with our 1.14 that Photon comes with.

Download and Install

This is short and sweet. As usual, I like to download and then install. I didn’t like the name of this file though so I renamed it.

curl -O https://raw.githubusercontent.com/kubernetes/dashboard/v2.0.0-beta1/aio/deploy/recommended.yaml

mv recommended.yaml dashboard-2b1.yaml

kubectl apply -f dashboard-2b1.yaml 
namespace/kubernetes-dashboard created
serviceaccount/kubernetes-dashboard created
service/kubernetes-dashboard created
secret/kubernetes-dashboard-certs created
secret/kubernetes-dashboard-csrf created
secret/kubernetes-dashboard-key-holder created
configmap/kubernetes-dashboard-settings created
role.rbac.authorization.k8s.io/kubernetes-dashboard created
clusterrole.rbac.authorization.k8s.io/kubernetes-dashboard created
rolebinding.rbac.authorization.k8s.io/kubernetes-dashboard created
clusterrolebinding.rbac.authorization.k8s.io/kubernetes-dashboard created
deployment.apps/kubernetes-dashboard created
service/dashboard-metrics-scraper created
deployment.apps/kubernetes-metrics-scraper created

Health Check

The dashboard namespace is kubernetes-dashboard so we run the following.

root@kube-master [ ~/kube ]# kubectl get all --namespace=kubernetes-dashboard
NAME                                              READY   STATUS    RESTARTS   AGE
pod/kubernetes-dashboard-6f89577b77-pbngw         1/1     Running   0          27s
pod/kubernetes-metrics-scraper-79c9985bc6-kj6h5   1/1     Running   0          28s

NAME                                TYPE        CLUSTER-IP       EXTERNAL-IP   PORT(S)    AGE
service/dashboard-metrics-scraper   ClusterIP   10.254.189.11    <none>        8000/TCP   57s
service/kubernetes-dashboard        ClusterIP   10.254.127.216   <none>        443/TCP    61s

NAME                                         READY   UP-TO-DATE   AVAILABLE   AGE
deployment.apps/kubernetes-dashboard         1/1     1            1           57s
deployment.apps/kubernetes-metrics-scraper   1/1     1            1           57s

NAME                                                    DESIRED   CURRENT   READY   AGE
replicaset.apps/kubernetes-dashboard-6f89577b77         1         1         1       29s
replicaset.apps/kubernetes-metrics-scraper-79c9985bc6   1         1         1       29s

Connecting

On the main Dashboard page it indicates you can access via running “kubectl proxy” and access the URL. This is where it gets a little tricky. Not for us since we have flannel working, even on the master. Simply download the Kubernetes kubectl client for your OS and run it locally.

dwcjr@Davids-MacBook-Pro ~ % kubectl proxy
Starting to serve on 127.0.0.1:8001

Now access the indicated link in the article. Namespace changed as it changed in 2.0 – http://localhost:8001/api/v1/namespaces/kubernetes-dashboard/services/https:kubernetes-dashboard:/proxy/

Kubernetes Login Screen

Authenticating

Kubernetes Access Control page does a good job at describing this but at a high level

Create an dashboard-adminuser.yaml

apiVersion: v1
kind: ServiceAccount
metadata:
  name: admin-user
  namespace: kubernetes-dashboard

apiVersion: rbac.authorization.k8s.io/v1
kind: ClusterRoleBinding
metadata:
  name: admin-user
roleRef:
  apiGroup: rbac.authorization.k8s.io
  kind: ClusterRole
  name: cluster-admin
subjects:
- kind: ServiceAccount
  name: admin-user
  namespace: kubernetes-dashboard

kubectl apply -f dashboard-adminuser.yaml

Then use this cool snippet to find the token. If you’re doing this on the master, make sure to install awk

kubectl -n kubernetes-dashboard describe secret $(kubectl -n kubernetes-dashboard get secret | grep admin-user | awk '{print $1}')

At the bottom of the output should be a token section that you can plug into the token request.

From here you’ve made it. Things just got a whole lot easier if you’re a visual learner!

Kubernetes Dashboard View

Final Words

I may write a few more articles on this but that this point we have a very functional Kubernetes Cluster that can deploy apps given we throw enough resources at the VMs. Other topics that need to be covered are networking and the actual topology. I feel that one of the best ways to learn a platform or technology is to push through a guided install and then understand what the components are. This works for me but not everyone.

Kubernetes Flannel Configuration

Summary

With all the pre-requisites met, including SSL, flannel is fairly simple to install and configure. Where it goes wrong is if some of those pre-requisites have not been met or are misconfigured. You will star to find that out in this step.

We will be running flannel in a docker image, even on the master versus a standalone which is much easier to manage.

Why Do We Need Flannel Or An Overlay?

Without flannel, each node has the same IP range associated with docker. We could change this and manage it ourselves. We would then need to setup firewall rules and routing table entries to handle this. Then we also need to keep up with ip allocations.

Flannel does all of this for us. It does so with a minimal amount of effort.

Staging for Flannel

Config

We need to update /etc/kubernetes/controller-manager again and add

--allocate-node-cidrs=true --cluster-cidr=10.244.0.0/16

KUBE_CONTROLLER_MANAGER_ARGS="--root-ca-file=/secret/ca.crt  --service-account-private-key-file=/secret/server.key --allocate-node-cidrs=true --cluster-cidr=10.244.0.0/16"

And then restart kube-controller-manager

I always prefer to download my yaml files so I can review and replay as necessary. Per their documentation I am just going to curl the URL and then apply it

On each node we need to add the following the the /etc/kubernetes/kubelet config and then restart kubelet

KUBELET_ARGS="--network-plugin=cni"

Firewall

Since flannel is an overlay, it overlays over the existing network and we need to open UDP/8285 per their doc. Therefore we need to put this in iptables on each host

# This line for VXLAN
-A INPUT -p udp -m udp --dport 8472 -j ACCEPT

# This line for UDP
-A INPUT -p udp -m udp --dport 8285 -j ACCEPT

Fire it up!

Now we are ready to apply and let it all spin up!

root@kube-master [ ~/kube ]# curl -O https://raw.githubusercontent.com/coreos/flannel/master/Documentation/kube-flannel.yml

root@kube-master [ ~/kube ]# kubectl apply -f kube-flannel.yml
podsecuritypolicy.policy/psp.flannel.unprivileged created
clusterrole.rbac.authorization.k8s.io/flannel created
clusterrolebinding.rbac.authorization.k8s.io/flannel created
serviceaccount/flannel created
configmap/kube-flannel-cfg created
daemonset.apps/kube-flannel-ds-amd64 created
daemonset.apps/kube-flannel-ds-arm64 created
daemonset.apps/kube-flannel-ds-arm created
daemonset.apps/kube-flannel-ds-ppc64le created
daemonset.apps/kube-flannel-ds-s390x created

If all is well at this point, it should be chewing through CPU and disk and in a minute or two the pods are deployed!

root@kube-master [ ~/kube ]# kubectl get pods --namespace=kube-system
NAME                          READY   STATUS    RESTARTS   AGE
kube-flannel-ds-amd64-7dqd4   1/1     Running   17         138m
kube-flannel-ds-amd64-hs6c7   1/1     Running   1          138m
kube-flannel-ds-amd64-txz9g   1/1     Running   18         139m

On each node you should see a “flannel” interface now too.

root@kube-master [ ~/kube ]# ifconfig -a | grep flannel
flannel.1 Link encap:Ethernet  HWaddr 1a:f8:1a:65:2f:75

Troubleshooting Flannel

From the “RESTARTS” section you can see some of them had some issues. What kind of blog would this be if I didn’t walk you through some troubleshooting steps?

I knew that the successful one was the master so it was likely a connectivity issue. Testing “curl -v https://10.254.0.1” passed on the master but failed on the nodes. By pass, I mean it made a connection but complained about the TLS certificate (which is fine). The nodes, however, indicated some sort of connectivity issue or firewall issue. So I tried the back end service member https://192.168.116.174:6443 and same symptoms. I would have expected Kubernetes to open up this port but it didn’t so I added it to iptables and updated my own documentation.

Some other good commands are “kubectl logs <resource>” such as

root@kube-master [ ~/kube ]# kubectl logs pod/kube-flannel-ds-amd64-txz9g --namespace=kube-system
I1031 18:47:14.419895       1 main.go:514] Determining IP address of default interface
I1031 18:47:14.420829       1 main.go:527] Using interface with name eth0 and address 192.168.116.175
I1031 18:47:14.421008       1 main.go:544] Defaulting external address to interface address (192.168.116.175)
I1031 18:47:14.612398       1 kube.go:126] Waiting 10m0s for node controller to sync
I1031 18:47:14.612648       1 kube.go:309] Starting kube subnet manager
....

You will notice the “namespace” flag. Kubernetes can segment resources into namespaces. If you’re unsure of which namespace something exists in, you can use “–all-namespaces”

Final Words

Now we have a robust network topology where pods can have unique IP ranges and communicate to pods on other nodes.

Next we will be talking about Kubernetes Dashboard and how to load it. The CLI is not for everyone and the dashboard helps put things into perspective.

Next – Kubernetes Dashboard
Next – Spinning Up Rancher With Kubernetes

Kubernetes SSL Configuration

Summary

Picking up where we left off in the Initializing Kubernetes article, we will now be setting up certificates! This will be closely following the Kubernetes “Certificates” article. Specifically using OpenSSL as easyrsa has some dependency issues with Photon.

OpenSSL

Generating Files

We’ll be running the following commands and I keep them in /root/kube/certs. They won’t remain there but its a good staging area that needs to be cleaned up or secured so we don’t have keys laying around.

openssl genrsa -out ca.key 2048
openssl req -x509 -new -nodes -key ca.key -subj "/CN=$192.168.116.174" -days 10000 -out ca.crt
openssl genrsa -out server.key 2048

We then need to generate a csr.conf

[ req ]
default_bits = 2048
prompt = no
default_md = sha256
req_extensions = req_ext
distinguished_name = dn

[ dn ]
C = <country>
ST = <state>
L = <city>
O = <organization>
OU = <organization unit>
CN = <MASTER_IP>

[ req_ext ]
subjectAltName = @alt_names

[ alt_names ]
DNS.1 = kubernetes
DNS.2 = kubernetes.default
DNS.3 = kubernetes.default.svc
DNS.4 = kubernetes.default.svc.cluster
DNS.5 = kubernetes.default.svc.cluster.local
IP.1 = <MASTER_IP>
IP.2 = <MASTER_CLUSTER_IP>

[ v3_ext ]
authorityKeyIdentifier=keyid,issuer:always
basicConstraints=CA:FALSE
keyUsage=keyEncipherment,dataEncipherment
extendedKeyUsage=serverAuth,clientAuth
subjectAltName=@alt_names

In my environment the MASTER_IP is 192.168.116.174 and the cluster IP is usually a default but we can get it by running kubectl

root@kube-master [ ~/kube ]# kubectl get services kubernetes
NAME         TYPE        CLUSTER-IP   EXTERNAL-IP   PORT(S)   AGE
kubernetes   ClusterIP   10.254.0.1   <none>        443/TCP   60m
[ req ]
default_bits = 2048
prompt = no
default_md = sha256
req_extensions = req_ext
distinguished_name = dn

[ dn ]
C = US
ST = Texas
L = Katy
O = Woohoo Services
OU = IT
CN = 192.168.116.174

[ req_ext ]
subjectAltName = @alt_names

[ alt_names ]
DNS.1 = kubernetes
DNS.2 = kubernetes.default
DNS.3 = kubernetes.default.svc
DNS.4 = kubernetes.default.svc.cluster
DNS.5 = kubernetes.default.svc.cluster.local
IP.1 = 192.168.116.174
IP.2 = 10.254.0.1

[ v3_ext ]
authorityKeyIdentifier=keyid,issuer:always
basicConstraints=CA:FALSE
keyUsage=keyEncipherment,dataEncipherment
extendedKeyUsage=serverAuth,clientAuth
subjectAltName=@alt_names

We then run

openssl req -new -key server.key -out server.csr -config csr.conf

openssl x509 -req -in server.csr -CA ca.crt -CAkey ca.key \
-CAcreateserial -out server.crt -days 10000 \
-extensions v3_ext -extfile csr.conf

# For verification only
openssl x509  -noout -text -in ./server.crt

Placing Files

I create a /secrets and moved the files in as follows

mkdir /secrets
chmod 700 /secrets
chown kube:kube /secrets

cp ca.crt /secrets/
cp server.crt /secrets/
cp server.key /secrets/
chmod 700 /secrets/*
chown kube:kube /secrets/*

Configure API Server

On the master, edit /etc/kubernetes/apiserver and add the following parameters

--client-ca-file=/secrets/ca.crt
--tls-cert-file=/secrets/server.crt
--tls-private-key-file=/secrets/server.key

KUBE_API_ARGS="--client-ca-file=/secrets/ca.crt --tls-cert-file=/secrets/server.crt --tls-private-key-file=/secrets/server.key"

Restart kube-apiserver. We also need to edit /etc/kubernetes/controller-manager

KUBE_CONTROLLER_MANAGER_ARGS="--root-ca-file=/secrets/ca.crt  --service-account-private-key-file=/secrets/server.key"

Trusting the CA

We need to copy the ca.crt to /etc/ssl/certs/kube-ca.pem on each node and then install the package “openssl-c_rehash” as I found here. Photon is very minimalistic so you will find you keep having to add packages for things you take for granted.

tdnf install openssl-c_rehash

c_rehash
Doing //etc/ssl/certs
link 3513523f.pem => 3513523f.0
link 76faf6c0.pem => 76faf6c0.0
link 68dd7389.pem => 68dd7389.0
link e2799e36.pem => e2799e36.0
.....
link kube-ca.pem => 8e7edafa.0

Final Words

At this point, you have a Kubernetes cluster setup with some basic security. Not very exciting, at least in terms of seeing results but the next article should be meaningful to show how to setup flannel.

Next – Flannel Configuration

Initializing Kubernetes

Summary

In my previous article Intro To Kubernetes, we walked through installing dependencies and setting the stage for initializing Kubernetes. At this point you should have a master and one or two nodes with the required software installed.

A Little More Configuration

Master Config Prep

We have just a little more configuration to do. On kube-master we need to change “/etc/kubenertes/apiserver” lines as follows. This allows other hosts to connect to it. If you don’t want to bind to 0.0.0.0 you could bind to the specific IP but would lose localhost binding.

# From this
KUBE_API_ADDRESS="--insecure-bind-address=127.0.0.1"

# To this
KUBE_API_ADDRESS="--address=0.0.0.0"

Create the Cluster Member Metadata

Save the following as a file, we’ll call it create_nodes.json. When standing up a cluster I like to start out with doing it on the master so I create a /root/kube and put my files in there for reference.

{
     "apiVersion": "v1",
     "kind": "Node",
     "metadata": {
         "name": "kube-master",
         "labels":{ "name": "kube-master-label"}
     },
     "spec": {
         "externalID": "kube-master"
     }
 }

{
     "apiVersion": "v1",
     "kind": "Node",
     "metadata": {
         "name": "kube-node1",
         "labels":{ "name": "kube-node-label"}
     },
     "spec": {
         "externalID": "kube-node1"
     }
 }

{
     "apiVersion": "v1",
     "kind": "Node",
     "metadata": {
         "name": "kube-node2",
         "labels":{ "name": "kube-node-label"}
     },
     "spec": {
         "externalID": "kube-node2"
     }
 }

We can then run kubectl to create the nodes based on that json. Keep in mind this is just creating metadata

root@kube-master [ ~/kube ]# kubectl create -f /root/kube/create_nodes.json
node/kube-master created
node/kube-node1 created
node/kube-node2 created

# We also want to "taint" the master so no app workloads get scheduled.

kubectl taint nodes kube-master key=value:NoSchedule

root@kube-master [ ~/kube ]# kubectl get nodes
NAME          STATUS     ROLES    AGE   VERSION
kube-master   NotReady   <none>   88s   
kube-node1    NotReady   <none>   88s   
kube-node2    NotReady   <none>   88s   

You can see they’re “NotReady” because the services have not been started. This is expected at this point.

All Machine Config Prep

This will be run on all machines, master and node. We need to edit “/etc/kubernetes/kubelet”

KUBELET_ADDRESS="--address=0.0.0.0"
KUBELET_HOSTNAME=""

Also edit /etc/kubernetes/kubeconfig

server: http://127.0.0.1:8080

# Should be

server: http://kube-master:8080

In /etc/kubernetes/config

KUBE_MASTER="--master=http://kube-master:8080"

Starting Services

Master

The VMware Photon Kubernetes guide we have been going by has the following snippit which I want to give credit to. Please run this on the master

for SERVICES in etcd kube-apiserver kube-controller-manager kube-scheduler kube-proxy kubelet docker; do
     systemctl restart $SERVICES
     systemctl enable $SERVICES
     systemctl status $SERVICES
 done

You can then run “netstat -an | grep 8080” to see it is listening. Particularly on 0.0.0.0 or the expected bind address.

Nodes

On the nodes we are only starting kube-proxy, kubelet and docker

for SERVICES in kube-proxy kubelet docker; do 
     systemctl restart $SERVICES
     systemctl enable $SERVICES
     systemctl status $SERVICES 
 done

Health Check

At this point we’ll run kubectl get nodes and see the status

root@kube-master [ ~/kube ]# kubectl get nodes
NAME          STATUS     ROLES    AGE     VERSION
127.0.0.1     Ready      <none>   23s     v1.14.6
kube-master   NotReady   <none>   3m13s   
kube-node1    NotReady   <none>   3m13s   
kube-node2    NotReady   <none>   3m13s   

Oops, we didn’t add 127.0.0.1 – I forgot to clear the hostname override in /etc/kubernetes/kubelet. Fixed that, restarted kubelet and then “kubectl delete nodes 127.0.0.1”

It does take a while for these to start showing up. The provisioning and orchestration processes are not fast but you should slowly show the version show up and then the status to Ready and here we are.

root@kube-master [ ~/kube ]# kubectl get nodes
NAME          STATUS   ROLES    AGE     VERSION
kube-master   Ready    <none>   9m42s   v1.14.6
kube-node1    Ready    <none>   9m42s   v1.14.6
kube-node2    Ready    <none>   9m42s   v1.14.6

Final Words

At this point we could start some pods if we wanted but there are a few other things that should be configured for a proper bare metal(or virtual) install. Many pods are now depending on auto discovery which uses TLS. Service accounts also need and service accounts are using secrets.

For the networking we will go over flannel which will provide our networking overlay using VXLAN. This is needed so that pods running on each node have a unique and routable address space that each node can see. Right now each node has a docker interface with the same address and pods on different nodes cannot communicate with each other.

Flannel uses the TLS based auto discovery to the ClusterIP. Without hacking it too much it is just best to enable SSL/TLS Certificates and also a security best practice.

root@kube-master [ ~/kube ]# kubectl get services
NAME         TYPE        CLUSTER-IP   EXTERNAL-IP   PORT(S)   AGE
kubernetes   ClusterIP   10.254.0.1   <none>        443/TCP   49m
root@kube-master [ ~/kube ]# kubectl describe services/kubernetes
Name:              kubernetes
Namespace:         default
Labels:            component=apiserver
                   provider=kubernetes
Annotations:       <none>
Selector:          <none>
Type:              ClusterIP
IP:                10.254.0.1
Port:              https  443/TCP
TargetPort:        6443/TCP
Endpoints:         192.168.116.174:6443
Session Affinity:  None
Events:            <none>

Next – SSL Configuration

Intro To Kubernetes

Summary

This will be part of a multi-part set of posts on Kubernetes. There are many other technical articles on this but I could not find one that got me end to end to my desired state with Kubernetes. These series of posts will help carry you through my journey at standing it up.

What This Is Not

Currently, this series is not a high level architecture overview. It does not go into detail of the various daemons and their function. I may create a separate article on this at a later date.

Why Kubenertes?

Kubernetes aka k8s, is great at provisioning resources and maintaining them for containerized workloads using Docker. Per the site’s tag line, “Production-Grade Container Orchestration”. It was developed in house by Google and shared with the public. Therefore Google Cloud’s Kubernetes offering is one of the better ones. Docker Swarm is Docker’s response to the need this fills.

Let’s Get Started!

For this series I will be using VMware Photon OS. You are more than welcome to use any distribution you wish although many of the commands may not be the same, particularly the package management commands to install software. I use VMware Fusion but any hypervisor or bare metal systems will suffice. We will be standing up 3 total nodes but you can do with 2 if resources are at a minimum.

We will also be following VMware’s Guide to installing Photon on Kubernetes with a minor tweak.

Installation

Install the OS

If you are looking to install something like Kubernetes it is assumed you are fairly familiar with installing an OS. For this we will need 3 instances of Photon. I am provisioning them with 4GB HDD, 1 core, 768 MB of RAM and removing any excess virtual hardware not needed since the machine I am running this on only has 8GB of RAM and dual core.

The machine names will be kube-master, kube-node1 and kube-node2

For Photon, you can pretty much accept the defaults with the kernel type being the only one you may need to think about. Photon can go on bare metal or even other hypervisors, but it does have a VMware optimized kernel with vm tools if you choose.

Photon Linux Kernel - VMware hypervisor optimized

Photon is very proud of their install times, but it is nice not waiting 10-20 mins for an OS install

Photon install in under 30 seconds

Login to the OS

By default, most recent distributions of Linux, including Photon are locked down. You can login to root at the console but not remotely unless you use ssh keys authentication. For production workloads, I would highly recommend not using the root login and instead using another login and sudo but for the purpose of this lab we will just add my local key to root and be on our way.

Temporarily disable prohibit-password to add key remotely

I personally use ssh-copy-id which is a best practice

dwcjr@Davids-MacBook-Pro ~ % ssh-copy-id -i ~/.ssh/id_rsa.pub [email protected]
/usr/bin/ssh-copy-id: INFO: Source of key(s) to be installed: "/Users/dwcjr/.ssh/id_rsa.pub"
/usr/bin/ssh-copy-id: INFO: attempting to log in with the new key(s), to filter out any that are already installed
/usr/bin/ssh-copy-id: INFO: 1 key(s) remain to be installed -- if you are prompted now it is to install the new keys
Password: 

Number of key(s) added:        1

Now try logging into the machine, with:   "ssh '[email protected]'"
and check to make sure that only the key(s) you wanted were added.

Installing Kubernetes on Master and Nodes

Photon uses tdfn so its quite simple. This is also where we deviate slightly from the instructions. We will be enabling all of the node services on the master so that it can run docker images. We do not want to run actual app images but there is a particular system image we will want to run that I will get into later

On Master and Nodes run the following

tdnf install kubernetes iptables docker

# Good idea to run through updates afterwards as well
tdnf update

Preparing Hosts

Next its a good idea to have a hosts file entry since we will not be using DNS for the scope of these tutorials. These are my IPs in this case.

#Kubernetes
192.168.116.174 kube-master
192.168.116.175 kube-node1
192.168.116.177 kube-node2

We then need to set /etc/kubernetes/config on all hosts to specifically update

KUBE_MASTER="--master=http://kube-master:8080"

On the master, we need to edit “/etc/systemd/scripts/ip4save” to add the following lines

-A INPUT -p tcp -m tcp --dport 8080 -j ACCEPT
-A INPUT -p tcp -m tcp --dport 6443 -j ACCEPT
-A INPUT -p tcp -m tcp --dport 10250 -j ACCEPT

#Then restart iptables.  On photon it doesn't appear to save IP tables between reboots so this is how it persists.

systemctl restart iptables

On the nodes you will need to add a similar line and restart iptables but it will be

-A INPUT -p tcp -m tcp --dport 10250 -j ACCEPT

Ending Note

At this point you do not quite have anything near a functional Kubernetes cluster but this was the first part in a few. I decided to break this article at this point as some people may be able to easily get here without these instructions.

For those that made it here, my next article will link here for the initial Kubernetes Configuration

Next – Initializing Kubernetes