Articles

Further Down AI Powered Chatbot Rabbit Hole

Summary

In my previous article Chatbots, AI and Docker! I talked about a little of the theory behind this but for this article I wanted to fully go down the rabbit hole and produced my own chatbot. To do this, I had to find an updated chatterbot fork, learn a little more python to handle dependencies better, create my own fork of corpus/training material and learn Google Cloud Run. Ultimately you can skip straight to the source if you like. That’s the great part of GitOps/IaC

And Then Some

Previously, I had a workable local instance that I was able to host in podman/kind but I wanted to put this in my hosting environment on Google. In order to personalize this, I wanted to be able to add some training data and use some better practices. Having previously used Google App Engine, assumedly that would naturally be the landing place for this. I then ran into some hiccups and came across Cloud Run which was not originally available and seemed like a suitable fit as it is built for containerized workflows. It provided me a way to use my existing Dockerfile to unify the build and deploy. For tools, I have a separate build and test workflow in my cloudbuild.yaml.

Get on with Chatbots!

In my last article, I mentioned I had to find a fork of chatterbot because it has not been recently maintained. In reality though it only allowed command line prompting which is not terribly useful for a wider audience to test. I came across this amazing medium post which I have to give full credit for (and do in the html as well). The skin is pretty amazing. It also provides a wealth of in depth details.

For the web framework, I opted to use Flask and gunicorn which was fairly trivial to get going after finding that great medium post above.

Training Data

Without any training data AI/ML does not really exist. It needs to be pre-trained and/or train “on the job”. For this, chatterbot-corpus comes into play. This is a pre-built training data set for the chatterbot library. It has some decent basic training. I wanted to be able to add my own and based on the input of casmith, its in python so shouldn’t it be able to converse with Monty Python quotes? So I did and created my own section for that.

categories:
- Monty
- humor
conversations:
- - What is your name?
  - My name is Sir Lancelot of Camelot.
- - What is your quest?
  - To seek the Holy Grail.
- - What is the air speed velocity of an unladen swallow?
  - What do you mean? An African or European swallow?
- - How do know so much about swallows?
  - Well, you have to know these things when you're a king, you know.

I have the real-time training disabled or rather put my chatterbot into read only mode because the internet can be a cruel place and I don’t need my creation coming home with a foul mouth! For my lab, the training is loaded at image creation time. This is primarily because its using the default sqlite back end. I could easily use a database for this and load the training out of band so it doesn’t require a deploy.

Logic Adapters

You may be thinking this is a simple bot that’s just doing string matching to figure out how to respond. For the most part you’re correct. This is not deep learning and it doesn’t fully understand what you are asking. With that said its very extensible with multiple logic adapters. The default is a “BestMatch” based on text input. Others allow it to report time and do math. It will weigh the confidence of the response on each adapter to let the highest scoring/weighing response win. Pretty neat!

chatbot = ChatBot(
    "Sure, Not",
    logic_adapters=[
        'chatterbot.logic.BestMatch',
        'chatterbot.logic.MathematicalEvaluation',
        'chatterbot.logic.TimeLogicAdapter'
    ],
    read_only=True
)

Over To The Infrastructure

For all of this, it starts with a Dockerfile. I already had this but it was a little bloated with build dependencies. Therefore, I created a multistage image using virtual python environment as guided by https://pythonspeed.com/articles/multi-stage-docker-python. I am not new to multistage images. My golang images use it. I was, however, new to doing this with Python. Not only did it reduce my image size down 100MB but it also removed 30 vulnerabilities from the images because of a dependency on git for some of the python libraries.

Cloud Run

To get deployed to Cloud Run, it was pretty simple although there were a few trial an errors due to permissions. The service account needed Cloud Run Admin access. Aside from that, this pumped everything through and let me keep my singular Dockerfile.

steps:
  # Docker Build
  - name: 'gcr.io/cloud-builders/docker'
    args: ['build', '-t', 
           'us.gcr.io/${PROJECT_ID}/chatbot:${SHORT_SHA}', '.']

  # Docker push to Google Artifact Registry
  - name: 'gcr.io/cloud-builders/docker'
    args: ['push',  'us.gcr.io/${PROJECT_ID}/chatbot:${SHORT_SHA}']

  # Deploy to Cloud Run
  - name: google/cloud-sdk
    args: ['gcloud', 'run', 'deploy', 'chatbot', 
           '--image=us.gcr.io/${PROJECT_ID}/chatbot:${SHORT_SHA}', 
           '--region', 'us-central1', '--platform', 'managed', 
           '--allow-unauthenticated', '--port', '5000', '--memory', '256Mi',
           '--no-cpu-boost']

# Store images in Google Artifact Registry 
images:
  - us.gcr.io/${PROJECT_ID}/chatbot:${SHORT_SHA}

It really was this simple since I had a working local environment and working Dockerfile. Just don’t look at my commit history 🙂 Quite a few silly mistakes were made if you look deep enough.

Caveat

Google App Engine lets you use custom domain mapping and bring your own certificates. I use Cloudflare to protect my entire environment and for this in GAE I placed a Cloudflare Origin certificate to help prevent it from being accessed by the outside world as no browser would trust it bypassing Cloudflare.

Google Cloud run has a preview feature of custom domain mapping. The easiest of the options doesn’t support custom certificates and therefore wants to issue you a certificate. The temp workaround for this is to not proxy through Cloudflare until the certificate is issued and then turn on proxy. Rinse and repeat yearly when the cert needs to be renewed.

I have to imagine this will get rectified once out of preview to be feature parity with Google App Engine since it seems Cloud Run intends to replace GAE.

Credits

For Multi-stage help with Python Docker Images – https://pythonspeed.com/articles/multi-stage-docker-python

For the entire UI of this demo/test – https://medium.com/@kumaramanjha2901/building-a-chatbot-in-python-using-chatterbot-and-deploying-it-on-web-7a66871e1d9b

Chatbots, AI and Docker!

Summary

I have started my learning journey about AI. With that I started reading Artificial Intelligence & Generative AI for Beginners. One of the use cases it went through for NLP (Natural Language Processing) was Chatbots.

To the internet I went – ready to go down a rabbit hole and came across a Python library called ChatterBox. I knew I did not want to bloat and taint my local environment so I started using a Docker instance in Podman.

Down the Rabbit Hole

I quickly realized the project has not been actively maintained in a number of years and had some specific and dated dependencies. For example, it seemed to do best with python 3.6 whereas the latest at the time if this writing is 3.12.

This is where Docker shines though. It is really easy to find older images and declare which versions you want. The syntax of Dockerfile is such that you can specify the image and layer the commands you want to run on it. It will work every time, no matter where it is deployed from there.

I eventually found a somewhat updated fork of it here which simplified things but it still had its nuances. chatterbox-corpus (the training data) required PyYaml 3.13 but to get this to work it needed 5.

Dockerfile

FROM python:3.6-slim

WORKDIR /usr/src/app

#COPY requirements.txt ./
#RUN pip install --no-cache-dir -r requirements.txt
RUN pip install spacy==2.2.4
RUN pip install pytz pyyaml chatterbot_corpus
RUN python -m spacy download en

RUN pip install --no-cache-dir chatterbot==1.0.8

COPY ./chatter.py .

CMD [ "python", "./chatter.py" ]

Here we can see, I needed a specific version of Python(3.6) whereas at the time of writing the latest is 3.12. It also required a specific spacy package version. With this I have a repeatable environment that I can reproduce and share (to peers or even to production!)

Dockerfile2

Just for grins, when I was able to use the updated fork it did not take much!

FROM python:3.12-slim

WORKDIR /usr/src/app

#COPY requirements.txt ./
#RUN pip install --no-cache-dir -r requirements.txt
RUN pip install spacy==3.7.4 --only-binary=:all:
RUN python -m spacy download en_core_web_sm

RUN apt-get update && apt-get install -y git
RUN pip install git+https://github.com/ShoneGK/ChatterPy

RUN pip install chatterbot-corpus

RUN pip uninstall -y PyYaml
RUN pip install --upgrade PyYaml

COPY ./chatter.py .

CMD [ "python", "./chatter.py" ]

Without Docker

Without Docker(podman) I would have tainted my local environment with many different dependencies. At the point of getting it all working, I couldn’t be sure it would work properly on another machine. Even if it did, was their environment tainted as well? With Docker, I knew I could easily repeat the process from a fresh image to validate.

Previous projects I worked on that were python related could have also tainted my local to cause unexpected results on other machines or excessive hours troubleshooting something unique to my machine. All of that avoided with a container image!

Declarative Version Management

When it becomes time to update to the next version of Python, it will be a really easy feat. Many tools will even parse these types of files and do dependency management like Dependabot or Snyk

Mozilla SOPS To Protect My cloudflared Secrets In Kubernetes

Summary

Aren’t these titles getting ridiculous? When talking about some of these stacks, you need a laundry list of names to drop. In this case I was working on publishing my CloudFlare Tunnels FTW work that houses my kind lab into my public GitHub Repository. I wanted to tie in FluxCD to it and essentially be able to easily blow away the cluster and recreate with secrets all through FluxCD.

I was able to successfully achieve that with all but the private key which needs to be manually loaded into the cluster so it can decrypt the sensitive information.

Why Do We Care About This?

While trying to go fully GitOps for Kubernetes, everything is stored in a Git Repository. This makes change management extremely simple and reduces complexities of compliance. Things like policy bots can automate change approval processes and document. But generally everything in Git is clear text.

Sure, there are private repositories but do all the the developers that work on the project need to read sensitive records like passwords for that project? Its best that they don’t and as a developer you really don’t want that responsibility!

Mozilla SOPS To The Rescue!

Mozilla SOPS is very well documented. In my case I’m using Flux which also has great documentation. For my lab, this work is focusing on “cluster3” which simply deploys my https://www.woohoosvcs.com and https://tools.woohoosvcs.com in my kind lab for local testing before pushing out to production.

Create Key with Age

Age appears to be the preferred encryption tool to use right now. It is pretty simple to use and going by the flux documentation we simply need to run

age-keygen -o age.agekey

This will create a file that contains both the public and private key. The public key will be in the comment and the command line will output the public key. We will need the private key later to add as a secret manually to decrypt. I’m sure there are ways of getting this into the cluster securely but for this blog article this is the only thing done outside of GitOps.

Let’s Get To the Details!

With Flux I have a bootstrap script to load flux into the environment. I also have a generate_cluster3.sh script that creates the yaml.

The pertinent lines to add to it above the standard are the following. The first line indicates that sops is a decryption provider. The second indicates the name of the secret to be stored. Flux requires this to be in the flux-system namespace

    --decryption-provider=sops \
    --decryption-secret=sops-age \

From there you simpley need to run the bootstrap_cluster3.sh which just loads the yaml manifests for flux. With flux you can do this on the command line but I preferred to have this generation and bootstrapping in Git. As you want to upgrade flux there’s also a upgrade_cluster3.sh script that is really a one liner.

flux install --export > ./clusters/cluster3/flux-system/gotk-components.yaml

This will update the components. If you’re already bootstrapped and running flux, you can run this and commit to push out the upgrades to use flux to upgrade itself!

In the root of the cluster3 folder I have .sops.yaml. This tells the kustomization module in flux what to decrypt and which public key to use.

Loading Private Key Via Secret

Once you have run the bootstrap_cluster3.sh you can then load the private key via

cat age.agekey | kubectl create secret generic sops-age \
  --namespace=flux-system --from-file=age.agekey=/dev/stdin

Caveat

This lab won’t work for you out of the box. This is because it requires a few confidential details

  1. My cloudflared secret is encrypted with my public key. You do not have my private key so you cannot load it into your cluster to decrypt it
  2. I have some private applications I am pushing into my kind cluster. You will have to clone and modify for your needs

CloudFlare Tunnels FTW

Summary

CloudFlare provides VPN tunnels between your web application and the CloudFlare network for private and direct access. There are a multitude of use cases for this. The nice part about this is the tunnels are available in all tiers (including free).

Use Cases

The main use case for this is Least Privileged Security. Without tunnels, the common use case for CloudFlare is to add ACLs to your edge allowing in connections from CloudFlare. With Tunnels you run an appliance or daemon/service internally that creates an outbound tunnel to CloudFlare for your web applications. What this allows is only allowing egress traffic, worst case. Best case only opening up FQDN based whitelists on specific ports to CloudFlare’s network to allow the tunnel to negotiate. In essence, only allowing specific outbound connections needed to support the applications.

An interesting secondary use case for this is self-hosting of your web application. Years ago if you wanted to self-host something at your home, you would have to either ask your ISP for a static IP or use a Dynamic DNS provider that would constantly update your DNS with your IP. With CloudFlare Tunnels, once configured, the tunnel will come up regardless of your location or IP address. This is great for self-hosting at home (when you can’t afford a cloud provider and want to reuse some equipment) or even having a local lab that you want to share out to friends for testing.

Technical Setup

There are other articles that walk through the setup and it really depends on your implementation but I will share a few links of what I did to setup a Kubernetes lab up with CloudFlare Tunnels to expose my local lab running podman + kind + Kubernetes with a custom app I wrote onto the Internet.

This is a create tutorial by CloudFlare on the steps – https://developers.cloudflare.com/cloudflare-one/tutorials/many-cfd-one-tunnel/

Some of the dependencies for it are to

  1. Have a working Kubernetes cluster. For a quick lab, I highly recommend kind+podman but many use minikube.
  2. Have a local cloudflared that you can run to setup the tunnel and access token

One of the tweaks I had to make though is that the cloudflared manifest is a bit dated. As of the time of this writing I made the following changes

#Image was set to 2022.3.0 which did not even start
image: cloudflare/cloudflared:2024.3.0

# Reduce replicas - this was a lab with a single node!
replicas: 1

# Update the ingress section.
# This maps the CloudFlare proxied address to a kubernetes service address.
# Since cloudflared runs int the cluster it will use K8 DNS to resolve
    - hostname: k8s-fcos-macos.woohoosvcs.com
      service: http://tools-service:80

Don’t forget to import the secret from the CloudFlare instructions!

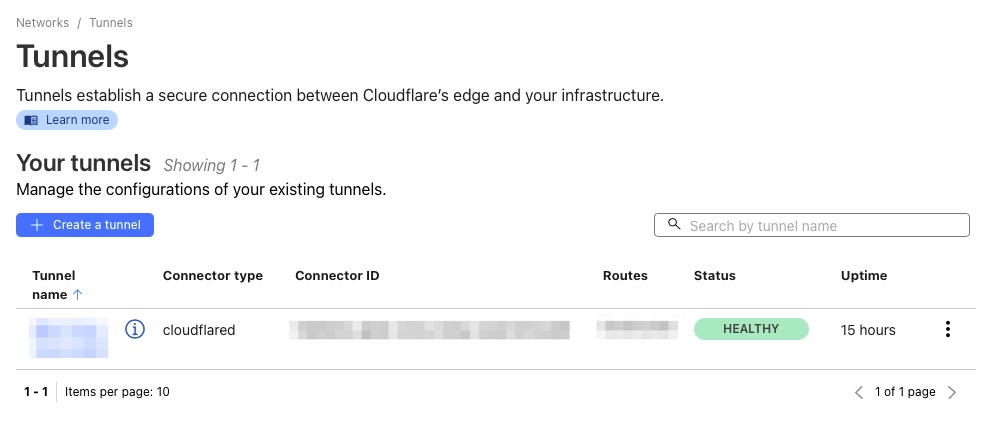
If setup properly you’ll see success!

More Than Tunnels

This is just the beginning. This is just a piece of the full Zero Trust Offering by Cloud Flare. It is a bit out of scope for this article but the nice part about CloudFlare is a lot of it is set it and forget it and let them manage once its configured properly.

Conclusion

Whether you are a large enterprise needing full Zero Trust or just a startup hosting a few servers out of your garage off your home internet, CloudFlare has tiers and offerings that can meet your budget. Its a great tool that I have used for this site and my https://tools.woohoosvcs.com/ for a number of years.

Local Kubernetes Lab – The Easy Way With podman and kind

Summary

In a few articles, I’ve shared how to provision your own local Kubernetes (K8s) lab using VMs. Over the years this has simplified from Intro To Kubernetes to Spinning Up Kubernetes Easily with kubeadm init!. With modern tools, many of us do not need to manage our own VMs.

These days there are many options but one of my favorites is kind. To use kind, you need either Docker Desktop or Podman Desktop.

Podman is quickly becoming a favorite because instead of the monolithic architecture of Docker Desktop, Podman is broken out a bit and the licensing may be more appeasable to people.

Installation

Installing Podman is relatively easy. Just navigate to https://podman.io and download the installer for your platform. Once installed you will need to provision a Podman Machine. The back end depends on your platform. Windows will use WSL2 if available. MacOS will use a qemu VM. This is nicely abstracted.

Installing kind is very easy. Depending on your platform you may opt for a package manager. I use brew so its a simple

brew install kind

The site https://kind.sigs.k8s.io/docs/user/quick-start/#installation goes through all the options.

Provisioning the Cluster

Once these two dependencies are in play its a simple case of

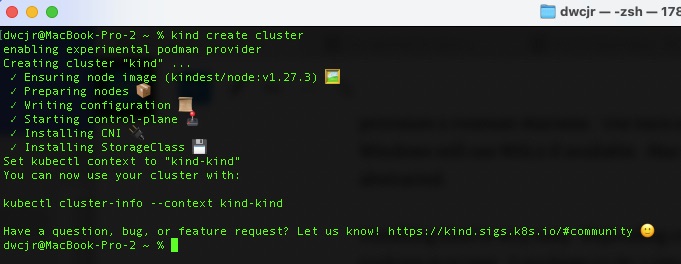
kind create cluster

The defaults are enough to get you a control plane that is able to schedule workloads. There are custom options such as specific K8s version and multiple control plans and worker nodes to more properly lab up a production environment.

kind create cluster

From here we should be good to go. Kind will provision the node and set up your KUBECONFIG to select the cluster.

As a quick validation we’ll run the recommended command.

We can see success and we’re able to apply manifests as we would expect. We have a working K8s instance for local testing.

Extending Functionality

In IaC & GitOps – Better Together we talked about GitOps. From here we can apply that GitOps repo if we wanted to.

We can clone the specific tag for this post and run the bootstrap

git clone https://github.com/dcatwoohoo/k8-fcos-gitops.git --branch postid_838 --single-branch

cd k8-fcos-gitops

./bootstrap_cluster1.sh

# We can check the status with the following until ingress-nginx is ready
kubectl get pods -A

# From there, check helm
helm ls -A

And here we are. A local testing cluster we stood up and is controlled by GitOps. Once flux was bootstrapped it pulled down and installed the nginx ingress controller.

A Look at Telsa Through the Team of Teams Lens

Summary

Going down a reading rabbit hole, I recently read Team of Teams: New Rules of Engagement for a Complex World by General Stanley McChrystal. I was not sure what I was in for with this. Paraphrasing what General Stanley McChrystal wrote, while he was going through the events in the book, he was not sure if what he experienced was a fluke or there was something more to it.

While this article is not a review as there are plenty around, this book did start to move me. I started thinking about other applicable lenses to view this through. In the book, the automotive industry is cited a couple of times. This opened Pandora’s box for me. In it, one of the examples was the GM Ignition Recall that took nearly 10 years to have fixed for a $2 part. Ultimately it was an organizational structure failure. The low level teams had known about this months after the new ignition switches were sent out into the wild and reports had started coming back.

Why Tesla?

It is easy to get wrapped up in the politics and public displays for which Elon Musk is known. Setting that aside, what Tesla is doing is revolutionary for a few reasons. In these times, it is extremely hard to start a new automobile company. Tesla not only a new automobile company but using a fuel source that is not industry standard.

Tesla is different. They are not just an automobile manufacturing company. Elon himself in numerous interviews cites that Tesla is actually a “hardcore” engineering company. They manufacture numerous parts for the vehicle in house as well as write all of the software (Software Engineering).

Outside the scope of this article, they’re also a data mining company. They have driving details on now millions of their vehicles. This has various uses such as road mapping, driving patterns and improving their autonomous driving.

How Legacy Automotive Companies Operate

Many of the legacy automotive manufacturers are extremely siloed using the “reductionist” methodology of breaking down areas into small teams and pushing them for efficiency. There are many different vendors that make components for legacy car companies. They build them to the Original Equipment Manufacturers specifications to ensure interoperability. These vendors do not typically communicate with each other or all of them to understand the whole picture. What this means is that the Engine Control Module (ECM) may be manufactured by one company and the Transmission Control Module (TCM) may be manufactured by another. The software may then be subcontracted out by those vendors. They use interoperability standards but may have little idea of how the Battery Control Module (BCM) interacts with these two modules.

This allows scale and efficiency. Vendor management is a very strong tool to help mitigate concerns. Many, like Toyota are great at this. They many times will have supply manufacturing happen in the same plant as the cars are assembled. Contracts also tend to indicate suppliers have a certain stock of supplies to weather temporary supply chain issues.

How Tesla Operates?

Many of its key components are manufactured in house, such as its seats. This is not to say it does not outsource any manufacturing. It certainly does. One critical piece that Telsa handles in house is to write its own software. This was instrumental in its adaptability during the computer chip shortages of 2020 and onward.

Chip Shortage

During the chip shortages, OEMs could not get their hands on chips. Many of the big ones had lots filled with unfinished vehicles. They were simply waiting on chips to arrive with no end in sight. Cars were delivered without features, in many cases.

Tesla did deal with a delay in production because of this. Its adaptability in writing its software, allowed it to utilize chips that were available. Not only did it adapt its software, Tesla realized it could in some cases reduce the need for some of them. This is very well documented in https://www.utilitydive.com/news/tesla-chip-semiconductor-shortage/628150/

Wrapping it Up

Traditional car manufacturers are very siloed. They are built this way for efficiency and scalability. With this, they are very inflexible and not very adaptable. Many of them are struggling to become profitable on their Electric Vehicles (EVs). Recently even Ford has started to bring its software development in house. This allows for constant updates that are needed without ever having to go into the dealership. Many of the Tesla recalls have been corrected via OTA (Over the Air) updates to software.

Conclusion

In a modern world of complexity, teams cannot work in isolation. They need to be aware of what other teams are doing to have a shared vision. Cognitive load needs to be minimized or information overload will occur but in this new world of complexity and constant information, silos do not work.

IaC & GitOps – Better Together

Summary

Building on the prior article of Fedora CoreOS + Ansible => K8s we want complete Infrastructure As Code. The newest way of doing this is GitOps where nearly everything is controlled by SCM. For that, flux is one of my favorites but Argo will also work.

The benefit of GitOps and K8s is that developers can have complete but indirect access to various environments. This makes it really easy for a DevOps team to provision the tooling very easily to either spin up environments effortlessly or let the developers do it themselves. That helps us get close to Platform Engineering.

Flux GitOps Repo

For this article, this is the tagged version of the GitOps repo used. At its core, we manually generated the yaml manifests via scripts commands. Namely upgrade_cluster1.sh and generate_cluster1.sh. Combined these create the yaml manifests needed. Upgrade cluster can be run to refresh the yaml during an upgrade but do not let it trick you. It can also be used to generate the initial component yaml. The generate_cluster1.sh should only need to be run once.

The bootstrap_cluster1.sh is used by our ansible playbook to actually apply the yaml.

Bootstrapping Flux

The flux cli has a bootstrap command that can be used but for this, we want disposable K8s clusters that can be torn down and then new ones rebuilt and attached to the same repo. Not only does this allow the workloads running to be treated like cattle but also the infrastructure itself.

To achieve this, we are manually creating the yaml manifests (still using the supported CLI tools) but decoupling that from the initial setup, deploy and running of the environment.

What Did We Get?

From a simple set of changes to pull and deploy flux, we have a sample ingress controller (nginx). In it you can specify any parameter about it and have clear visibility as to what is deployed. In this scenario we are just specifying the version but we could also specify how many instances or whether to deploy via daemonset (one instance per worker node).

Wrapping It All Up – What Is The Big Deal?

It might be a natural question as to what is the big deal about K8s, IaC, GitOps and this entire ecosystem. True IaC combined with GitOps allows complete transparency into what is deployed into production because flux ensures what is in Git is reconciled with the configured cluster. No more, one off configurations that nobody knows about until upgrade to replacement time on the server.

The fact that we have so much automation allows for tearing down and rebuilding as necessary. This allows for easy patching. Instead of applying updates and hoping for the best, just instantiate new instances and tear down the old ones.

Fedora CoreOS + Ansible => K8s

Summary

Kubernetes is a personal passion of mine and I have written a few times about how to standup one of my favorite Container Optimized Operating Systems, PhotonOS. Most recently I wanted to rebuild my lab because it has been a while. While some of my prior posts have served as a Standard Operating Procedure for how to do it, its lost its luster doing it manually.

Because of this, I sought out to automate the deployment of PhotonOS with Ansible. Having already learned and written about SaltStack, I wanted to tool around with Ansible. I thought, great, Photon is highly orchestrated by VMware, this should be simple.

Unfortunately PhotonOS 5 does not work well with Ansible, namely due to the package manager.

Container Optimized Operating Systems

In my search for one that did work well with Ansible, I came across a few. Flatcar was the first. It seemed to have plenty of options. I think came across Fedora CoreOS. These seem to be two of many forks of an older “CoreOS” distribution. Since Ansible and Fedora fall under the RedHat umbrella, I went with FCOS.

The interesting thing about Flatcar and CoreOS is that they use Ignition (and Butane) for bootstrapping. This allows for first time boot provisioning. This is the primary method for adding authentication such as ssh keys.

My Lab

My lab consists of VMware Fusion since I’m on a Mac. For that a lot of my steps are specific to that but I attempted to make them generic enough so that it could be modified for your environment.

Here is my full repo on this – https://github.com/dcatwoohoo/k8-fcos/tree/postid_822

Setting up Ignition

To help ensure your ssh keys are put into the environment, you’ll need to update butane with the appropriate details. Particularly the section “ssh_authorized_keys”

Butane is a yaml based format that is designed to be human read/writable. Ignition is designed to be human readable but not easily writable. For that reason, we use a conversion tool to help.

docker run -i --rm quay.io/coreos/butane:release --pretty --strict < ignition/butane.yaml > ignition/ignition.json

Don’t worry, this is baked into the ovf.sh script

Instantiating the OVF

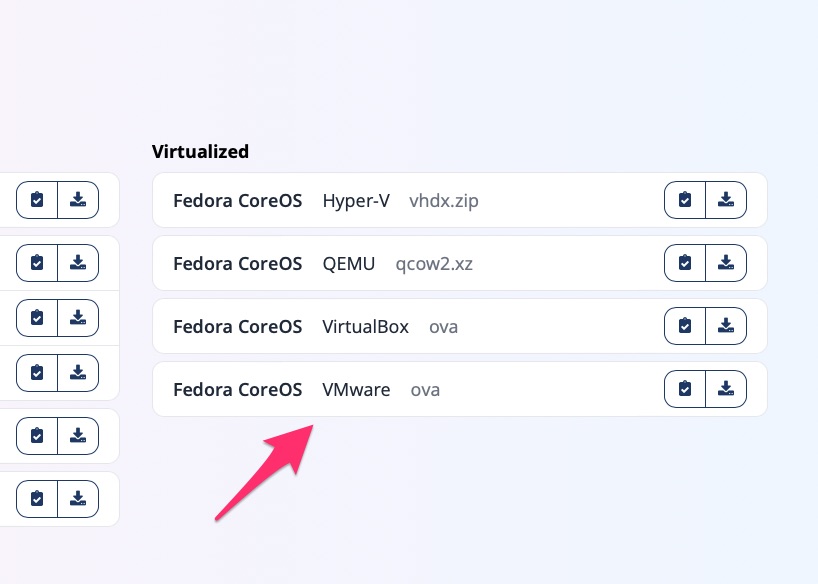
The first step was acquiring the OVA template (Open Virtual Appliance). On https://fedoraproject.org/coreos/download?stream=stable#arches that would be over here!

For this I scripted it via ovf.sh that instantiates it for a given number of instances. As documented, its 2 nodes, fcos-node01 and fcos-node02

Once they are done and powered one, along with a 45 second pause/sleep, we’re good to run Ansible and get the cluster going.

Running Ansible

Because I can be lazy, I created a shell script called k8s-fcos-playbook.sh that runs the playbook. At this point, sit back and enjoy the wait.

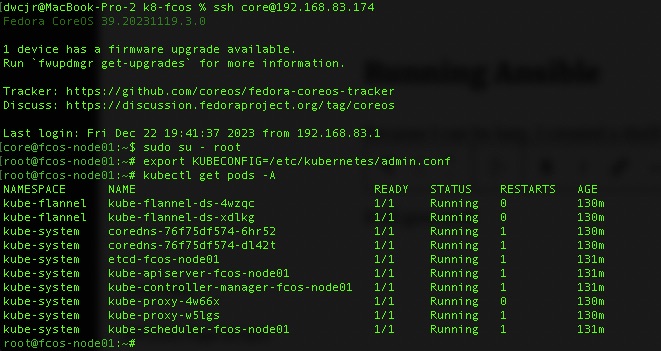
If all goes well you’ll have a list of pods up and running successfully and a bare bones cluster.

kubectl get pods -A

Concluding thoughts

While I did not go specifically into Ansible and the details, it is a public repository and written in a fairly self explanatory way. It’s not the best or most modular but is easy to follow.

Special Thanks!

A special thanks to Péter Vámos and his repository on doing this similarly. He gave me some great ideas, although some of it I went in a different direction.

Bootstrapping a CA for Kubernetes

Summary

The purpose of this article is to walk through bootstrapping a CA for Kubernetes clusters for use in the ingresses and other possible needs like a private docker repository. For this we will use https://cert-manager.io. We will assume you have an operational K8 cluster/node but if not check out https://blog.woohoosvcs.com/2023/06/photon-os-5-0-kubernetes-1-25/ on how to do that.

Use Case

A really good use case for this is when you want to use self-signed certificates in your lab but want the browser to trust it. For certificates to work, they require FQDNs. One could certainly have host file entries for every endpoint they need but I recently came across a more elegant solution “localdev.me”. This was referenced in a few places but namely https://kubernetes.github.io/ingress-nginx/deploy/

The beauty of localdev.me is that any subdomain resolves to 127.0.0.1 so you can easily run

kubectl port-forward svc/ingress-nginx-controller -n ingress-nginx 443:443

To forward all of your ingresses to localhost. Its a neat trick and in today’s world we want to test TLS encryption using HTTPS.

Requirements

For this, we simply need to install cert-manager. There are two main ways. kubectl apply or using the Helm Chart. If you’re not familiar with Helm, please go down that rabbit hole. For this we’ll assume you are just running kubectl apply.

Installation

kubectl apply -f https://github.com/cert-manager/cert-manager/releases/download/v1.12.0/cert-manager.yaml

With any luck you will have some cert-manager related pods running

% kubectl get pods -n cert-manager
NAME                                      READY   STATUS    RESTARTS   AGE
cert-manager-559b5d5b7d-tq7rt             1/1     Running   0          29s
cert-manager-cainjector-f5c6565d4-vv652   1/1     Running   0          29s
cert-manager-webhook-5f44bc85f4-qkg7s     1/1     Running   0          29s

What Next?

Cert-Manager is a fairly extensible framework. It can connect to ACME compatible authorities to request and process certificate creation and renewals but for this we will be using two other configurations for it. We will be using the “CA” ClusterIssuer. In order to bootstrap a CA though we also have to use the “SelfSigned” Issuer.

Show Me the YAML

At the beginning is a Self signed issuer. What this means in our case is that the certificate’s common name matches the issuer name. You will find this in any public certificate authority root as well. There are two types of “issuers” in cert-manager. An “Issuer” which is namespaced and can only issue for that namespace and a “ClusterIssuer” which can issue for the cluster. For labs I like to use ClusterIssuers so do not need to have multiple issuers.

Certificates are namespaced though. My preference is to have a wildcard certificate in each namespace but you can also have the ingress request certificates.

No – Really Show Me the YAML!

apiVersion: cert-manager.io/v1
kind: ClusterIssuer
metadata:
  name: selfsigned-issuer
spec:
  selfSigned: {}

Here we have a simple self-signed issuer. An Issuer is just a construct to issuer certificates. We still need to create the CA Certificate.

apiVersion: cert-manager.io/v1
kind: Certificate
metadata:
  name: my-selfsigned-ca
  namespace: cert-manager
spec:
  isCA: true
  commonName: my-selfsigned-ca
  duration: 43800h
  secretName: root-secret
  privateKey:
    algorithm: ECDSA
    size: 256
  issuerRef:
    name: selfsigned-issuer
    kind: ClusterIssuer
    group: cert-manager.io

Here we are requesting a root certificate that will expire in 5 years. We can’t swap these out too regularly because its a pain getting our OS and other tools to trust them. In the issuerRef we see the self-signed-issuer referenced with many other attributes we’ll use later.

Then we need to create a cluster issuer for the certificates we want to issue. We tell it to use the ca root-secret for the chain.

apiVersion: cert-manager.io/v1
kind: ClusterIssuer
metadata:
  name: my-ca-cluster-issuer
  namespace: cert-manager
spec:
  ca:
    secretName: root-secret 

Next we will issue a certificate in a namespace that will chain off the self-signed root. It is namespaced to the sandbox namespace. They will expire after 90 days and renew 15 days before expiration.

Make sure to create the sandbox namespace first if you want to use this or change it to the namespace you want.

apiVersion: cert-manager.io/v1
kind: Certificate
metadata:
  name: localdev-me
  namespace: sandbox
spec:
  # Secret names are always required.
  secretName: localdev-me-tls

  # Secret template is optional. If set, these annotations
  # and labels will be copied to the secret named example-com-tls.

  # Note: Labels and annotations from the template are only synced to the Secret at the time when the certificate 
  # is created or renewed. Currently labels and annotations can only be added, but not removed. Removing any 
  # labels or annotations from the template or removing the template itself will have no effect.
  # See https://github.com/cert-manager/cert-manager/issues/4292.
  secretTemplate:
    annotations:
      my-secret-annotation-1: "foo"
      my-secret-annotation-2: "bar"
    labels:
      my-secret-label: foo

  duration: 2160h # 90d
  renewBefore: 360h # 15d
  subject:
    organizations:
      - Woohoo Services
  # The use of the common name field has been deprecated since 2000 and is
  # discouraged from being used.
  commonName: localdev.me
  isCA: false
  privateKey:
    algorithm: RSA
    encoding: PKCS1
    size: 2048
  usages:
    - server auth
    - client auth
  # At least one of a DNS Name, URI, or IP address is required.
  dnsNames:
    - localdev.me
    - "*.localdev.me"
  # Issuer references are always required.
  issuerRef:
    name: my-ca-cluster-issuer
    # We can reference ClusterIssuers by changing the kind here.
    # The default value is Issuer (i.e. a locally namespaced Issuer)
    kind: ClusterIssuer
    # This is optional since cert-manager will default to this value however
    # if you are using an external issuer, change this to that issuer group.
    group: cert-manager.io

We now have a wildcard certificate for use in the sandbox namespace

% kubectl get secret/localdev-me-tls -n sandbox -o yaml
apiVersion: v1
data:
  ca.crt: XXXXX
  tls.crt: XXXXX
  tls.key: XXXXX
kind: Secret
metadata:
  annotations:
    cert-manager.io/alt-names: localdev.me,*.localdev.me
    cert-manager.io/certificate-name: localdev-me
    cert-manager.io/common-name: localdev.me
    cert-manager.io/ip-sans: ""
    cert-manager.io/issuer-group: cert-manager.io
    cert-manager.io/issuer-kind: ClusterIssuer
    cert-manager.io/issuer-name: my-ca-cluster-issuer
    cert-manager.io/subject-organizations: Woohoo Services
    cert-manager.io/uri-sans: ""
    my-secret-annotation-1: foo
    my-secret-annotation-2: bar
  creationTimestamp: "2023-06-25T19:20:05Z"
  labels:
    controller.cert-manager.io/fao: "true"
    my-secret-label: foo
  name: localdev-me-tls
  namespace: sandbox
  resourceVersion: "3711"
  uid: 3fcca4e2-2918-486c-b191-e10bd585259e
type: kubernetes.io/tls

Where is the Trust?

You may be wondering, great but how do I get my browser to trust this? You’re right, this is essentially an untrusted certificate chain. We need to base64decode the ca.crt section and then import it into a few places. The most important is your OS/browser so that it trusts the root.

On MacOS you’ll use keychain to import and set the trust on it to allow it much like this article – https://tosbourn.com/getting-os-x-to-trust-self-signed-ssl-certificates/

On Windows it will look closer to https://techcommunity.microsoft.com/t5/windows-server-essentials-and/installing-a-self-signed-certificate-as-a-trusted-root-ca-in/ba-p/396105

There may be cases where you need your Kubernetes cluster to trust it as well. That will depend on your distribution but for Photon running a stock K8 distribution its fairly trivial.

You’ll simply put a copy in /etc/ssl/certs/ using a unique name. You will need “openssl-c_rehash” as mentioned in https://github.com/vmware/photon/issues/592 to be able to get the OS to trust it.

You will also want to add the PEM to /etc/docker/certs.d/ so that docker itself (or containerd) trusts it. You will need to restart docker/containerd to get it to accept the cert though. The use case for this is that if you want to mount the certificate in the private repository doing something like this you can. In this case the kubelet on the kubernetes node will call docker/containerd and that will need to trust the certificate.

     volumes:
      - name: localdev-me-tls
        secret:
          secretName: localdev-me-tls
      ...
      containers:
        - image: registry:2
          name: private-repository-k8s
          imagePullPolicy: IfNotPresent
          env:
          - name: REGISTRY_HTTP_TLS_CERTIFICATE
            value: "/certs/tls.crt"
          - name: REGISTRY_HTTP_TLS_KEY
            value: "/certs/tls.key"
          ...
          volumeMounts:
          - name: localdev-me-tls
            mountPath: /certs

Final Words

There you have it. A cluster wide CA that you can have your K8 nodes and local machine trust for TLS encryption. Once setup in this manner it makes it easy and portable to using something like letsencrypt when going to production because most of the framework and configuration is there and has been tested.

Photon OS 5.0 & Kubernetes 1.25

Summary

It is 2023 and a lot has changed since my prior Photon OS and Kubernetes posts. Some things have become much easier but also things have changed such as the migration from docker/dockershim to containerd.

Installation

Installation is as simple as ever. It requires having the ISO and installing. It will require that you navigate to https://github.com/vmware/photon/wiki/Downloading-Photon-OS and download 5.0 (full or minimal).

For the VM specifications, you will need at least 2 cores to run the control plane. I set my lab up with 2 cores, 4GB RAM and 30GB HDD.

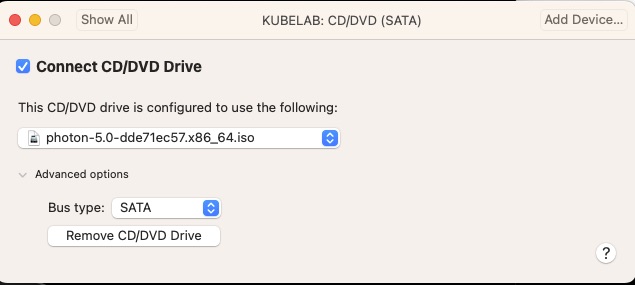
My local fusion defaults to an IDE for the CD/DVD and Photon OS 5.0 does not do well with that and recommends changing it to SATA.

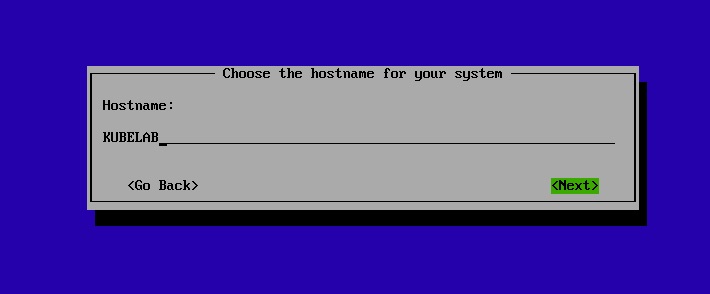
After boot into the ISO, just a few simple questions and we’re off! For my lab I’m naming it KUBELAB

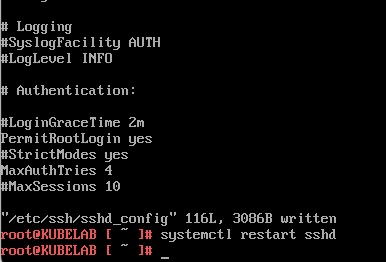
Once booted, I prefer to access via SSH and since only a root user has been provisioned I will allow root logins via ssh by editing /etc/ssh/sshd_config

That’s it, we’re installed!

Setting up Dependencies

Instead of using the Photon OS Kubernetes packages, we’ll be using the Google ones. They provide better granularity which is required for upgrades. Instructions for adding them are https://kubernetes.io/docs/setup/production-environment/tools/kubeadm/install-kubeadm/

In particular we want to do the following

cat <<EOF | sudo tee /etc/yum.repos.d/kubernetes.repo
[kubernetes]
name=Kubernetes
baseurl=https://packages.cloud.google.com/yum/repos/kubernetes-el7-\$basearch
enabled=1
gpgcheck=1
gpgkey=https://packages.cloud.google.com/yum/doc/rpm-package-key.gpg
exclude=kubelet kubeadm kubectl
EOF

Since Photon OS uses tdnf, we’ll want to install via

# Install 1.25.11-0 of Kubernetes!
tdnf install kubeadm-1.25.11-0 kubectl-1.25.11-0 kubelet-1.25.11-0 cri-tools-1.25.0-0

For this, we’re choosing 1.25.11-0 as I’ve exhaustively tested it for the series I am doing. Once installed, we want to disable the /etc/yum.repos.d/kubernetes.repo by setting “enabled=0” so that OS updates do not push Kubernetes update as we want to control that.

After doing that let’s update the OS packages. But first let’s remove docker we not use containerd

# We are using containerd now
tdnf remove docker*

# OS Updates
tdnf --refresh update

Before we reboot there are a few tried and true settings we’ll want to update.

In /etc/sysctl.d/90-kubernetes.conf

# These are required for it to work properly
net.bridge.bridge-nf-call-iptables = 1
net.bridge.bridge-nf-call-ip6tables = 1
net.ipv4.ip_forward = 1

# This helps an issue later on when we get into running promtail
fs.inotify.max_user_instances = 256


In /etc/modules-load.d/20-kubernetes.conf
# Required to allow the basic networking to work
br_netfilter

In /etc/security/limits.conf
# Bump up the default of 1024 max open files per process to 10000
*		hard	nofile		10000

In /etc/containerd/config.toml
version = 2
[plugins]
  [plugins."io.containerd.grpc.v1.cri"]
   [plugins."io.containerd.grpc.v1.cri".containerd]
      [plugins."io.containerd.grpc.v1.cri".containerd.runtimes]
        [plugins."io.containerd.grpc.v1.cri".containerd.runtimes.runc]
          runtime_type = "io.containerd.runc.v2"
          [plugins."io.containerd.grpc.v1.cri".containerd.runtimes.runc.options]
            SystemdCgroup = true


In /etc/crictl.yaml

runtime-endpoint: "unix:///run/containerd/containerd.sock"
image-endpoint: "unix:///run/containerd/containerd.sock"
timeout: 0
debug: false
pull-image-on-create: false
disable-pull-on-run: false

In /etc/hosts
# Change the localhost binding to the IP of the VM
# Without this kubectl get node - won't show ready
#127.0.0.1   KUBELAB
192.168.83.170  KUBELAB

The config.tomly should look like this.

Now we reboot!

Initialize The Cluster

For this we will run the following with –pod-network-cidr. This is the default for flannel which we’ll use for ease.

# Allow kubelet to start when kubeadm init allows it
systemctl enable kubelet.service

# Initialize - this may take a while as the pods are pulled down
kubeadm init --pod-network-cidr=10.244.0.0/16

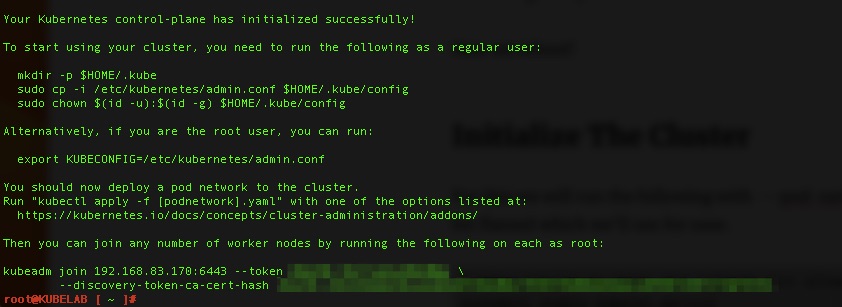
This will take 5-10 minutes, maybe longer depending on your internet connection. When you come back with any luck you’ll see success!!!

follow the steps listed.

mkdir -p $HOME/.kube
cp -i /etc/kubernetes/admin.conf $HOME/.kube/config
chown $(id -u):$(id -g) $HOME/.kube/config

# Check to see if pods are up!
root@KUBELAB [ ~ ]# kubectl get pods -A
NAMESPACE     NAME                              READY   STATUS    RESTARTS   AGE
kube-system   coredns-565d847f94-6gmrp          0/1     Pending   0          2m31s
kube-system   coredns-565d847f94-wrvqk          0/1     Pending   0          2m31s
kube-system   etcd-kubelab                      1/1     Running   0          2m46s
kube-system   kube-apiserver-kubelab            1/1     Running   0          2m44s
kube-system   kube-controller-manager-kubelab   1/1     Running   0          2m46s
kube-system   kube-proxy-g9kpj                  1/1     Running   0          2m31s
kube-system   kube-scheduler-kubelab            1/1     Running   0          2m44s

Almost there

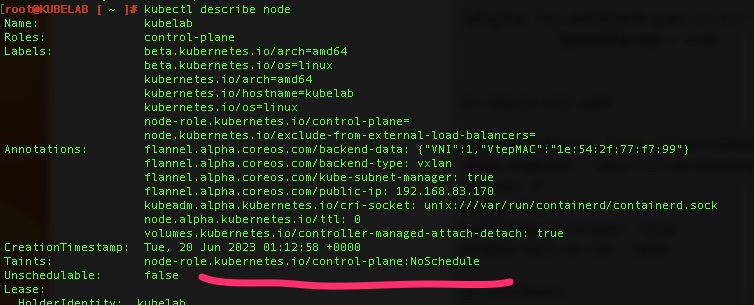
The cluster(single node) is up but we still need networking which we’ll use Flannel and to remove a taint to allow scheduling on the control plane since this will be a single node lab with control plane and worker nodes on the same VM.

# Reference https://github.com/flannel-io/flannel

# Apply the flannel network overlay
kubectl apply -f https://github.com/flannel-io/flannel/releases/latest/download/kube-flannel.yml

# Remove the taint - the minus removes it
kubectl taint nodes kubelab node-role.kubernetes.io/control-plane:NoSchedule-

Validations!

By running kubectl get pods -A and kubectl get nodes – we can see pods are running and the node is “Ready”