In a few articles, I’ve shared how to provision your own local Kubernetes (K8s) lab using VMs. Over the years this has simplified from Intro To Kubernetes to Spinning Up Kubernetes Easily with kubeadm init!. With modern tools, many of us do not need to manage our own VMs.
These days there are many options but one of my favorites is kind. To use kind, you need either Docker Desktop or Podman Desktop.
Podman is quickly becoming a favorite because instead of the monolithic architecture of Docker Desktop, Podman is broken out a bit and the licensing may be more appeasable to people.
Installation
Installing Podman is relatively easy. Just navigate to https://podman.io and download the installer for your platform. Once installed you will need to provision a Podman Machine. The back end depends on your platform. Windows will use WSL2 if available. MacOS will use a qemu VM. This is nicely abstracted.
Installing kind is very easy. Depending on your platform you may opt for a package manager. I use brew so its a simple
Once these two dependencies are in play its a simple case of
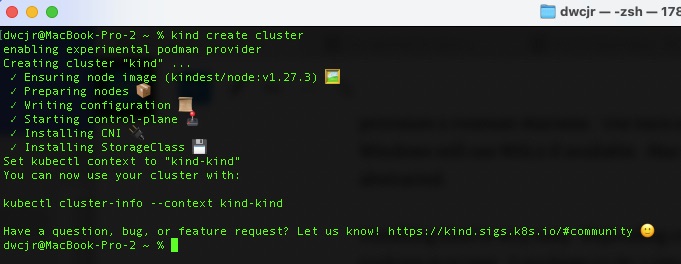
kind create cluster
The defaults are enough to get you a control plane that is able to schedule workloads. There are custom options such as specific K8s version and multiple control plans and worker nodes to more properly lab up a production environment.
From here we should be good to go. Kind will provision the node and set up your KUBECONFIG to select the cluster.
As a quick validation we’ll run the recommended command.
We can see success and we’re able to apply manifests as we would expect. We have a working K8s instance for local testing.
We can clone the specific tag for this post and run the bootstrap
git clone https://github.com/dchapman992000/k8-fcos-gitops.git --branch postid_838 --single-branch
cd k8-fcos-gitops
./bootstrap_cluster1.sh
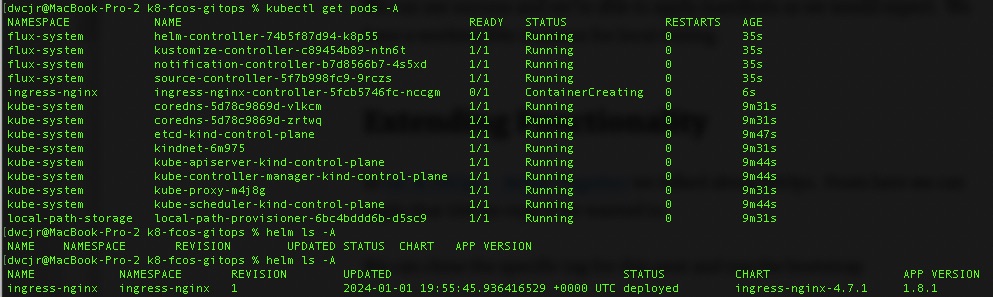
# We can check the status with the following until ingress-nginx is ready
kubectl get pods -A
# From there, check helm
helm ls -A
And here we are. A local testing cluster we stood up and is controlled by GitOps. Once flux was bootstrapped it pulled down and installed the nginx ingress controller.
Building on the prior article of Fedora CoreOS + Ansible => K8s we want complete Infrastructure As Code. The newest way of doing this is GitOps where nearly everything is controlled by SCM. For that, flux is one of my favorites but Argo will also work.
The benefit of GitOps and K8s is that developers can have complete but indirect access to various environments. This makes it really easy for a DevOps team to provision the tooling very easily to either spin up environments effortlessly or let the developers do it themselves. That helps us get close to Platform Engineering.
Flux GitOps Repo
For this article, this is the tagged version of the GitOps repo used. At its core, we manually generated the yaml manifests via scripts commands. Namely upgrade_cluster1.sh and generate_cluster1.sh. Combined these create the yaml manifests needed. Upgrade cluster can be run to refresh the yaml during an upgrade but do not let it trick you. It can also be used to generate the initial component yaml. The generate_cluster1.sh should only need to be run once.
The flux cli has a bootstrap command that can be used but for this, we want disposable K8s clusters that can be torn down and then new ones rebuilt and attached to the same repo. Not only does this allow the workloads running to be treated like cattle but also the infrastructure itself.
To achieve this, we are manually creating the yaml manifests (still using the supported CLI tools) but decoupling that from the initial setup, deploy and running of the environment.
What Did We Get?
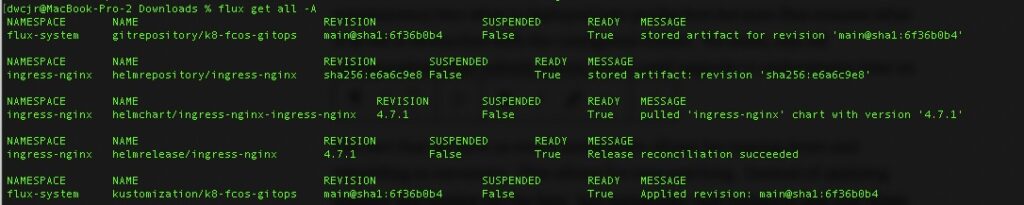
From a simple set of changes to pull and deploy flux, we have a sample ingress controller (nginx). In it you can specify any parameter about it and have clear visibility as to what is deployed. In this scenario we are just specifying the version but we could also specify how many instances or whether to deploy via daemonset (one instance per worker node).
Wrapping It All Up – What Is The Big Deal?
It might be a natural question as to what is the big deal about K8s, IaC, GitOps and this entire ecosystem. True IaC combined with GitOps allows complete transparency into what is deployed into production because flux ensures what is in Git is reconciled with the configured cluster. No more, one off configurations that nobody knows about until upgrade to replacement time on the server.
The fact that we have so much automation allows for tearing down and rebuilding as necessary. This allows for easy patching. Instead of applying updates and hoping for the best, just instantiate new instances and tear down the old ones.
Kubernetes is a personal passion of mine and I have written a few times about how to standup one of my favorite Container Optimized Operating Systems, PhotonOS. Most recently I wanted to rebuild my lab because it has been a while. While some of my prior posts have served as a Standard Operating Procedure for how to do it, its lost its luster doing it manually.
Because of this, I sought out to automate the deployment of PhotonOS with Ansible. Having already learned and written about SaltStack, I wanted to tool around with Ansible. I thought, great, Photon is highly orchestrated by VMware, this should be simple.
Unfortunately PhotonOS 5 does not work well with Ansible, namely due to the package manager.
Container Optimized Operating Systems
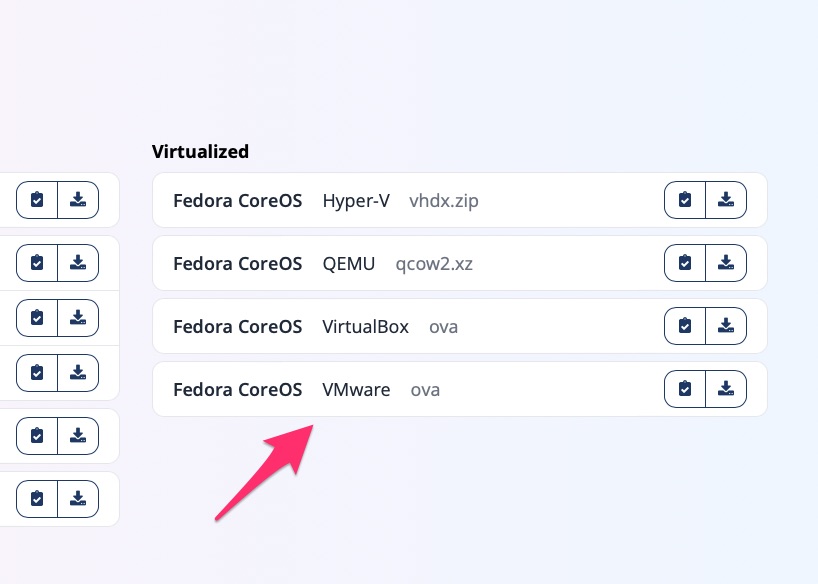
In my search for one that did work well with Ansible, I came across a few. Flatcar was the first. It seemed to have plenty of options. I think came across Fedora CoreOS. These seem to be two of many forks of an older “CoreOS” distribution. Since Ansible and Fedora fall under the RedHat umbrella, I went with FCOS.
The interesting thing about Flatcar and CoreOS is that they use Ignition (and Butane) for bootstrapping. This allows for first time boot provisioning. This is the primary method for adding authentication such as ssh keys.
My Lab
My lab consists of VMware Fusion since I’m on a Mac. For that a lot of my steps are specific to that but I attempted to make them generic enough so that it could be modified for your environment.
To help ensure your ssh keys are put into the environment, you’ll need to update butane with the appropriate details. Particularly the section “ssh_authorized_keys”
Butane is a yaml based format that is designed to be human read/writable. Ignition is designed to be human readable but not easily writable. For that reason, we use a conversion tool to help.
For this I scripted it via ovf.sh that instantiates it for a given number of instances. As documented, its 2 nodes, fcos-node01 and fcos-node02
Once they are done and powered one, along with a 45 second pause/sleep, we’re good to run Ansible and get the cluster going.
Running Ansible
Because I can be lazy, I created a shell script called k8s-fcos-playbook.sh that runs the playbook. At this point, sit back and enjoy the wait.
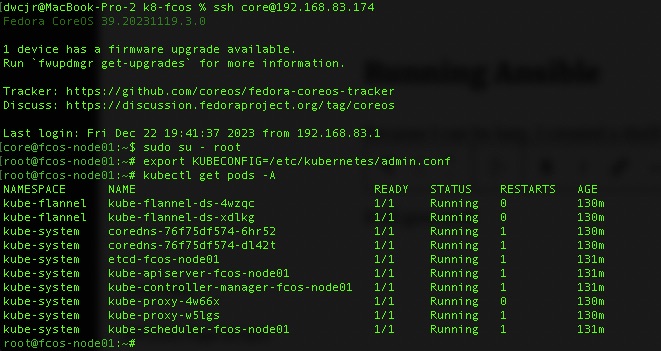
If all goes well you’ll have a list of pods up and running successfully and a bare bones cluster.
kubectl get pods -A
Concluding thoughts
While I did not go specifically into Ansible and the details, it is a public repository and written in a fairly self explanatory way. It’s not the best or most modular but is easy to follow.
Special Thanks!
A special thanks to Péter Vámos and his repository on doing this similarly. He gave me some great ideas, although some of it I went in a different direction.
The purpose of this article is to walk through bootstrapping a CA for Kubernetes clusters for use in the ingresses and other possible needs like a private docker repository. For this we will use https://cert-manager.io. We will assume you have an operational K8 cluster/node but if not check out https://blog.woohoosvcs.com/2023/06/photon-os-5-0-kubernetes-1-25/ on how to do that.
Use Case
A really good use case for this is when you want to use self-signed certificates in your lab but want the browser to trust it. For certificates to work, they require FQDNs. One could certainly have host file entries for every endpoint they need but I recently came across a more elegant solution “localdev.me”. This was referenced in a few places but namely https://kubernetes.github.io/ingress-nginx/deploy/
The beauty of localdev.me is that any subdomain resolves to 127.0.0.1 so you can easily run
To forward all of your ingresses to localhost. Its a neat trick and in today’s world we want to test TLS encryption using HTTPS.
Requirements
For this, we simply need to install cert-manager. There are two main ways. kubectl apply or using the Helm Chart. If you’re not familiar with Helm, please go down that rabbit hole. For this we’ll assume you are just running kubectl apply.
With any luck you will have some cert-manager related pods running
% kubectl get pods -n cert-manager
NAME                                      READY   STATUS    RESTARTS   AGE
cert-manager-559b5d5b7d-tq7rt             1/1     Running   0          29s
cert-manager-cainjector-f5c6565d4-vv652   1/1     Running   0          29s
cert-manager-webhook-5f44bc85f4-qkg7s     1/1     Running   0          29s
What Next?
Cert-Manager is a fairly extensible framework. It can connect to ACME compatible authorities to request and process certificate creation and renewals but for this we will be using two other configurations for it. We will be using the “CA” ClusterIssuer. In order to bootstrap a CA though we also have to use the “SelfSigned” Issuer.
Show Me the YAML
At the beginning is a Self signed issuer. What this means in our case is that the certificate’s common name matches the issuer name. You will find this in any public certificate authority root as well. There are two types of “issuers” in cert-manager. An “Issuer” which is namespaced and can only issue for that namespace and a “ClusterIssuer” which can issue for the cluster. For labs I like to use ClusterIssuers so do not need to have multiple issuers.
Certificates are namespaced though. My preference is to have a wildcard certificate in each namespace but you can also have the ingress request certificates.
Here we are requesting a root certificate that will expire in 5 years. We can’t swap these out too regularly because its a pain getting our OS and other tools to trust them. In the issuerRef we see the self-signed-issuer referenced with many other attributes we’ll use later.
Then we need to create a cluster issuer for the certificates we want to issue. We tell it to use the ca root-secret for the chain.
Next we will issue a certificate in a namespace that will chain off the self-signed root. It is namespaced to the sandbox namespace. They will expire after 90 days and renew 15 days before expiration.
Make sure to create the sandbox namespace first if you want to use this or change it to the namespace you want.
apiVersion: cert-manager.io/v1
kind: Certificate
metadata:
  name: localdev-me
  namespace: sandbox
spec:
  # Secret names are always required.
  secretName: localdev-me-tls

  # Secret template is optional. If set, these annotations
  # and labels will be copied to the secret named example-com-tls.

  # Note: Labels and annotations from the template are only synced to the Secret at the time when the certificate
  # is created or renewed. Currently labels and annotations can only be added, but not removed. Removing any
  # labels or annotations from the template or removing the template itself will have no effect.
  # See https://github.com/cert-manager/cert-manager/issues/4292.
  secretTemplate:
    annotations:
      my-secret-annotation-1: "foo"
      my-secret-annotation-2: "bar"
    labels:
      my-secret-label: foo

  duration: 2160h # 90d
  renewBefore: 360h # 15d
  subject:
    organizations:
      - Woohoo Services
  # The use of the common name field has been deprecated since 2000 and is
  # discouraged from being used.
  commonName: localdev.me
  isCA: false
  privateKey:
    algorithm: RSA
    encoding: PKCS1
    size: 2048
  usages:
    - server auth
    - client auth
  # At least one of a DNS Name, URI, or IP address is required.
  dnsNames:
    - localdev.me
    - "*.localdev.me"
  # Issuer references are always required.
  issuerRef:
    name: my-ca-cluster-issuer
    # We can reference ClusterIssuers by changing the kind here.
    # The default value is Issuer (i.e. a locally namespaced Issuer)
    kind: ClusterIssuer
    # This is optional since cert-manager will default to this value however
    # if you are using an external issuer, change this to that issuer group.
    group: cert-manager.io
We now have a wildcard certificate for use in the sandbox namespace
You may be wondering, great but how do I get my browser to trust this? You’re right, this is essentially an untrusted certificate chain. We need to base64decode the ca.crt section and then import it into a few places. The most important is your OS/browser so that it trusts the root.
There may be cases where you need your Kubernetes cluster to trust it as well. That will depend on your distribution but for Photon running a stock K8 distribution its fairly trivial.
You’ll simply put a copy in /etc/ssl/certs/ using a unique name. You will need “openssl-c_rehash” as mentioned in https://github.com/vmware/photon/issues/592 to be able to get the OS to trust it.
You will also want to add the PEM to /etc/docker/certs.d/ so that docker itself (or containerd) trusts it. You will need to restart docker/containerd to get it to accept the cert though. The use case for this is that if you want to mount the certificate in the private repository doing something like this you can. In this case the kubelet on the kubernetes node will call docker/containerd and that will need to trust the certificate.
There you have it. A cluster wide CA that you can have your K8 nodes and local machine trust for TLS encryption. Once setup in this manner it makes it easy and portable to using something like letsencrypt when going to production because most of the framework and configuration is there and has been tested.
It is 2023 and a lot has changed since my prior Photon OS and Kubernetes posts. Some things have become much easier but also things have changed such as the migration from docker/dockershim to containerd.
For the VM specifications, you will need at least 2 cores to run the control plane. I set my lab up with 2 cores, 4GB RAM and 30GB HDD.
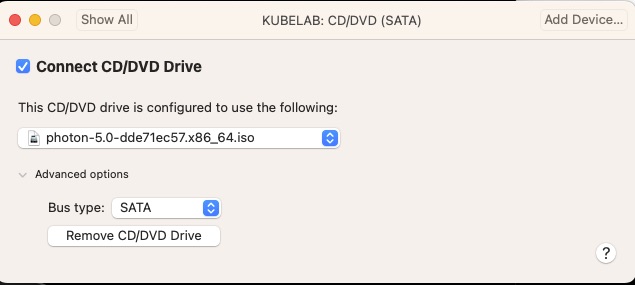
My local fusion defaults to an IDE for the CD/DVD and Photon OS 5.0 does not do well with that and recommends changing it to SATA.
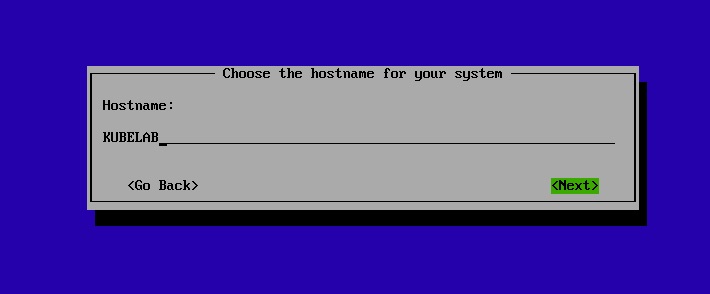
After boot into the ISO, just a few simple questions and we’re off! For my lab I’m naming it KUBELAB
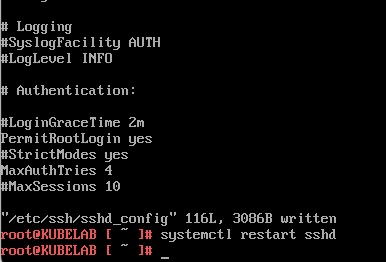
Once booted, I prefer to access via SSH and since only a root user has been provisioned I will allow root logins via ssh by editing /etc/ssh/sshd_config
For this, we’re choosing 1.25.11-0 as I’ve exhaustively tested it for the series I am doing. Once installed, we want to disable the /etc/yum.repos.d/kubernetes.repo by setting “enabled=0” so that OS updates do not push Kubernetes update as we want to control that.
After doing that let’s update the OS packages. But first let’s remove docker we not use containerd
# We are using containerd now
tdnf remove docker*

# OS Updates
tdnf --refresh update
Before we reboot there are a few tried and true settings we’ll want to update.
In /etc/sysctl.d/90-kubernetes.conf

# These are required for it to work properly
net.bridge.bridge-nf-call-iptables = 1
net.bridge.bridge-nf-call-ip6tables = 1
net.ipv4.ip_forward = 1

# This helps an issue later on when we get into running promtail
fs.inotify.max_user_instances = 256


In /etc/modules-load.d/20-kubernetes.conf
# Required to allow the basic networking to work
br_netfilter

In /etc/security/limits.conf
# Bump up the default of 1024 max open files per process to 10000
*		hard	nofile		10000

In /etc/containerd/config.toml
version = 2
[plugins]
  [plugins."io.containerd.grpc.v1.cri"]
   [plugins."io.containerd.grpc.v1.cri".containerd]
      [plugins."io.containerd.grpc.v1.cri".containerd.runtimes]
        [plugins."io.containerd.grpc.v1.cri".containerd.runtimes.runc]
          runtime_type = "io.containerd.runc.v2"
          [plugins."io.containerd.grpc.v1.cri".containerd.runtimes.runc.options]
            SystemdCgroup = true


In /etc/crictl.yaml

runtime-endpoint: "unix:///run/containerd/containerd.sock"
image-endpoint: "unix:///run/containerd/containerd.sock"
timeout: 0
debug: false
pull-image-on-create: false
disable-pull-on-run: false

In /etc/hosts
# Change the localhost binding to the IP of the VM
# Without this kubectl get node - won't show ready
#127.0.0.1   KUBELAB
192.168.83.170  KUBELAB
The config.tomly should look like this.
Now we reboot!
Initialize The Cluster
For this we will run the following with –pod-network-cidr. This is the default for flannel which we’ll use for ease.
# Allow kubelet to start when kubeadm init allows it
systemctl enable kubelet.service

# Initialize - this may take a while as the pods are pulled down
kubeadm init --pod-network-cidr=10.244.0.0/16
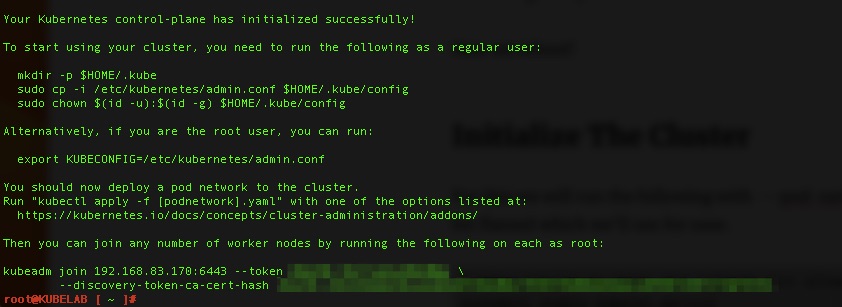
This will take 5-10 minutes, maybe longer depending on your internet connection. When you come back with any luck you’ll see success!!!
follow the steps listed.
mkdir -p $HOME/.kube
cp -i /etc/kubernetes/admin.conf $HOME/.kube/config
chown $(id -u):$(id -g) $HOME/.kube/config

# Check to see if pods are up!
root@KUBELAB [ ~ ]# kubectl get pods -A
NAMESPACE     NAME                              READY   STATUS    RESTARTS   AGE
kube-system   coredns-565d847f94-6gmrp          0/1     Pending   0          2m31s
kube-system   coredns-565d847f94-wrvqk          0/1     Pending   0          2m31s
kube-system   etcd-kubelab                      1/1     Running   0          2m46s
kube-system   kube-apiserver-kubelab            1/1     Running   0          2m44s
kube-system   kube-controller-manager-kubelab   1/1     Running   0          2m46s
kube-system   kube-proxy-g9kpj                  1/1     Running   0          2m31s
kube-system   kube-scheduler-kubelab            1/1     Running   0          2m44s
Almost there
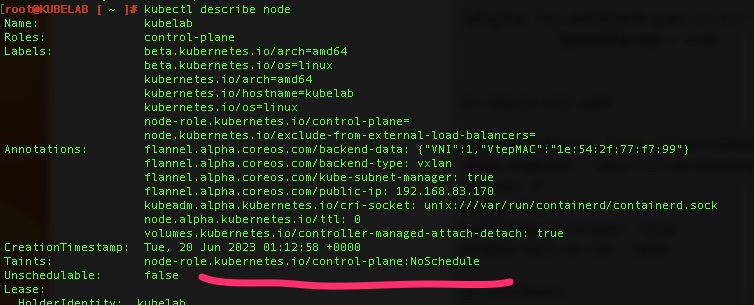
The cluster(single node) is up but we still need networking which we’ll use Flannel and to remove a taint to allow scheduling on the control plane since this will be a single node lab with control plane and worker nodes on the same VM.
# Reference https://github.com/flannel-io/flannel

# Apply the flannel network overlay
kubectl apply -f https://github.com/flannel-io/flannel/releases/latest/download/kube-flannel.yml

# Remove the taint - the minus removes it
kubectl taint nodes kubelab node-role.kubernetes.io/control-plane:NoSchedule-
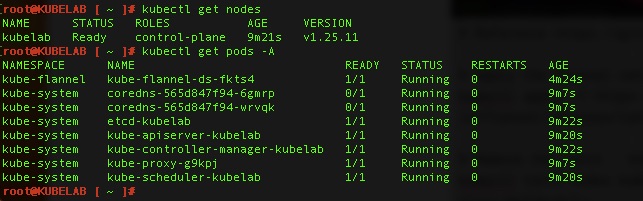
Validations!
By running kubectl get pods -A and kubectl get nodes – we can see pods are running and the node is “Ready”
In this article we tackle VM orchestration. We I touched on in other articles, the desire is to dynamically spin up VMs as necessary. Some of the constructions in Google Cloud that are used are instance templates, instance groups, load balancers, health checks, salt (both state and reactor).
First Things First
In order to dynamically spin up VMs we need an instance group. For an instance group to work dynamically we need an instance template.
Instance Template
For this instance template, I will name it web-test. The name for this is important but we’ll touch on that later on.
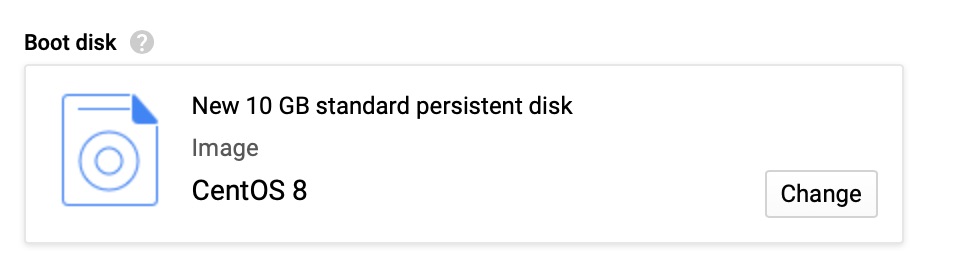
For this demonstration we used CentOS 8. It can be any OS but our Salt state is tuned for CentOS.
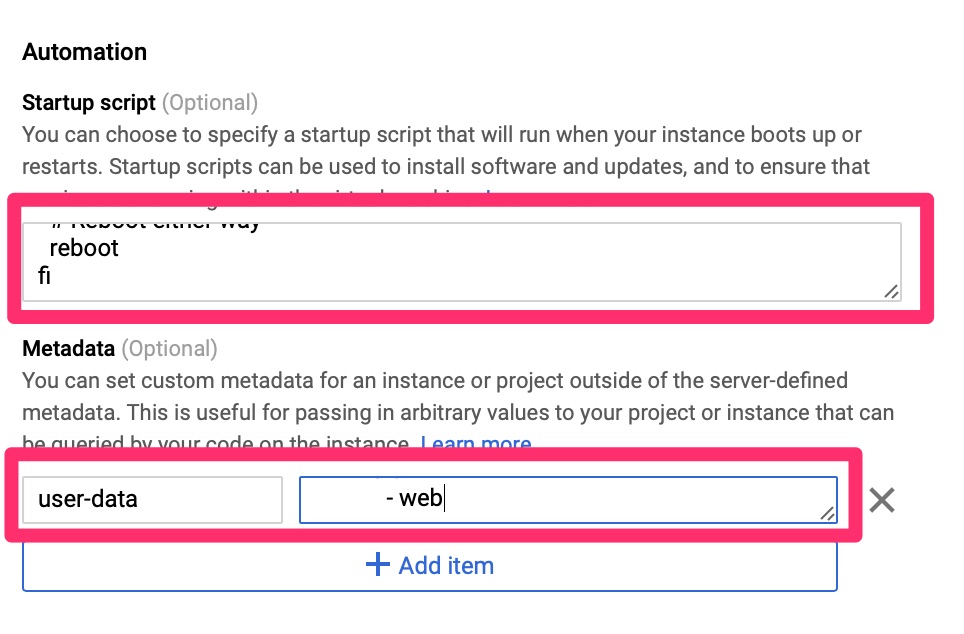
GCE – Automation
As we touched on in the Cloud-init on Google Compute Engine article, we need to automate the provisioning and configuration on this. Since Google’s CentOS image does not come with this we use the startup script to load it. Once loaded and booted, cloud-init configures the local machine as a salt-minion and points it to the master.
Startup Script below
#!/bin/bash

if ! type cloud-init > /dev/null 2>&1 ; then
  # Log startup of script
  echo "Ran - `date`" >> /root/startup
  sleep 30
  yum install -y cloud-init

  if [ $? == 0 ]; then
    echo "Ran - yum success - `date`" >> /root/startup
    systemctl enable cloud-init
    # Sometimes GCE metadata URI is inaccessible after the boot so start this up and give it a minute
    systemctl start cloud-init
    sleep 10
  else
    echo "Ran - yum fail - `date`" >> /root/startup
  fi

  # Reboot either way
  reboot
fi
The first thing is to accept new minions as this is usually manual. We then need it to apply a state. Please keep in mind there are security implications of auto accepting. These scripts do not take that into consideration as they are just a baseline to get this working.
In order to have these automatically work, we need to use Salt reactor which listens to events and acts on them. Our reactor file looks like this. We could add some validation, particularly on the accept such as validating the minion name has web in it to push the wordpress state.
{# test server is sending new key -- accept this key #}
{% if 'act' in data and data['act'] == 'pend' %}
minion_add:
  wheel.key.accept:
  - match: {{ data['id'] }}
{% endif %}
{% if data['act'] == 'accept' %}
initial_load:
  local.state.sls:
    - tgt: {{ data['id'] }}
    - arg:
      - wordpress
{% endif %}
This is fairly simple. When a minion authenticates for the first time, acknowledge it and then apply the wordpress state we worked on in our articicle on Salt State. Since we may have multiple and rotating servers that spin up and down we will use Google’s Load Balancer to point Cloudflare to.
Cloudflare does offer load balancing but for the integration we want, its easier to use Google. The load balancer does require an instance group so we need to set that up first.
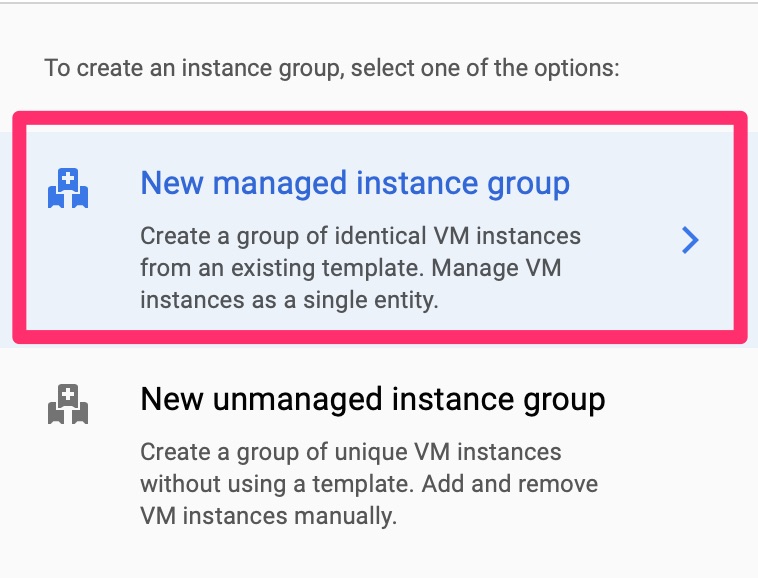
Instance Groups
Instance groups are one of the constructions you can point a load balancer towards. Google has two types of instance groups. Managed, which it will auto scale based on health checks. There is also managed which you have to manually add VMs to. We will choose managed
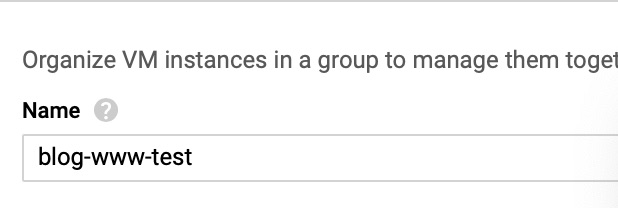
GCE – New Managed Instance
This name is not too important so it can be any one you like.
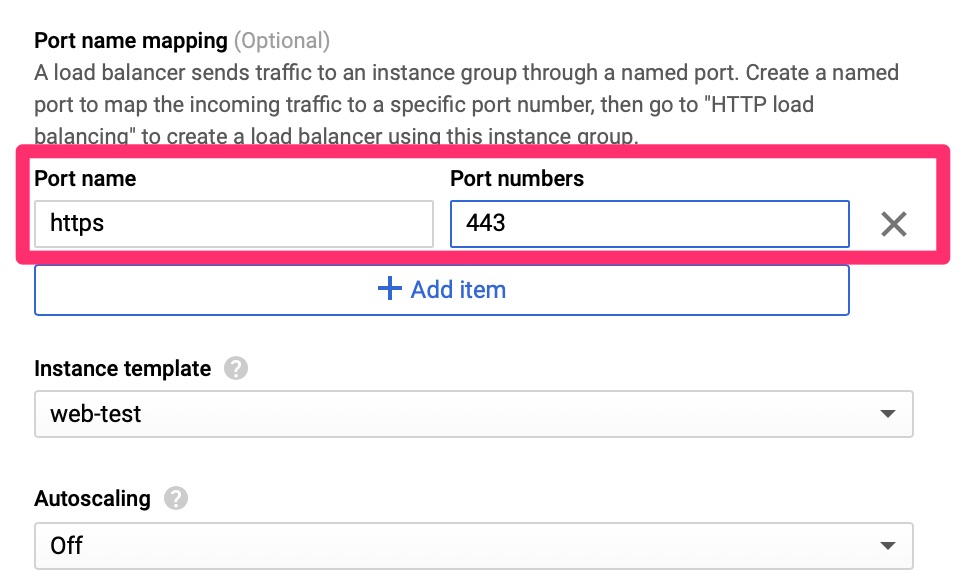
GCE – Instance Group
Here we set the port name and number, an instance template. For this lab we disabled autoscaling but in the real world this is why you want to set all of this up.
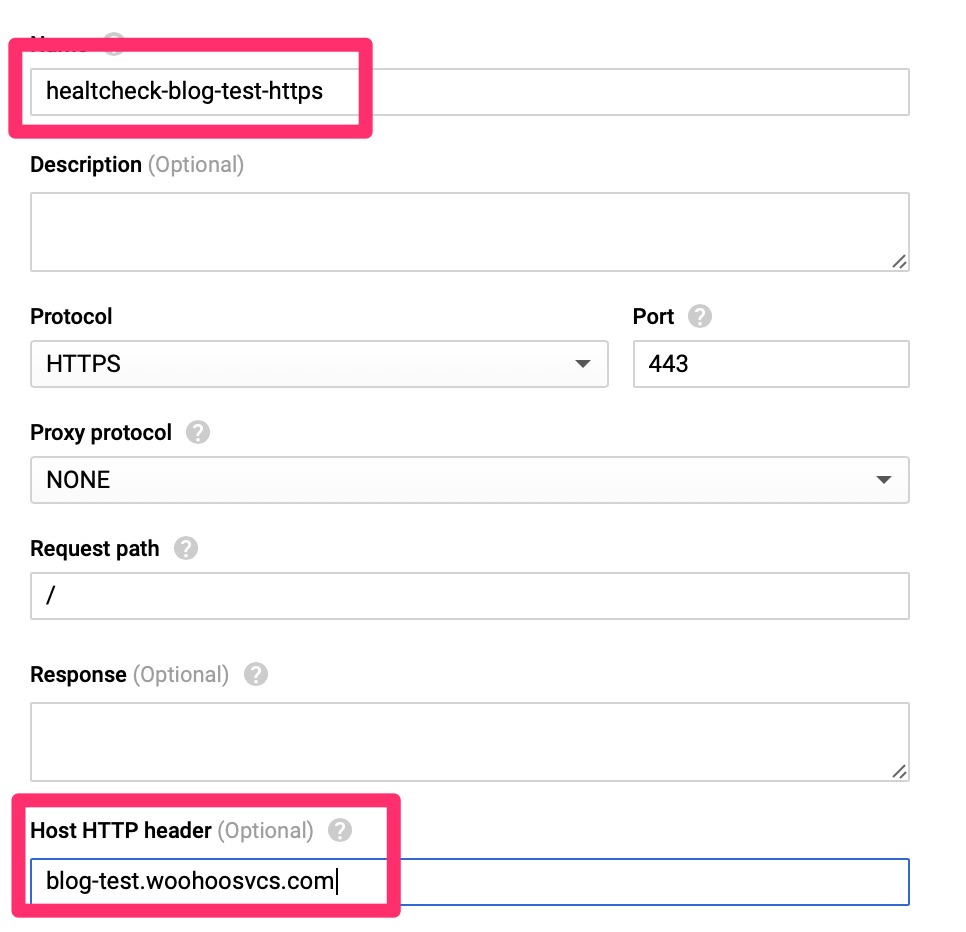
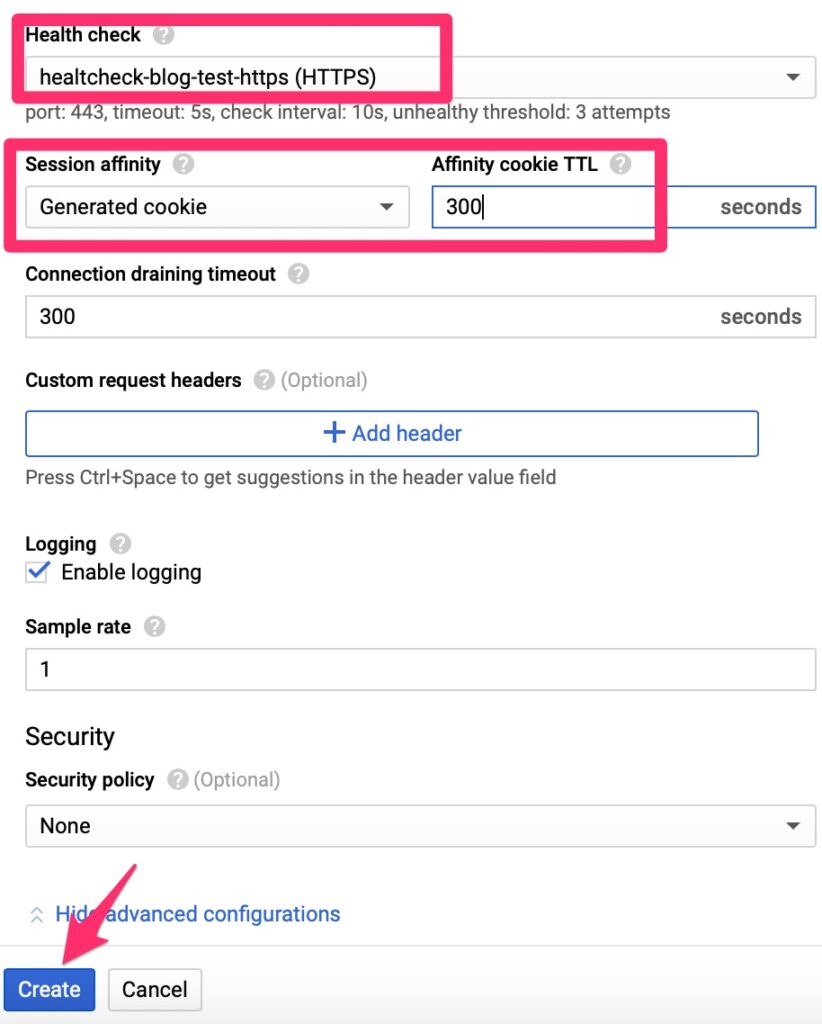
Instance Group – Health Check
The HealthCheck expects to receive an HTTP 200 message for all clear. It is much better than a TCP check as it can validate the web server is actually responding with expected content. Since WordPress sends a 301 to redirect, we do have to set the Host HTTP Header here, otherwise the check will fail. Other load balancers only fail on 400-599 but Google does expect only a HTTP 200 per their document – https://cloud.google.com/load-balancing/docs/health-check-concepts
Instance Group Provisioning
And here you can see it is provisioning! While it does that, let’s move over to the load balancer.
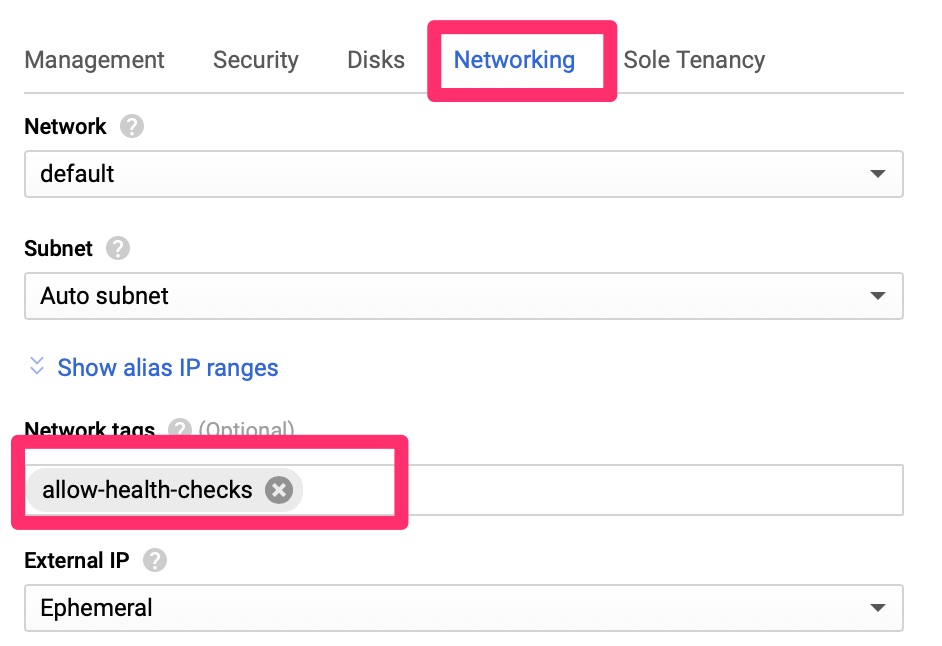
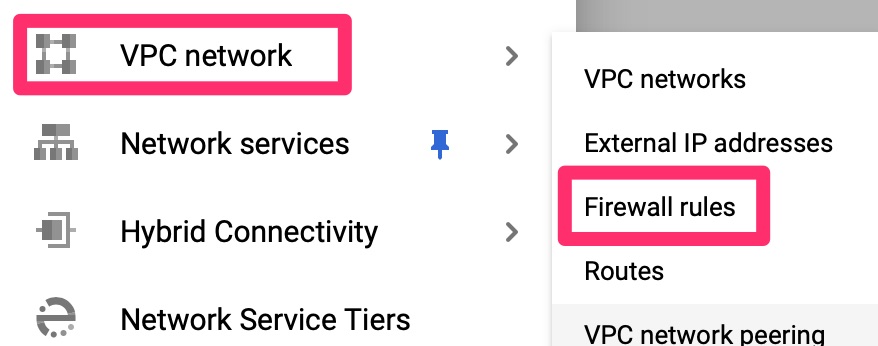
Firewall Rules
The health checks for the load balancer come from a set range of Google IPs that we need to allow. We can allow these subnets via network tags. Per Google’s Healthcheck document, the HTTP checks come from two ranges.
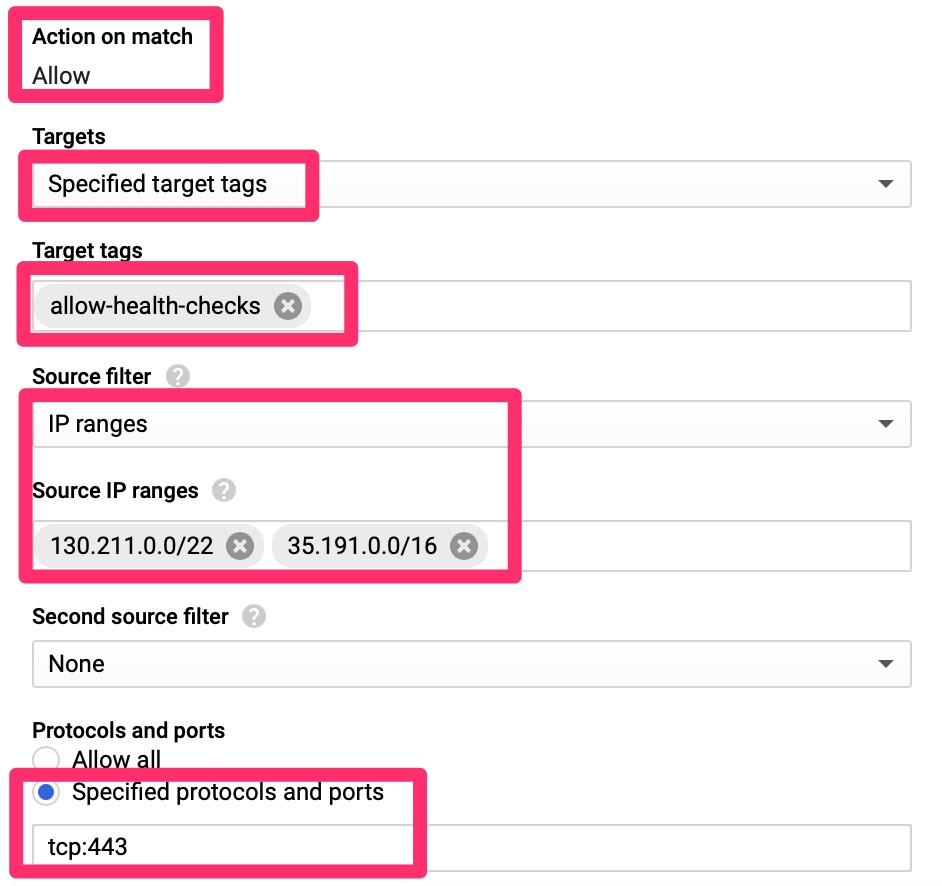
VPC – Allow Health Checks!
Here we only allow the health checks from the Google identified IP ranges to machines that are tagged with “allow-health-checks” to port 443.
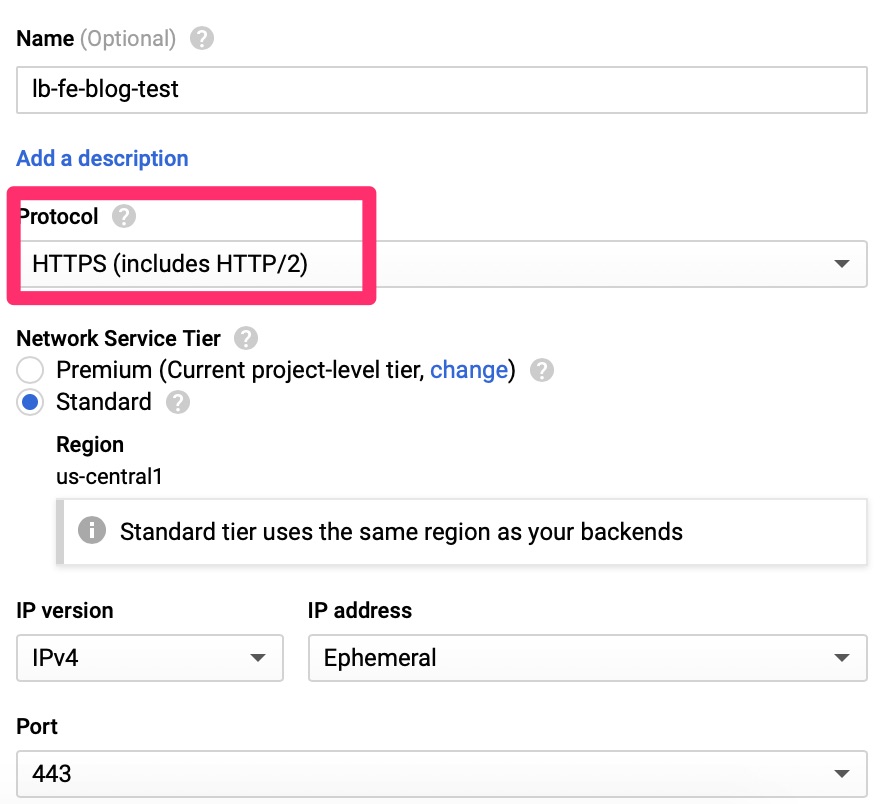
Google Load Balancer
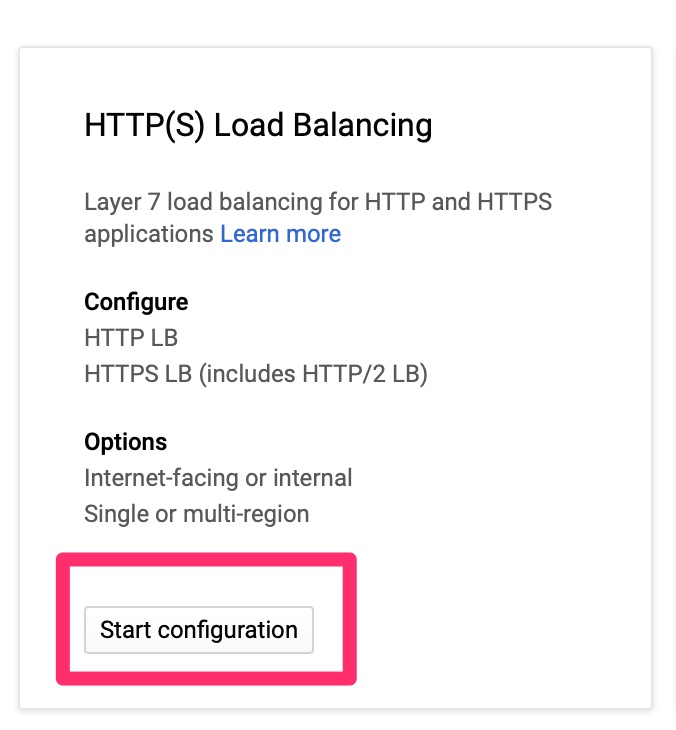
Initial
This is a crash course into load balancers if you have never set them up before. It is expected you have some understanding of front end, back end and health checks. In the VPC section we need to allow these
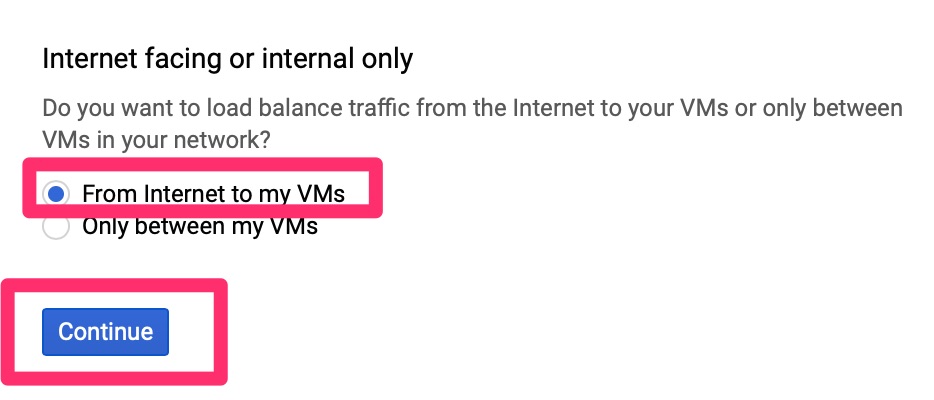
Google Load Balancer – Start configurationGoogle Load Balancer – Internet
Back End Configuration
Google’s load balancers can be used for internal only or external to internal. We want to load balance external connections.
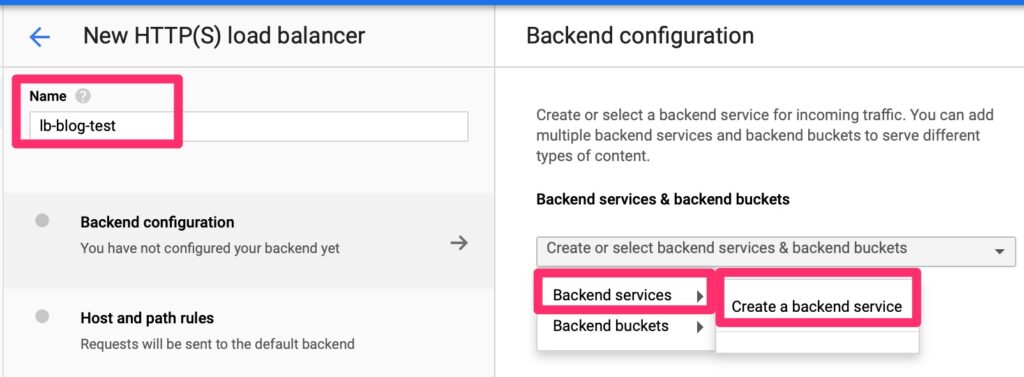
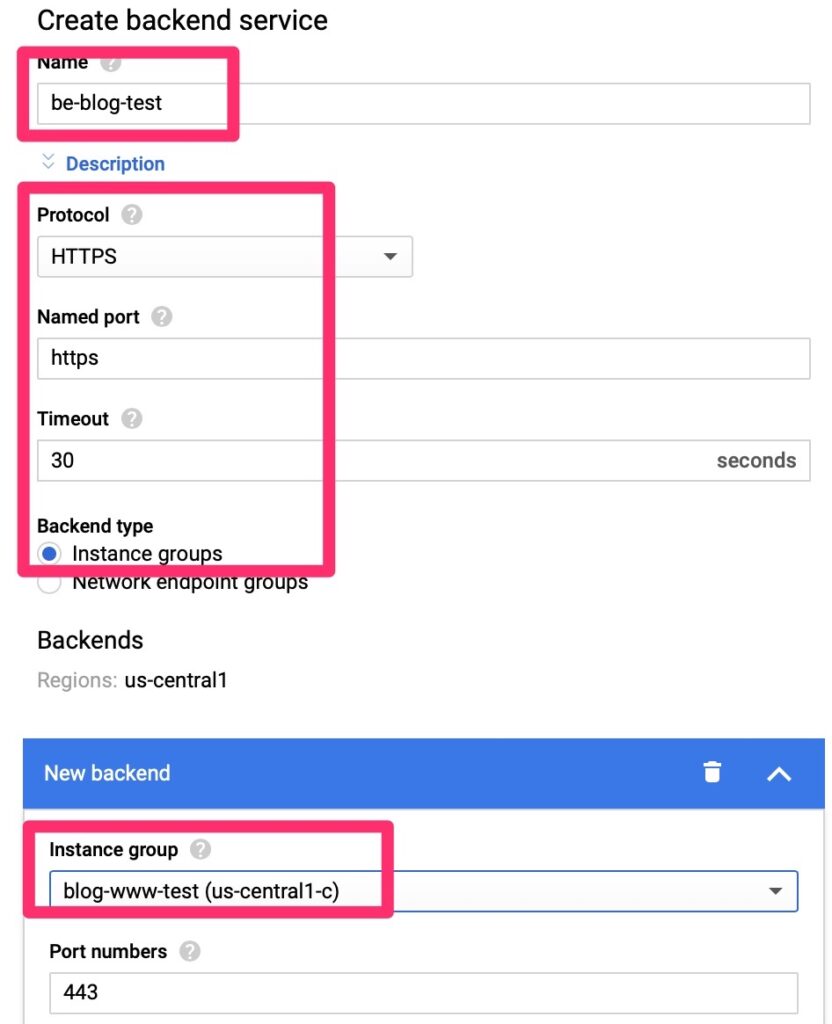
Google Load Balancer – Back End Create
We will need to create a back end endpoint.
Luckily this is simple. We point it at a few objects we already created and set session affinity so that traffic is persistent to a single web server. We do not want it hopping between servers as it may confuse the web services.
Front End Configuration
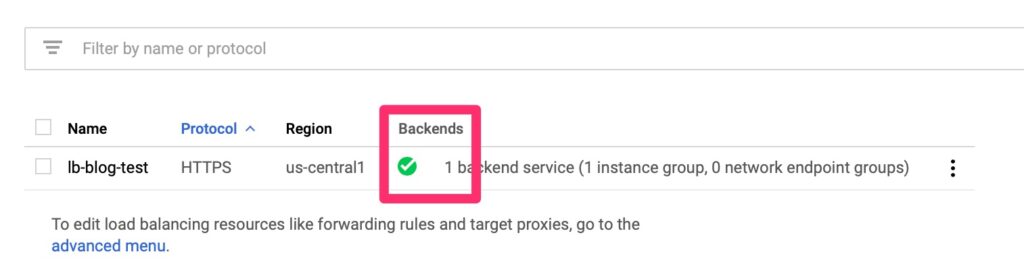
Health Check Validation
Give the load balancer provisioning a few minutes to spin up. It should then show up healthy if all is well. This never comes up the first time. Not even in a lab!
Google Load Balancer – Healthy!
Troubleshooting
The important part is to walk through the process from beginning to end when something does not work. Here’s a quick run through.
On provisioning, is the instance group provisioning the VM?
What is the status of cloud-init?
Is salt-minion installing on the VM and starting?
Does the salt-master see the minion?
Reapply the state and check for errors
Does the load balancer see health?
Final Words
If it does come up healthy, the last step is to point your DNS at the load balancer public IP and be on your way!
Since Salt is such a complex beast, I have provided most of the framework and configs here – Some of the more sensitive files are truncated but left so that you know they exist. The standard disclaimer applies in that I cannot guarantee the outcome of these files on your system or that they are best practices from a security standpoint.
Now that we’ve stood up a majority of the framework we can get to some of the fun stuff. Namely Kubernetes Dashboard. Due to compatibility reasons we will be using 2.0beta1. Newer 2.0 betas are not well tested and I ran into some issues with our 1.14 that Photon comes with.
Download and Install
This is short and sweet. As usual, I like to download and then install. I didn’t like the name of this file though so I renamed it.
curl -O https://raw.githubusercontent.com/kubernetes/dashboard/v2.0.0-beta1/aio/deploy/recommended.yaml

mv recommended.yaml dashboard-2b1.yaml

kubectl apply -f dashboard-2b1.yaml
namespace/kubernetes-dashboard created
serviceaccount/kubernetes-dashboard created
service/kubernetes-dashboard created
secret/kubernetes-dashboard-certs created
secret/kubernetes-dashboard-csrf created
secret/kubernetes-dashboard-key-holder created
configmap/kubernetes-dashboard-settings created
role.rbac.authorization.k8s.io/kubernetes-dashboard created
clusterrole.rbac.authorization.k8s.io/kubernetes-dashboard created
rolebinding.rbac.authorization.k8s.io/kubernetes-dashboard created
clusterrolebinding.rbac.authorization.k8s.io/kubernetes-dashboard created
deployment.apps/kubernetes-dashboard created
service/dashboard-metrics-scraper created
deployment.apps/kubernetes-metrics-scraper created
Health Check
The dashboard namespace is kubernetes-dashboard so we run the following.
root@kube-master [ ~/kube ]# kubectl get all --namespace=kubernetes-dashboard
NAME                                              READY   STATUS    RESTARTS   AGE
pod/kubernetes-dashboard-6f89577b77-pbngw         1/1     Running   0          27s
pod/kubernetes-metrics-scraper-79c9985bc6-kj6h5   1/1     Running   0          28s

NAME                                TYPE        CLUSTER-IP       EXTERNAL-IP   PORT(S)    AGE
service/dashboard-metrics-scraper   ClusterIP   10.254.189.11    <none>        8000/TCP   57s
service/kubernetes-dashboard        ClusterIP   10.254.127.216   <none>        443/TCP    61s

NAME                                         READY   UP-TO-DATE   AVAILABLE   AGE
deployment.apps/kubernetes-dashboard         1/1     1            1           57s
deployment.apps/kubernetes-metrics-scraper   1/1     1            1           57s

NAME                                                    DESIRED   CURRENT   READY   AGE
replicaset.apps/kubernetes-dashboard-6f89577b77         1         1         1       29s
replicaset.apps/kubernetes-metrics-scraper-79c9985bc6   1         1         1       29s
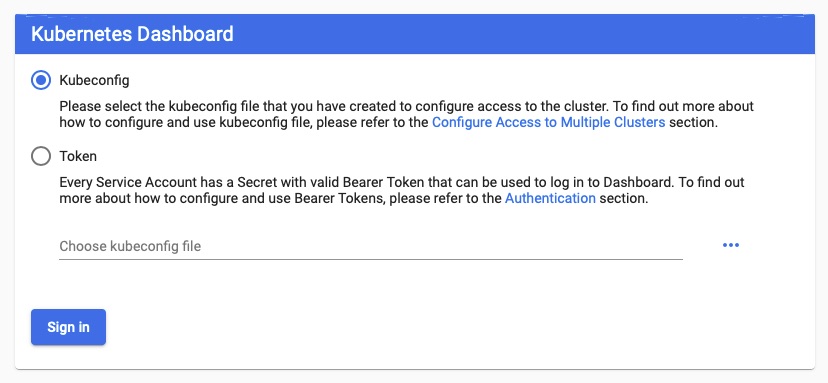
Connecting
On the main Dashboard page it indicates you can access via running “kubectl proxy” and access the URL. This is where it gets a little tricky. Not for us since we have flannel working, even on the master. Simply download the Kubernetes kubectl client for your OS and run it locally.
dwcjr@Davids-MacBook-Pro ~ % kubectl proxy
Starting to serve on 127.0.0.1:8001
At the bottom of the output should be a token section that you can plug into the token request.
From here you’ve made it. Things just got a whole lot easier if you’re a visual learner!
Final Words
I may write a few more articles on this but that this point we have a very functional Kubernetes Cluster that can deploy apps given we throw enough resources at the VMs. Other topics that need to be covered are networking and the actual topology. I feel that one of the best ways to learn a platform or technology is to push through a guided install and then understand what the components are. This works for me but not everyone.
With all the pre-requisites met, including SSL, flannel is fairly simple to install and configure. Where it goes wrong is if some of those pre-requisites have not been met or are misconfigured. You will star to find that out in this step.
We will be running flannel in a docker image, even on the master versus a standalone which is much easier to manage.
Why Do We Need Flannel Or An Overlay?
Without flannel, each node has the same IP range associated with docker. We could change this and manage it ourselves. We would then need to setup firewall rules and routing table entries to handle this. Then we also need to keep up with ip allocations.
Flannel does all of this for us. It does so with a minimal amount of effort.
Staging for Flannel
Config
We need to update /etc/kubernetes/controller-manager again and add
I always prefer to download my yaml files so I can review and replay as necessary. Per their documentation I am just going to curl the URL and then apply it
On each node we need to add the following the the /etc/kubernetes/kubelet config and then restart kubelet
KUBELET_ARGS="--network-plugin=cni"
Firewall
Since flannel is an overlay, it overlays over the existing network and we need to open UDP/8285 per their doc. Therefore we need to put this in iptables on each host
# This line for VXLAN
-A INPUT -p udp -m udp --dport 8472 -j ACCEPT

# This line for UDP
-A INPUT -p udp -m udp --dport 8285 -j ACCEPT
Fire it up!
Now we are ready to apply and let it all spin up!
root@kube-master [ ~/kube ]# curl -O https://raw.githubusercontent.com/coreos/flannel/master/Documentation/kube-flannel.yml

root@kube-master [ ~/kube ]# kubectl apply -f kube-flannel.yml
podsecuritypolicy.policy/psp.flannel.unprivileged created
clusterrole.rbac.authorization.k8s.io/flannel created
clusterrolebinding.rbac.authorization.k8s.io/flannel created
serviceaccount/flannel created
configmap/kube-flannel-cfg created
daemonset.apps/kube-flannel-ds-amd64 created
daemonset.apps/kube-flannel-ds-arm64 created
daemonset.apps/kube-flannel-ds-arm created
daemonset.apps/kube-flannel-ds-ppc64le created
daemonset.apps/kube-flannel-ds-s390x created
If all is well at this point, it should be chewing through CPU and disk and in a minute or two the pods are deployed!
root@kube-master [ ~/kube ]# kubectl get pods --namespace=kube-system
NAME                          READY   STATUS    RESTARTS   AGE
kube-flannel-ds-amd64-7dqd4   1/1     Running   17         138m
kube-flannel-ds-amd64-hs6c7   1/1     Running   1          138m
kube-flannel-ds-amd64-txz9g   1/1     Running   18         139m
On each node you should see a “flannel” interface now too.
root@kube-master [ ~/kube ]# ifconfig -a | grep flannel
flannel.1 Link encap:Ethernet  HWaddr 1a:f8:1a:65:2f:75
Troubleshooting Flannel
From the “RESTARTS” section you can see some of them had some issues. What kind of blog would this be if I didn’t walk you through some troubleshooting steps?
I knew that the successful one was the master so it was likely a connectivity issue. Testing “curl -v https://10.254.0.1” passed on the master but failed on the nodes. By pass, I mean it made a connection but complained about the TLS certificate (which is fine). The nodes, however, indicated some sort of connectivity issue or firewall issue. So I tried the back end service member https://192.168.116.174:6443 and same symptoms. I would have expected Kubernetes to open up this port but it didn’t so I added it to iptables and updated my own documentation.
Some other good commands are “kubectl logs <resource>” such as
root@kube-master [ ~/kube ]# kubectl logs pod/kube-flannel-ds-amd64-txz9g --namespace=kube-system
I1031 18:47:14.419895       1 main.go:514] Determining IP address of default interface
I1031 18:47:14.420829       1 main.go:527] Using interface with name eth0 and address 192.168.116.175
I1031 18:47:14.421008       1 main.go:544] Defaulting external address to interface address (192.168.116.175)
I1031 18:47:14.612398       1 kube.go:126] Waiting 10m0s for node controller to sync
I1031 18:47:14.612648       1 kube.go:309] Starting kube subnet manager
....
You will notice the “namespace” flag. Kubernetes can segment resources into namespaces. If you’re unsure of which namespace something exists in, you can use “–all-namespaces”
Final Words
Now we have a robust network topology where pods can have unique IP ranges and communicate to pods on other nodes.
Next we will be talking about Kubernetes Dashboard and how to load it. The CLI is not for everyone and the dashboard helps put things into perspective.
Picking up where we left off in the Initializing Kubernetes article, we will now be setting up certificates! This will be closely following the Kubernetes “Certificates” article. Specifically using OpenSSL as easyrsa has some dependency issues with Photon.
OpenSSL
Generating Files
We’ll be running the following commands and I keep them in /root/kube/certs. They won’t remain there but its a good staging area that needs to be cleaned up or secured so we don’t have keys laying around.
In my environment the MASTER_IP is 192.168.116.174 and the cluster IP is usually a default but we can get it by running kubectl
root@kube-master [ ~/kube ]# kubectl get services kubernetes
NAME         TYPE        CLUSTER-IP   EXTERNAL-IP   PORT(S)   AGE
kubernetes   ClusterIP   10.254.0.1   <none>        443/TCP   60m
[ req ]
default_bits = 2048
prompt = no
default_md = sha256
req_extensions = req_ext
distinguished_name = dn

[ dn ]
C = US
ST = Texas
L = Katy
O = Woohoo Services
OU = IT
CN = 192.168.116.174

[ req_ext ]
subjectAltName = @alt_names

[ alt_names ]
DNS.1 = kubernetes
DNS.2 = kubernetes.default
DNS.3 = kubernetes.default.svc
DNS.4 = kubernetes.default.svc.cluster
DNS.5 = kubernetes.default.svc.cluster.local
IP.1 = 192.168.116.174
IP.2 = 10.254.0.1

[ v3_ext ]
authorityKeyIdentifier=keyid,issuer:always
basicConstraints=CA:FALSE
keyUsage=keyEncipherment,dataEncipherment
extendedKeyUsage=serverAuth,clientAuth
subjectAltName=@alt_names
We need to copy the ca.crt to /etc/ssl/certs/kube-ca.pem on each node and then install the package “openssl-c_rehash” as I found here. Photon is very minimalistic so you will find you keep having to add packages for things you take for granted.
tdnf install openssl-c_rehash

c_rehash
Doing //etc/ssl/certs
link 3513523f.pem => 3513523f.0
link 76faf6c0.pem => 76faf6c0.0
link 68dd7389.pem => 68dd7389.0
link e2799e36.pem => e2799e36.0
.....
link kube-ca.pem => 8e7edafa.0
Final Words
At this point, you have a Kubernetes cluster setup with some basic security. Not very exciting, at least in terms of seeing results but the next article should be meaningful to show how to setup flannel.
In my previous article Intro To Kubernetes, we walked through installing dependencies and setting the stage for initializing Kubernetes. At this point you should have a master and one or two nodes with the required software installed.
A Little More Configuration
Master Config Prep
We have just a little more configuration to do. On kube-master we need to change “/etc/kubenertes/apiserver” lines as follows. This allows other hosts to connect to it. If you don’t want to bind to 0.0.0.0 you could bind to the specific IP but would lose localhost binding.
# From this
KUBE_API_ADDRESS="--insecure-bind-address=127.0.0.1"

# To this
KUBE_API_ADDRESS="--address=0.0.0.0"
Create the Cluster Member Metadata
Save the following as a file, we’ll call it create_nodes.json. When standing up a cluster I like to start out with doing it on the master so I create a /root/kube and put my files in there for reference.
We can then run kubectl to create the nodes based on that json. Keep in mind this is just creating metadata
root@kube-master [ ~/kube ]# kubectl create -f /root/kube/create_nodes.json
node/kube-master created
node/kube-node1 created
node/kube-node2 created

# We also want to "taint" the master so no app workloads get scheduled.

kubectl taint nodes kube-master key=value:NoSchedule

root@kube-master [ ~/kube ]# kubectl get nodes
NAME          STATUS     ROLES    AGE   VERSION
kube-master   NotReady   <none>   88s
kube-node1    NotReady   <none>   88s
kube-node2    NotReady   <none>   88s
You can see they’re “NotReady” because the services have not been started. This is expected at this point.
All Machine Config Prep
This will be run on all machines, master and node. We need to edit “/etc/kubernetes/kubelet”
server: http://127.0.0.1:8080

# Should be

server: http://kube-master:8080
In /etc/kubernetes/config
KUBE_MASTER="--master=http://kube-master:8080"
Starting Services
Master
The VMware Photon Kubernetes guide we have been going by has the following snippit which I want to give credit to. Please run this on the master
for SERVICES in etcd kube-apiserver kube-controller-manager kube-scheduler kube-proxy kubelet docker; do
     systemctl restart $SERVICES
     systemctl enable $SERVICES
     systemctl status $SERVICES
 done
You can then run “netstat -an | grep 8080” to see it is listening. Particularly on 0.0.0.0 or the expected bind address.
Nodes
On the nodes we are only starting kube-proxy, kubelet and docker
for SERVICES in kube-proxy kubelet docker; do
     systemctl restart $SERVICES
     systemctl enable $SERVICES
     systemctl status $SERVICES
 done
Health Check
At this point we’ll run kubectl get nodes and see the status
root@kube-master [ ~/kube ]# kubectl get nodes
NAME          STATUS     ROLES    AGE     VERSION
127.0.0.1     Ready      <none>   23s     v1.14.6
kube-master   NotReady   <none>   3m13s
kube-node1    NotReady   <none>   3m13s
kube-node2    NotReady   <none>   3m13s
Oops, we didn’t add 127.0.0.1 – I forgot to clear the hostname override in /etc/kubernetes/kubelet. Fixed that, restarted kubelet and then “kubectl delete nodes 127.0.0.1”
It does take a while for these to start showing up. The provisioning and orchestration processes are not fast but you should slowly show the version show up and then the status to Ready and here we are.
root@kube-master [ ~/kube ]# kubectl get nodes
NAME          STATUS   ROLES    AGE     VERSION
kube-master   Ready    <none>   9m42s   v1.14.6
kube-node1    Ready    <none>   9m42s   v1.14.6
kube-node2    Ready    <none>   9m42s   v1.14.6
Final Words
At this point we could start some pods if we wanted but there are a few other things that should be configured for a proper bare metal(or virtual) install. Many pods are now depending on auto discovery which uses TLS. Service accounts also need and service accounts are using secrets.
For the networking we will go over flannel which will provide our networking overlay using VXLAN. This is needed so that pods running on each node have a unique and routable address space that each node can see. Right now each node has a docker interface with the same address and pods on different nodes cannot communicate with each other.
Flannel uses the TLS based auto discovery to the ClusterIP. Without hacking it too much it is just best to enable SSL/TLS Certificates and also a security best practice.