Internet Routing and BGP Looking Glasses

Summary

From time to time I get requests from colleagues, “Can you ping this address?”. Many times what is going on is they are bringing up a new internet link and want to check routing. Sometimes they areadding a public endpoint and want to make sure its accessible. They are asking me because within their network it works but they need to make sure it is accessible or routing properly over the internet.

BGP Looking Glasses are a great tool for this if you would like to be self sufficient. You can also get a wider view than just a few colleagues. My favorite one is HE.net’s https://lg.he.net

What is BGP?

BGP Stands for Border Gateway Protocol. It is the standard exterior gateway protocol for internet routing. While an internal network may use something like OSPF for its interior, BGP is better suited for exterior routing.

One of the few keys to understanding BGP at a high level is to understand it is a distance vector routing protocol. These routes are typically better suited for WAN routing as they are a bit more light weight. The downside is that each router’s perception of the internet is key. There is no unified single view of the internet routing. Each router has its own perception of the internet based on the BGP routes it receives.

This is why Looking Glasses are so important. You can see the perception of various points on the internet. This can help you determine internet traffic destined to your infrastructure is taking the expected and optimal path.

HE.net’s Looking Glass

Here is a small snippit of HE’s LG. They have various routers all over the world that would not fit into this screen shot. You can also see the various functions you can perform on the right hand side.

HE.net Looking Glass

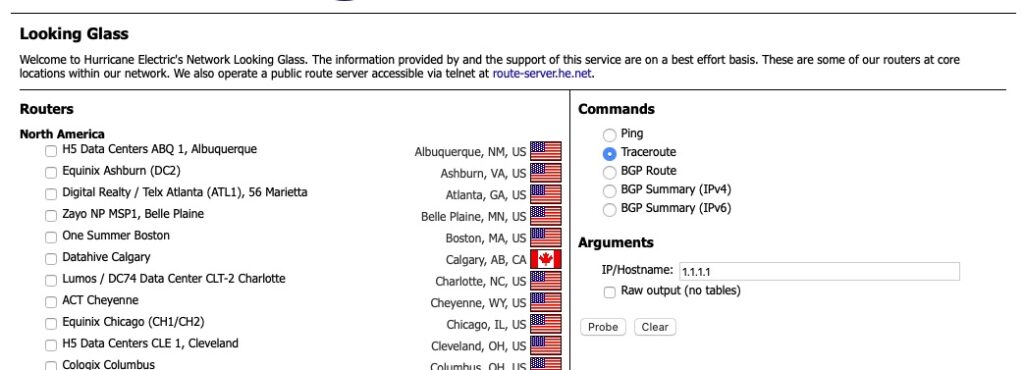
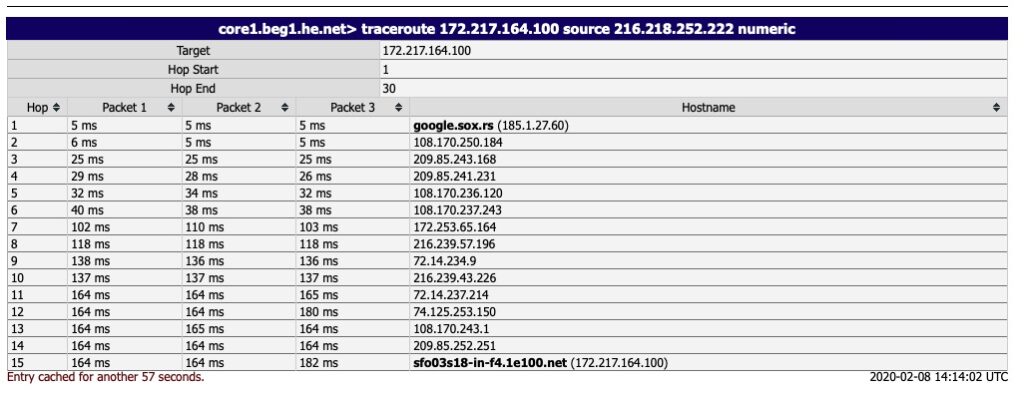
Ping and traceroute are fairly self explanatory. For ping it just returns the results of an ICMP ping and traceroute shows a list of routers in the path of getting to the destination.

HE.net Looking Glass - Traceroute
HE.net Looking Glass – Traceroute

The real value here is the “BGP Route” option.

HE.net BGP Looking Glass Details
HE.net Looking Glass BGP Details

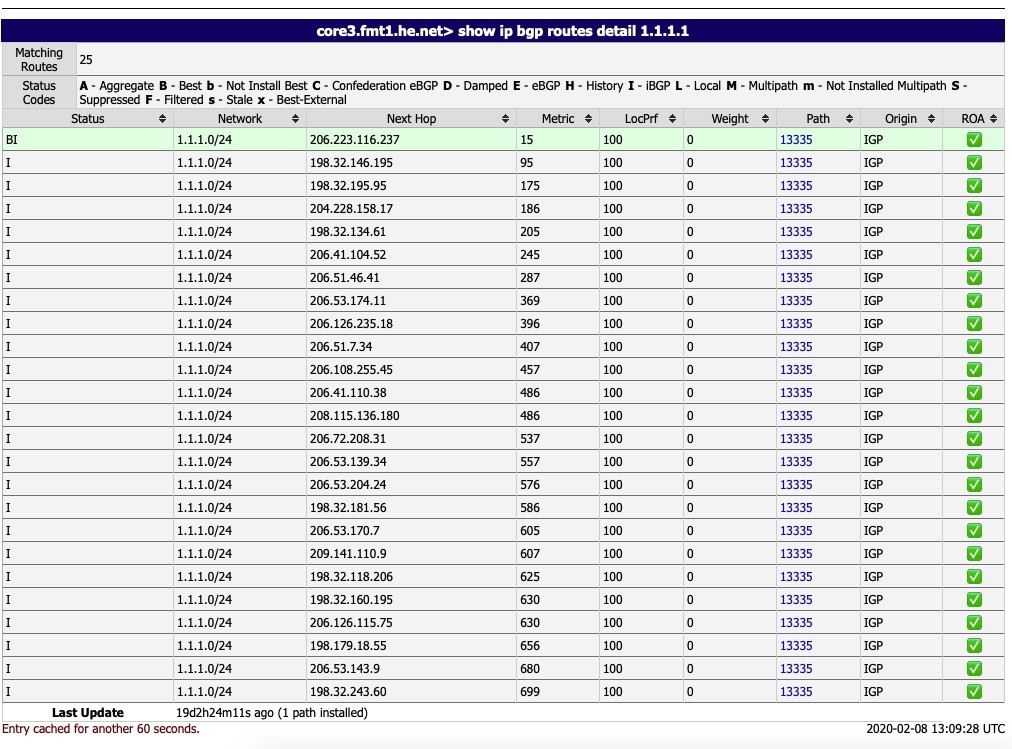
Here we can see all of the BGP peers this particular router has learned the route to 1.1.1.0/24, the AS path it takes and which one it selects as the best path.

Autonomous Systems

If you are new to BGP and dynamic routing protocols you may be wondering what an AS (Autonomous System) is. In BGP world, it is basically a grouping of similar routers that announce a similar set of subnets or prefixes as they are called in BGP. BGP groups systems together by AS. As each router learns a route, it appends its own AS to the AS path before passing it along.

The above is a bad example because it shows a single direct AS path as HE appears to be directly peered with CloudFlare (AS 13335). CloudFlare is very well peered on the internet. Below is a better example. It at least shows it passing through AS 1299 (Telia) to AS 174 (Cogent)

It seems HE.net is fairly well peered but here is another router output that shows some decent AS paths and the differences. AS 174 being Cogent and AS 209 being CenturyLink and AS 3356 being Level3 it chooses the shortest AS path. Keep in mind the traceroute through CenturyLink could possibly be shorter actual router hops. A shorter AS path does not necessarily mean less latency or shorter traceroute hops.

#show ip bgp 73.0.0.0/8 
BGP routing table entry for 73.0.0.0/8, version 767462940
Paths: (2 available, best #1, table default)
  Advertised to update-groups:
     18        
  Refresh Epoch 1
  174 7922, (received & used)
    X.X.X.X from X.X.X.X (X.X.X.X)
      Origin IGP, metric 13031, localpref 100, valid, external, best
      Community: 174:21000 174:22013
      rx pathid: 0, tx pathid: 0x0
  Refresh Epoch 3
  209 3356 7922, (received & used)
    X.X.X.X from X.X.X.X (X.X.X.X)
      Origin IGP, metric 7800026, localpref 100, valid, internal
      rx pathid: 0, tx pathid: 0

Final Words

If you ever find yourself needing to ping or traceroute from a remote endpoint lg.he.net has you covered. Many carriers have their own looking glass. This is useful incase you want to see how your routes are perceived from their end. If you use BGP at your edge and receive full routes, this is another avenue of seeing those prefixes. With looking glasses, you can do this from various endpoints across the internet pretty easily.

OpenVPN with Encrypted Private Key – Issue Resolved

Summary

I was working on Azure Client VPN with OpenVPN and in testing I had removed the passphrase on the private key for authentication but wanted to put it back on there and it would not work. Some quick searches did not turn up much other than common complaints of this.

Reason

With certificate based authentication on OpenVPN, the public key and private key are put in the ovpn file. This is not the most secure with an unencrypted private key as anyone can simply obtain the file and connect.

With a passphrase on it, there is less concern over the ovpn being disseminated and the key reused.

Issue

The OpenVPN client logs indicated the following

2019-12-20 12:22:42-0600 [-] OVPN 40_89_167_211_p4967 ERR: ">FATAL:CLIENT_EXCEPTION: connect error: PEM_PASSWORD_FAIL: mbed TLS: error parsing config private key : PK - Private key password can't be empty"
2019-12-20 12:22:42-0600 [MyOMIClient,0,] FROM OMI: u">FATAL:CLIENT_EXCEPTION: connect error: PEM_PASSWORD_FAIL: mbed TLS: error parsing config private key : PK - Private key password can't be empty"
2019-12-20 12:22:42-0600 [HTTPChannel,224,] *** API CALL f=xmlrpc_Poll args=['sess_40_89_167_211_p4967_VuxJ7YkTyUVYXeKV_1', 10] kw={} ret=[{'active': True, 'timestamp': 1576866162, 'type': 'ACTIVE', 'last': None}, {'timestamp': 1576866162, 'type': 'FATAL', 'error': u"CLIENT_EXCEPTION: connect error: PEM_PASSWORD_FAIL: mbed TLS: error parsing config private key : PK - Private key password can't be empty"}]

It seemed like it was just not prompting me to enter the passphrase and using a blank one.

Solution

I came across the following article ( https://github.com/pivpn/pivpn/issues/372 ) which had quite a few tangents on it but most recently someone indicated using OpenVPN Connect 3.1.0 and it worked. I tried that and was surprised, it actually prompts me for the passphrase!

It seems the community version of the OpenVPN GUI client supported this but the OpenVPN Connect lacked the feature until recently. As of the time of this writing 3.1.0 is Beta but seems to work great!

I had tried upgrading from 2.5 to 2.7 without luck. Finally after installing 3.1.0 it worked again.

Azure Client VPN with OpenVPN

Summary

In my article Intro To Azure Active Directory Domain Services we discussed environments with minimal infrastructure. With all of the RDP exploits it is typically best not to expose RDP over the internet. Since Bastion is not yet fully available the next best thing aside from setting up a VPN appliance is to use the Point-to-site functionality of a Virtual Network Gateway.

Prerequisites

The first pre-requisite for client VPN using a Virtual Network Gateway is to actually provision one. For OpenVPN compatibility it does require at least SKU VpnGw1 and will not work with basic.

It will require 2 subnets, one for the inside leg of the gateway and another for the client-side pool.

The Virtual Network Gateway does want an inside subnet dedicated for use to the Virtual Network Gateway and not shared amongst other devices.

Authentication is handled either via radius or certificate based. If you are reading this article for a minimized infrastructure you probably do not have radius servers.

Provisioning

The provisioning process is fairly simple although it can take 30-60 minutes for the Virtual Network Gateway to fully provision before you can use the Point-to-site configuration. There are a few simple questions.

Virtual Network Gateway - Create
Virtual Network Gateway – Create

That’s really it for the initial provisioning.

Configuration

Some basic Point-to-site configurations need to be set.

Point-to-site configuration

The next part is the most difficult part of this. A root and at least one child certificate have to be provisioned. Microsoft has some good documentation on it. To do in Powershell, it does require Windows 10 or Server 2016 or higher.

Root Certificate
Root Certificate

The name is arbritrary but the “Public certificate data” is the area between the “—BEGIN CERTIFICATE—” section and the “—END CERTIFICATE”

The following Microsoft article describes and outlines the process much better than I can do so I will just share it here – https://docs.microsoft.com/en-us/azure/vpn-gateway/vpn-gateway-certificates-point-to-site

Client Configuration

Again – Microsoft does a really good job on instructions for configuring the client so I will just share this link – https://docs.microsoft.com/en-us/azure/vpn-gateway/vpn-gateway-howto-openvpn-clients

Final Words

It can be a pain for those of us not familiar with certificates and command line tools like openssl. The idea is that you have a root certificate authority that then issues individual certificates per user or group of users. If that key becomes compromised you can then revoke the individual certificate or untrust the entire certificate authority. I like the idea of creating a CA chain per organization you grant access to.

In this article we walked through creating the resources required and configuring. We did rely heavily upon the Microsoft documentation but it was fairly complete and well shown.

Make sure you distribute your ovpn files with encrypted private keys! – OpenVPN with Encrypted Private Key – Issue Resolved

IP Subnet Calculator on Google App Engine

Summary

Over the past few days I put a few hours towards writing a web app to perform some basic CIDR subnet calculations. I wanted to both share the link to it ( https://tools.woohoosvcs.com/subnetcalculator/ ). I also wanted to walk through how I deployed it to Google App Engine.

What is a Subnet Calculator?

When provisioning subnets you typically need to determine your requirements. Determining the size of the subnet based on the number of hosts or what the mask will be can take a little bit of time. This is particularly so when you do not calculate this often. Subnet calculators help save some time on this.

Why did I do it?

I have written a few over the years. My early ones were written in C. Golang has a few libraries though in the new package to help with this. I had to use one the other day and figured why not quite my own. While doing this, why not share how to deploy your own app?

Deploying Golang on Google App Engine

In this, we assume you already have the Google SDK. We walked through this in Hello World From Google App Engine Via PHP.

As with any App Engine app, we need an app.yaml. Mine looks like this

runtime: go112

service: tools

handlers:
 - url: /view\.html
   static_files: view.html
   upload: view.html

I have a main.go file and a static view.html file. Since I already have a default service I am calling this one service. That requires I use a dispatch for my custom domain name.

Don’t forget to add the custom domain to the Settings section!

dispatch:
- url: "tools.woohoosvcs.com/*"
  service: tools

The easiest way to get a Golang app running is as follow. The Google App Engine will run the main function in the main package. Google App Engine sets the PORT environment variable.

package main

func main() {
        port := os.Getenv("PORT")
        if port == "" {
                port = "8080"
                log.Printf("Defaulting to port %s", port)
        }

        http.HandleFunc("/subnetcalculator/", viewSubnetCalculator)

        log.Printf("Listening on port %s", port)
        if err := http.ListenAndServe(":"+port, nil); err != nil {
                log.Fatal(err)
        }
}

// This is the main page to view the Subnet Calculator
func viewSubnetCalculator(w http.ResponseWriter, r *http.Request) {
        http.ServeFile(w, r, "./view.html")
}

The best practice for this would dictate a separate main.go importing your own package but if you were familiar enough with that, you may not need this article.

It is out of scope for this article but “http.HandleFunc(“/subnetcalculator/”, viewSubnetCalculator)” tells Golang that the “/subnetcalculator/” URI be directed to the “viewSubnetCalculator” function. That function simply displays the view.html file

From there we simply run the following. I have tools.woohoosvcs.com under the same parent as dispatch.yaml

cd tools.woohoosvcs.com 
gcloud app deploy

cd ..
gcloud app deploy dispatch/dispatch.yaml

Securing Google App Engine

If you use a Web Application Firewall like Cloudflare, don’t forget to ACL GAE to only allow connections from it. Otherwise, it can be completely bypassed

Google App Engine - Firewall
Google App Engine – Firewall

Final Words

This was just a quick and dirty deploy of a golang app to Google App Engine. As with all the apps though, I run them through Cloudflare or at least some sort of Web Application Firewall.

Kubernetes Flannel Configuration

Summary

With all the pre-requisites met, including SSL, flannel is fairly simple to install and configure. Where it goes wrong is if some of those pre-requisites have not been met or are misconfigured. You will star to find that out in this step.

We will be running flannel in a docker image, even on the master versus a standalone which is much easier to manage.

Why Do We Need Flannel Or An Overlay?

Without flannel, each node has the same IP range associated with docker. We could change this and manage it ourselves. We would then need to setup firewall rules and routing table entries to handle this. Then we also need to keep up with ip allocations.

Flannel does all of this for us. It does so with a minimal amount of effort.

Staging for Flannel

Config

We need to update /etc/kubernetes/controller-manager again and add

--allocate-node-cidrs=true --cluster-cidr=10.244.0.0/16

KUBE_CONTROLLER_MANAGER_ARGS="--root-ca-file=/secret/ca.crt  --service-account-private-key-file=/secret/server.key --allocate-node-cidrs=true --cluster-cidr=10.244.0.0/16"

And then restart kube-controller-manager

I always prefer to download my yaml files so I can review and replay as necessary. Per their documentation I am just going to curl the URL and then apply it

On each node we need to add the following the the /etc/kubernetes/kubelet config and then restart kubelet

KUBELET_ARGS="--network-plugin=cni"

Firewall

Since flannel is an overlay, it overlays over the existing network and we need to open UDP/8285 per their doc. Therefore we need to put this in iptables on each host

# This line for VXLAN
-A INPUT -p udp -m udp --dport 8472 -j ACCEPT

# This line for UDP
-A INPUT -p udp -m udp --dport 8285 -j ACCEPT

Fire it up!

Now we are ready to apply and let it all spin up!

root@kube-master [ ~/kube ]# curl -O https://raw.githubusercontent.com/coreos/flannel/master/Documentation/kube-flannel.yml

root@kube-master [ ~/kube ]# kubectl apply -f kube-flannel.yml
podsecuritypolicy.policy/psp.flannel.unprivileged created
clusterrole.rbac.authorization.k8s.io/flannel created
clusterrolebinding.rbac.authorization.k8s.io/flannel created
serviceaccount/flannel created
configmap/kube-flannel-cfg created
daemonset.apps/kube-flannel-ds-amd64 created
daemonset.apps/kube-flannel-ds-arm64 created
daemonset.apps/kube-flannel-ds-arm created
daemonset.apps/kube-flannel-ds-ppc64le created
daemonset.apps/kube-flannel-ds-s390x created

If all is well at this point, it should be chewing through CPU and disk and in a minute or two the pods are deployed!

root@kube-master [ ~/kube ]# kubectl get pods --namespace=kube-system
NAME                          READY   STATUS    RESTARTS   AGE
kube-flannel-ds-amd64-7dqd4   1/1     Running   17         138m
kube-flannel-ds-amd64-hs6c7   1/1     Running   1          138m
kube-flannel-ds-amd64-txz9g   1/1     Running   18         139m

On each node you should see a “flannel” interface now too.

root@kube-master [ ~/kube ]# ifconfig -a | grep flannel
flannel.1 Link encap:Ethernet  HWaddr 1a:f8:1a:65:2f:75

Troubleshooting Flannel

From the “RESTARTS” section you can see some of them had some issues. What kind of blog would this be if I didn’t walk you through some troubleshooting steps?

I knew that the successful one was the master so it was likely a connectivity issue. Testing “curl -v https://10.254.0.1” passed on the master but failed on the nodes. By pass, I mean it made a connection but complained about the TLS certificate (which is fine). The nodes, however, indicated some sort of connectivity issue or firewall issue. So I tried the back end service member https://192.168.116.174:6443 and same symptoms. I would have expected Kubernetes to open up this port but it didn’t so I added it to iptables and updated my own documentation.

Some other good commands are “kubectl logs <resource>” such as

root@kube-master [ ~/kube ]# kubectl logs pod/kube-flannel-ds-amd64-txz9g --namespace=kube-system
I1031 18:47:14.419895       1 main.go:514] Determining IP address of default interface
I1031 18:47:14.420829       1 main.go:527] Using interface with name eth0 and address 192.168.116.175
I1031 18:47:14.421008       1 main.go:544] Defaulting external address to interface address (192.168.116.175)
I1031 18:47:14.612398       1 kube.go:126] Waiting 10m0s for node controller to sync
I1031 18:47:14.612648       1 kube.go:309] Starting kube subnet manager
....

You will notice the “namespace” flag. Kubernetes can segment resources into namespaces. If you’re unsure of which namespace something exists in, you can use “–all-namespaces”

Final Words

Now we have a robust network topology where pods can have unique IP ranges and communicate to pods on other nodes.

Next we will be talking about Kubernetes Dashboard and how to load it. The CLI is not for everyone and the dashboard helps put things into perspective.

Next – Kubernetes Dashboard
Next – Spinning Up Rancher With Kubernetes