Summary
The Rancher ecosystem is an umbrella of tools. We will specifically be talking about the Rancher product or sometimes referred to as Rancher Server. Rancher is an excellent tool for managing and monitoring your Kubernetes cluster, no matter where it exists.
Requirements and Setup
The base requirement is just a machine that has docker. For the sake of this article, we will use their RancherOS to deploy.
RancherOS touts itself at being the lightest weight OS capable of running docker. All of the system services have been containerized as well. The most difficult part of installing “ros” is using the cloud-init.yaml to push your keys to it!
We will need the installation media as can be found here
The minimum requirements state 1GB of RAM but I had issues with that and bumped my VM up to 1.5GB. It was also provisioned with 1 CPU Core and 4GB HDD.
A cloud-config.yml should be provisioned with your ssh public key
#cloud-config
ssh_authorized_keys:
  - ssh-rsa XXXXXXXXXXXXXXXXXXXXXXXXXXXXX
We also assume you will be picking up from the Intro to Kubernetes article and importing that cluster.
Installing RacherOS
On my laptop I ran the following command in the same directory that I have the cloud-config.yml. This is a neat way to have a quick and dirty web server on your machine.
python -m SimpleHTTPServer 8000In the rancher window
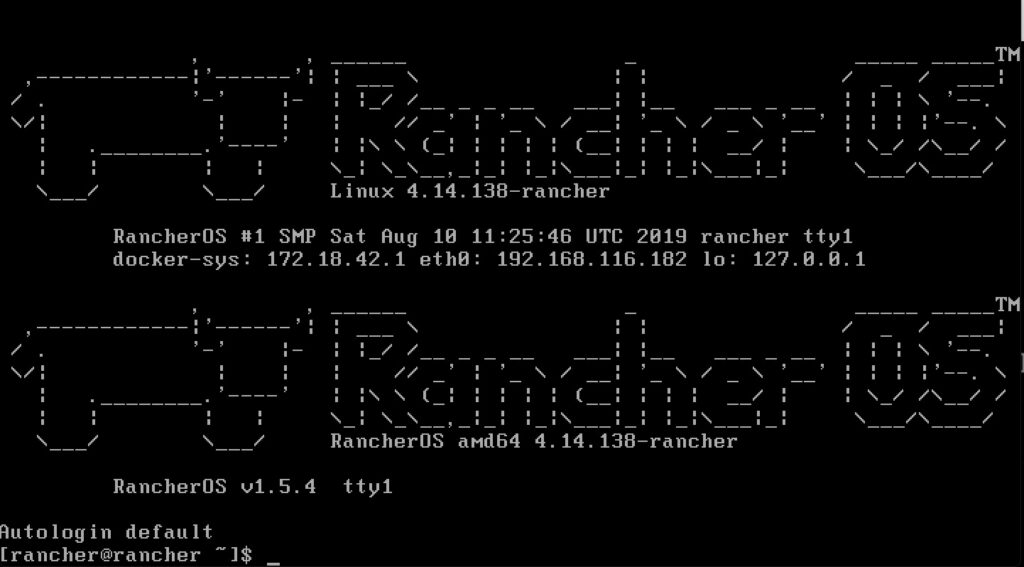
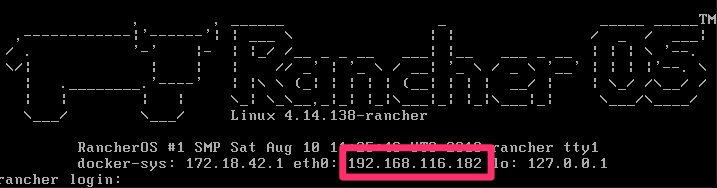
sudo ros install -c http://192.168.116.1:8000/cloud-config.yml -d /dev/sdaA few prompts including a reboot and you will be asking yourself if it was just that easy? When it boots up, it shows you the IP to make it that much easier to remotely connect. Afterall, you are only enabled for ssh key auth at this point and cannot really login at the console.
 % ssh [email protected]
The authenticity of host '192.168.116.182 (192.168.116.182)' can't be established.
ECDSA key fingerprint is SHA256:KGTRt8HZu1P4VFp54vOAxf89iCFZ3jgtmdH8Zz1nPOA.
Are you sure you want to continue connecting (yes/no)? yes
Warning: Permanently added '192.168.116.182' (ECDSA) to the list of known hosts.
Enter passphrase for key '/Users/dwcjr/.ssh/id_rsa':
[rancher@rancher ~]$
Starting Up Rancher
And we’re in! We will then do a single node self-signed cert install per – https://rancher.com/docs/rancher/v2.x/en/installation/single-node/
[rancher@rancher ~]$ docker run -d --restart=unless-stopped \
> -p 80:80 -p 443:443 \
> rancher/rancher:latest
Unable to find image 'rancher/rancher:latest' locally
latest: Pulling from rancher/rancher
22e816666fd6: Pull complete
079b6d2a1e53: Pull complete
11048ebae908: Pull complete
c58094023a2e: Pull complete
8a37a3d9d32f: Pull complete
e403b6985877: Pull complete
9acf582a7992: Pull complete
bed4e005ec0d: Pull complete
74a2e9817745: Pull complete
322f0c253a60: Pull complete
883600f5c6cf: Pull complete
ff331cbe510b: Pull complete
e1d7887879ba: Pull complete
5a5441e6019b: Pull complete
Digest: sha256:f8751258c145cfa8cfb5e67d9784863c67937be3587c133288234a077ea386f4
Status: Downloaded newer image for rancher/rancher:latest
76742197270b5154bf1e21cf0ba89479e0dfe1097f84c382af53eab1d13a25dd
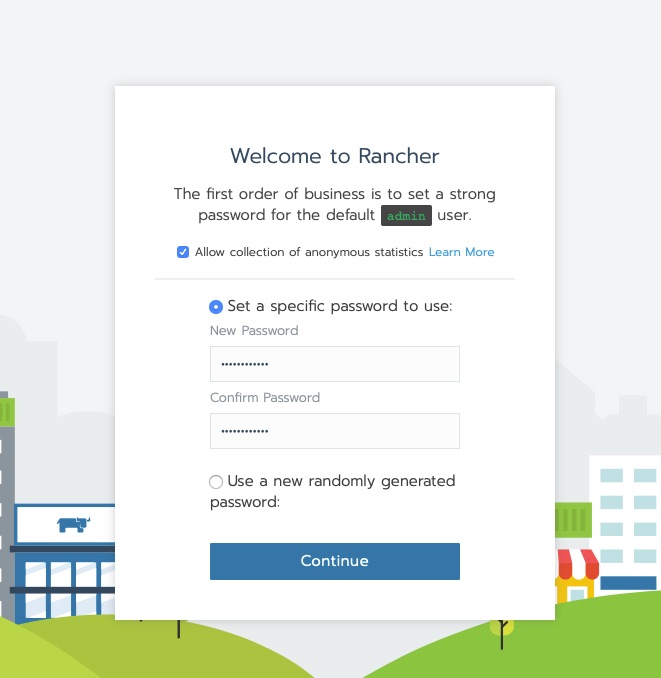
[rancher@rancher ~]$ Connect via HTTPS to the rancher server and you’ll get the new user creation for admin
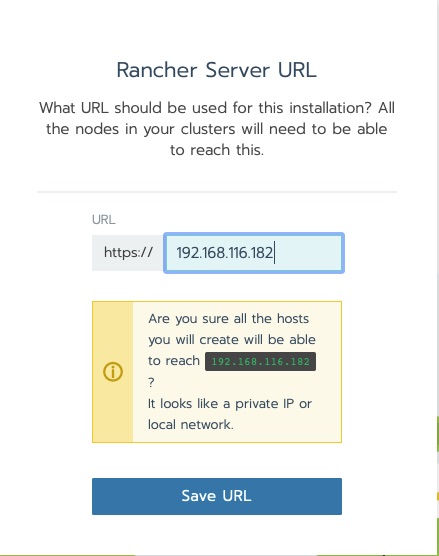
The next question is an important design decision. The Kubernetes nodes that this will be managing need to be able to connect to the rancher host. the reason being is agents are deployed that phone home. The warning in this next message is ok for this lab.
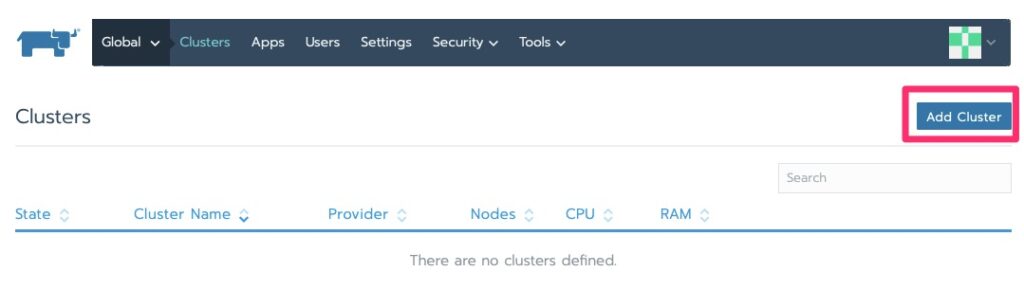
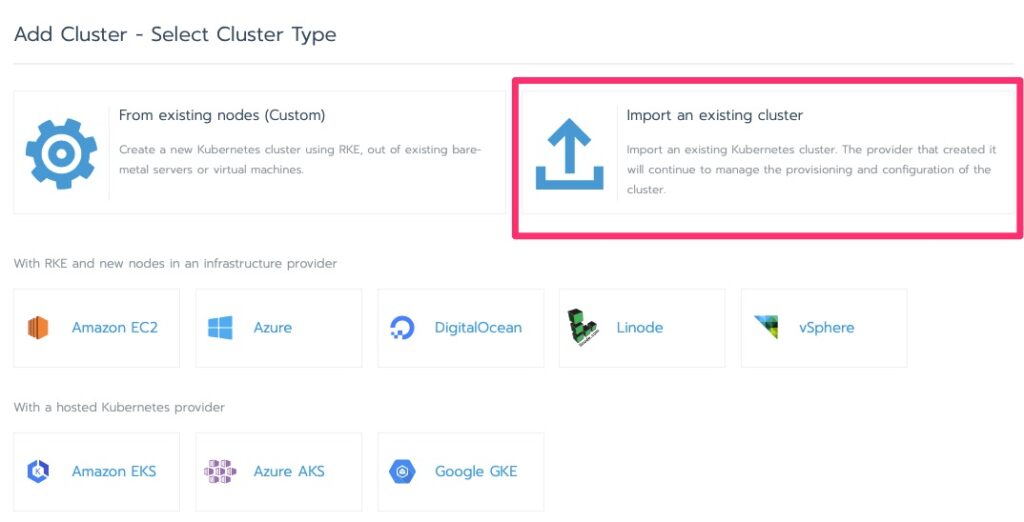
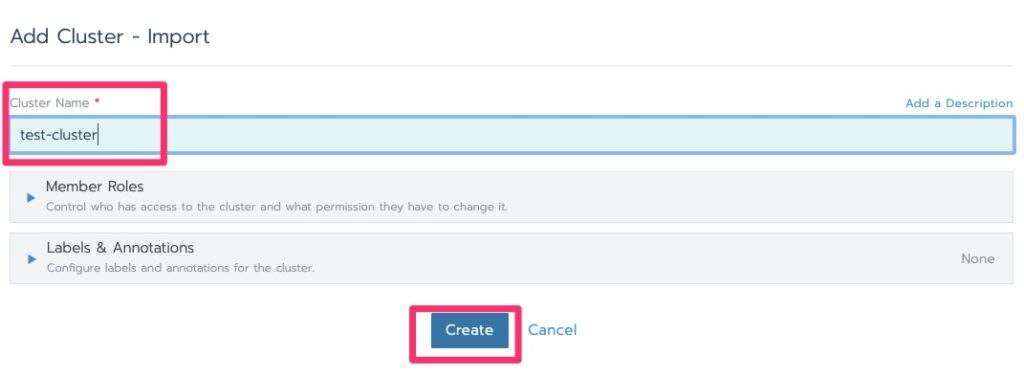
Importing a Cluster
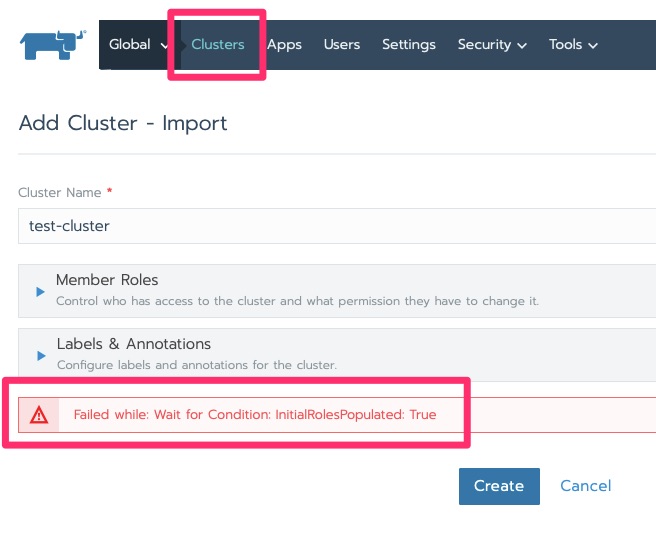
In this lab I have been getting the following error but click over to clusters and it moves on with initializing.
It will stay in initializing for a little bit. Particularly in this lab with minimal resources. We are waiting for “Pending”.
Now that it is pending we can edit it for the kubectl command to run on the nodes to deploy the agent

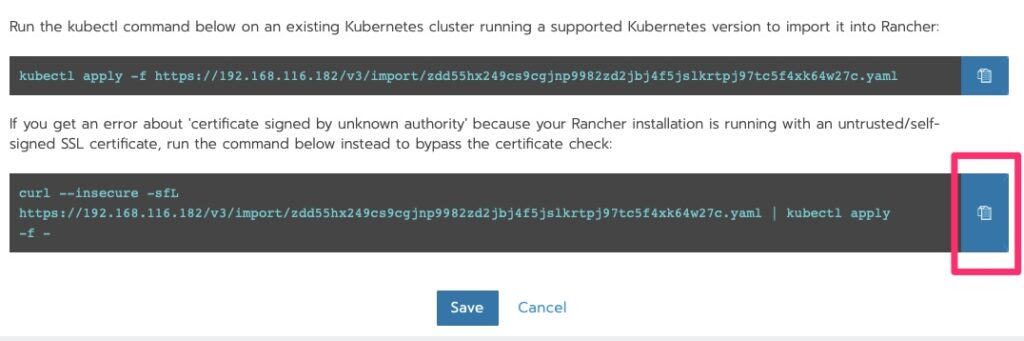
Deploying the Agent
Run the curl!
root@kube-master [ ~ ]# curl --insecure -sfL https://192.168.116.182/v3/import/zdd55hx249cs9cgjnp9982zd2jbj4f5jslkrtpj97tc5f4xk64w27c.yaml | kubectl apply -f -
clusterrole.rbac.authorization.k8s.io/proxy-clusterrole-kubeapiserver created
clusterrolebinding.rbac.authorization.k8s.io/proxy-role-binding-kubernetes-master created
namespace/cattle-system created
serviceaccount/cattle created
clusterrolebinding.rbac.authorization.k8s.io/cattle-admin-binding created
secret/cattle-credentials-79f50bc created
clusterrole.rbac.authorization.k8s.io/cattle-admin created
deployment.apps/cattle-cluster-agent created
The DaemonSet "cattle-node-agent" is invalid: spec.template.spec.containers[0].securityContext.privileged: Forbidden: disallowed by cluster policy
Boo – what is “disallowed by cluster policy”? This is a permission issue
On Kubernetes 1.14 you can set “–allow-privileged=true” on the apiserver and kubelet. It is deprecated in higher versions. Make that change on our 1.14 cluster and we’re off to the races!
root@kube-master [ ~ ]# vi /etc/kubernetes/apiserver
root@kube-master [ ~ ]# vi /etc/kubernetes/kubelet
root@kube-master [ ~ ]# systemctl restart kube-apiserver.service kubelet.service
root@kube-master [ ~ ]# curl --insecure -sfL https://192.168.116.182/v3/import/zdd55hx249cs9cgjnp9982zd2jbj4f5jslkrtpj97tc5f4xk64w27c.yaml | kubectl apply -f -
clusterrole.rbac.authorization.k8s.io/proxy-clusterrole-kubeapiserver unchanged
clusterrolebinding.rbac.authorization.k8s.io/proxy-role-binding-kubernetes-master unchanged
namespace/cattle-system unchanged
serviceaccount/cattle unchanged
clusterrolebinding.rbac.authorization.k8s.io/cattle-admin-binding unchanged
secret/cattle-credentials-79f50bc unchanged
clusterrole.rbac.authorization.k8s.io/cattle-admin unchanged
deployment.apps/cattle-cluster-agent unchanged
daemonset.apps/cattle-node-agent created
Slow races but we’re off. Give it a good few minutes to make some progress. While we wait for this node to provision, set the “–allow-privileged=true” on the other nodes in /etc/kubernetes/kubelet
We should now see some nodes and the status has changed to “waiting” and we will do just that. By now, if you haven’t realized, Kubernetes is not “fast” on the provisioning. Well at least in these labs with minimal resources 🙂
Checking on the status I ran into this. My first thought was RAM on the master node. I have run into this enough before.
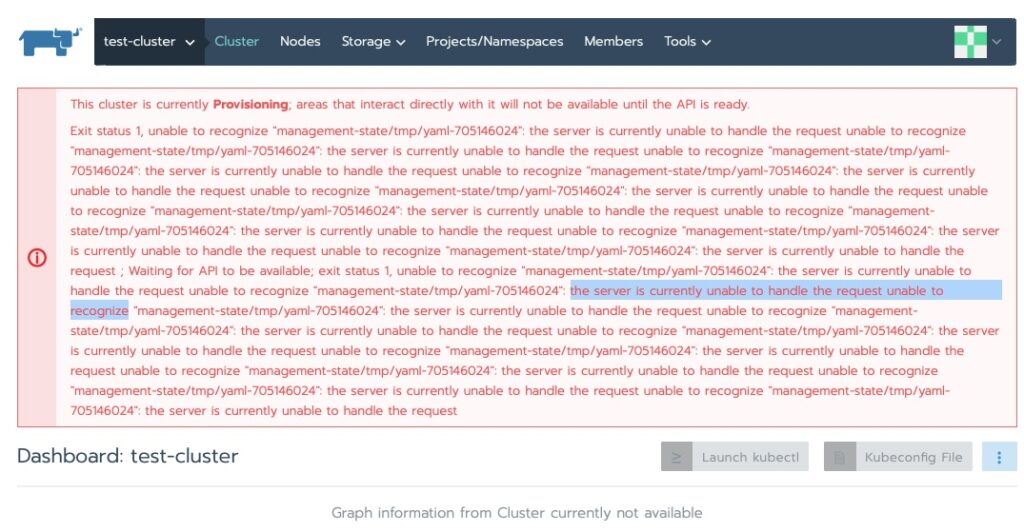
Exit status 1, unable to recognize “management-state/tmp/yaml-705146024”: the server is currently unable to handle the request unable to recognize “management-state/tmp/yaml-705146024”
Sure enough, running top and checking the console confirmed that.
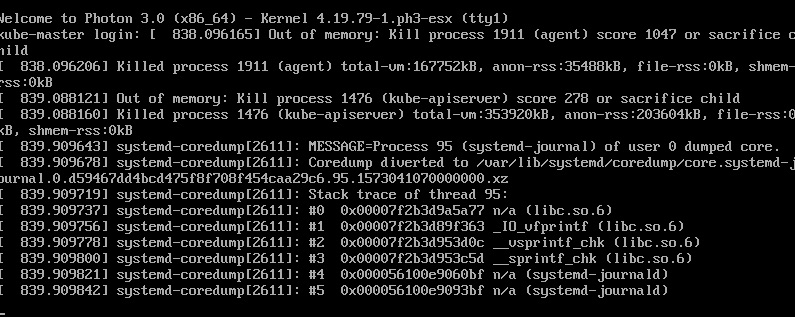
kube-master out of ram. Time to increase a little to cover the overhead of the agent. Went from 768MB to 1024MB and back up and at ’em!
It did sit at the following error for some time.
This cluster is currently Provisioning; areas that interact directly with it will not be available until the API is ready.
Exit status 1, unable to recognize "management-statefile_path_redacted":
Some indications show this eventually resolves itself. Others have indicated adding a node helps kick off the provisioning to continue. In my case a good 10 minutes and we’re all green now!
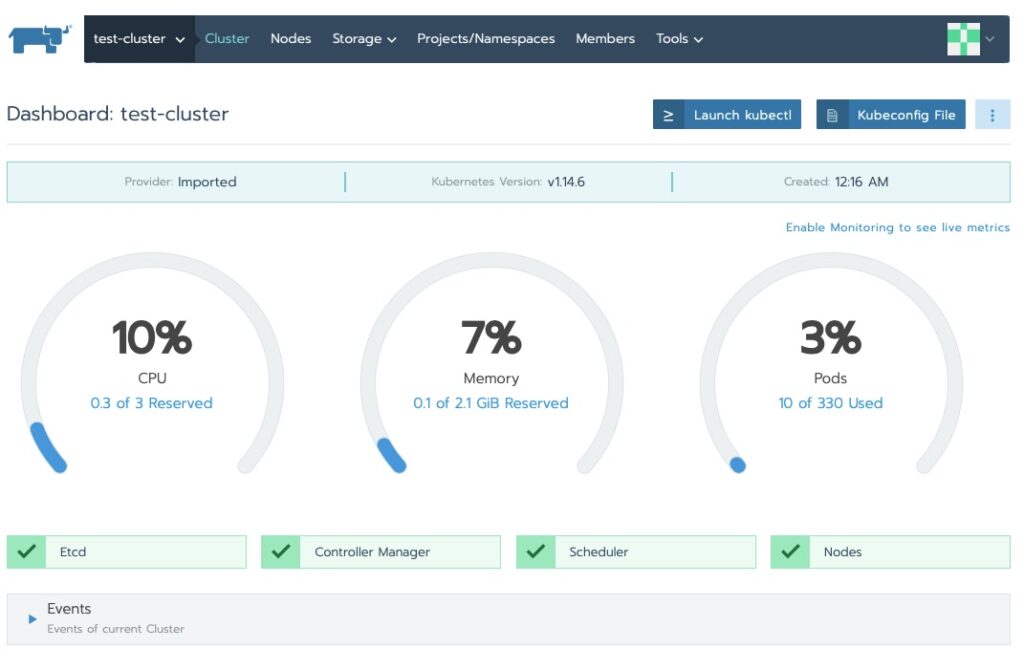
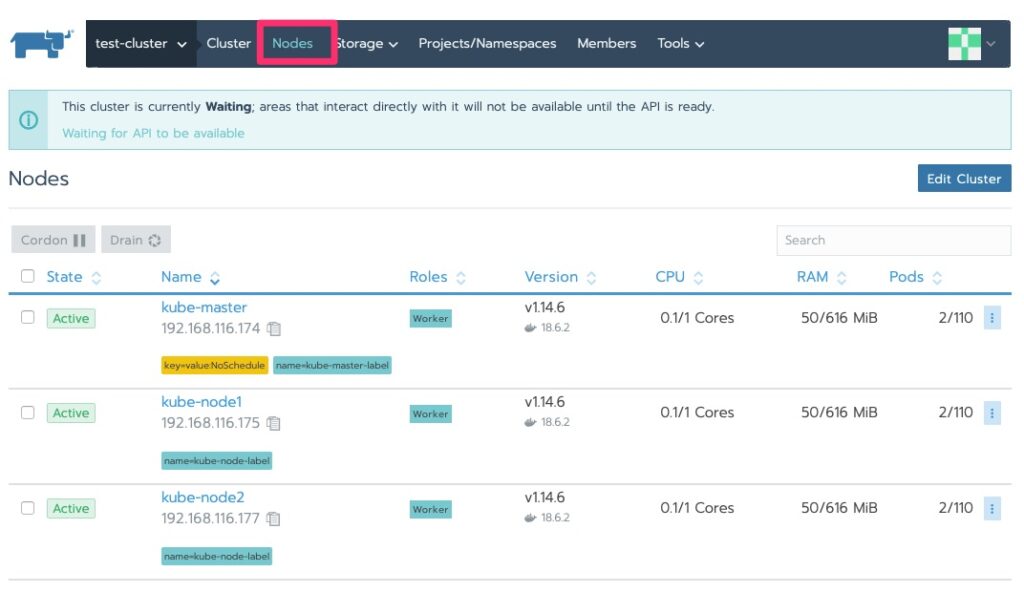
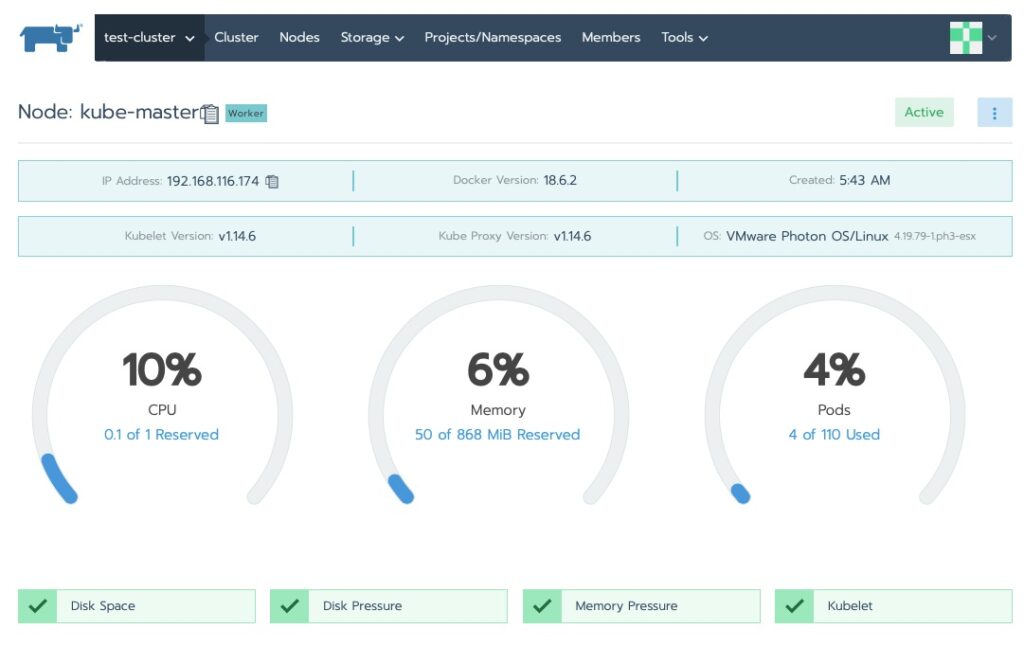
Navigating Around
We saw the cluster area. Let’s drill into the nodes!
Final Words
Rancher extends the functionality of Kubernetes, even on distributions of Kubernetes that are not Rancher. Those extensions are beyond the scope of this article. At the end of this article though you have a single node Rancher management tool that can manage multiple clusters. We did so with RancherOS. Should you want to do this in production it is recommended to have a “management” Kubernetes cluster to make rancher highly available and use a certificate truted by Kubernetes, from the trusted CA cert.
When shutting down this lab, I saw that the kube-node1/2 ran out of memory and I had to increase them to 1GB as well for future boots to help avoid this.
One thought on “Spinning Up Rancher With Kubernetes”
Comments are closed.