Summary
This will be part of a multi-part set of posts on Kubernetes. There are many other technical articles on this but I could not find one that got me end to end to my desired state with Kubernetes. These series of posts will help carry you through my journey at standing it up.
What This Is Not
Currently, this series is not a high level architecture overview. It does not go into detail of the various daemons and their function. I may create a separate article on this at a later date.
Why Kubenertes?
Kubernetes aka k8s, is great at provisioning resources and maintaining them for containerized workloads using Docker. Per the site’s tag line, “Production-Grade Container Orchestration”. It was developed in house by Google and shared with the public. Therefore Google Cloud’s Kubernetes offering is one of the better ones. Docker Swarm is Docker’s response to the need this fills.
Let’s Get Started!
For this series I will be using VMware Photon OS. You are more than welcome to use any distribution you wish although many of the commands may not be the same, particularly the package management commands to install software. I use VMware Fusion but any hypervisor or bare metal systems will suffice. We will be standing up 3 total nodes but you can do with 2 if resources are at a minimum.
We will also be following VMware’s Guide to installing Photon on Kubernetes with a minor tweak.
Installation
Install the OS
If you are looking to install something like Kubernetes it is assumed you are fairly familiar with installing an OS. For this we will need 3 instances of Photon. I am provisioning them with 4GB HDD, 1 core, 768 MB of RAM and removing any excess virtual hardware not needed since the machine I am running this on only has 8GB of RAM and dual core.
The machine names will be kube-master, kube-node1 and kube-node2
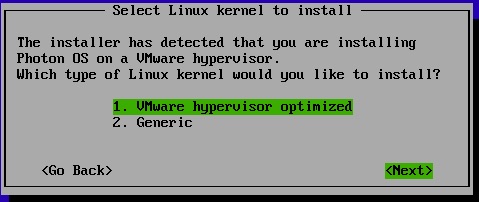
For Photon, you can pretty much accept the defaults with the kernel type being the only one you may need to think about. Photon can go on bare metal or even other hypervisors, but it does have a VMware optimized kernel with vm tools if you choose.
Photon is very proud of their install times, but it is nice not waiting 10-20 mins for an OS install

Login to the OS
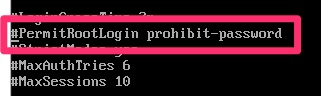
By default, most recent distributions of Linux, including Photon are locked down. You can login to root at the console but not remotely unless you use ssh keys authentication. For production workloads, I would highly recommend not using the root login and instead using another login and sudo but for the purpose of this lab we will just add my local key to root and be on our way.
I personally use ssh-copy-id which is a best practice
dwcjr@Davids-MacBook-Pro ~ % ssh-copy-id -i ~/.ssh/id_rsa.pub [email protected]
/usr/bin/ssh-copy-id: INFO: Source of key(s) to be installed: "/Users/dwcjr/.ssh/id_rsa.pub"
/usr/bin/ssh-copy-id: INFO: attempting to log in with the new key(s), to filter out any that are already installed
/usr/bin/ssh-copy-id: INFO: 1 key(s) remain to be installed -- if you are prompted now it is to install the new keys
Password:

Number of key(s) added:        1

Now try logging into the machine, with:   "ssh '[email protected]'"
and check to make sure that only the key(s) you wanted were added.
Installing Kubernetes on Master and Nodes
Photon uses tdfn so its quite simple. This is also where we deviate slightly from the instructions. We will be enabling all of the node services on the master so that it can run docker images. We do not want to run actual app images but there is a particular system image we will want to run that I will get into later
On Master and Nodes run the following
tdnf install kubernetes iptables docker

# Good idea to run through updates afterwards as well
tdnf update
Preparing Hosts
Next its a good idea to have a hosts file entry since we will not be using DNS for the scope of these tutorials. These are my IPs in this case.
#Kubernetes
192.168.116.174 kube-master
192.168.116.175 kube-node1
192.168.116.177 kube-node2
We then need to set /etc/kubernetes/config on all hosts to specifically update
KUBE_MASTER="--master=http://kube-master:8080"On the master, we need to edit “/etc/systemd/scripts/ip4save” to add the following lines
-A INPUT -p tcp -m tcp --dport 8080 -j ACCEPT
-A INPUT -p tcp -m tcp --dport 6443 -j ACCEPT
-A INPUT -p tcp -m tcp --dport 10250 -j ACCEPT

#Then restart iptables.  On photon it doesn't appear to save IP tables between reboots so this is how it persists.

systemctl restart iptables
On the nodes you will need to add a similar line and restart iptables but it will be
-A INPUT -p tcp -m tcp --dport 10250 -j ACCEPTEnding Note
At this point you do not quite have anything near a functional Kubernetes cluster but this was the first part in a few. I decided to break this article at this point as some people may be able to easily get here without these instructions.
For those that made it here, my next article will link here for the initial Kubernetes Configuration
Next – Initializing Kubernetes