Summary
Some time ago when I was just learning Kubernetes, I wrote a series of articles that started with Intro To Kubernetes. This was on an earlier version (1.14) where many of these manual steps worked. Spinning up a new instance on 1.17, these steps really did not hold up and the cluster was not fully functional. I decided to give kubeadm init a try and it made my life infinitely easier.
Google does have a great install guide here that attempts to work for various operating systems but this article is specific to PhotonOS. Here is Google’s guide – https://kubernetes.io/docs/setup/production-environment/tools/kubeadm/install-kubeadm/
Provisioning
Many of the provisioning steps in Intro To Kubernetes are similar, if not the same. Instead of manually starting services on hardware though, kubeadm spins up a bit of it as pods which saves time.
For this lab we need a VM we will name kcp1 (Kubernetes Control Plane 1). Since most of the master/slave terminology is going by the wayside to be more sensitive to what it represented in the past, what was previously referred to as master is now a control plane. The nodes were almost always referred to as worker nodes so it makes sense.
kcp1 needs 2GB of RAM and 2 cores/vCPUs. kwn1 can get away with 1GB RAM and 1 core. For storage, since this is a test lab, 8GB is more than sufficient. For the OS, I still am using VMware Photon OS version 3. I choose the ISO and its a quick install – https://vmware.github.io/photon/. PhotonOS was chosen because it is highly optimized for being a VM and minimized to be a very light weight OS to run docker containers. These traits make it perfect for running Kubernetes.
Installing Packages
For this we will need the kubernetes and kubernetes-kubeadm packages installed. It also requires iptables and docker but that comes installed even on the minimal install.
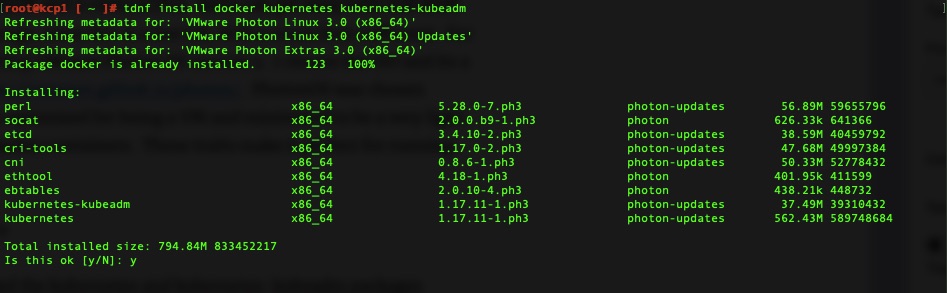
Install and we’re off to the races! We’ll need this on kcp1 and kwn1.
Firewall Rules
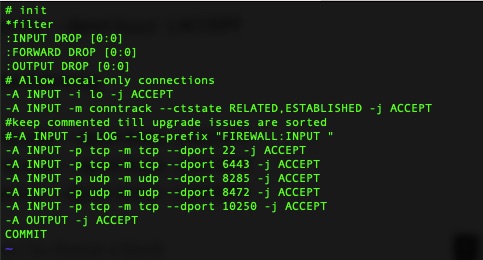
In order for key parts of it to work, we’ll need to open a few firewall rules. This is done by editing /etc/systemd/scripts/ip4save and adding a few lines and then restarting iptables.
kcp1 needs the following line. This is for the API calls which must of the cluster makes to the control plane nodes.
-A INPUT -p tcp -m tcp --dport 6443 -j ACCEPT
kcp1 & kwn1 need the following. The first two are for Flannel’s Pod Network overlay. The last one is for the Kubelet service which runs on all nodes. Google provides a listing here of all ports but with Photon this is all we need – https://kubernetes.io/docs/setup/production-environment/tools/kubeadm/install-kubeadm/
-A INPUT -p udp -m udp --dport 8285 -j ACCEPT
-A INPUT -p udp -m udp --dport 8472 -j ACCEPT
-A INPUT -p tcp -m tcp --dport 10250 -j ACCEPT
It should look something like this afterwards
Then a simple restart to make the rules take effect.
systemctl restart iptables
kubeadm init Magic!
The magic here is kubeadm init. We need to use something like flannel for the pod network overlay. We don’t get into that in this article but if we don’t pass the right flags for that into kubeadm init, it won’t work. Per flannel
This needs to first be run on the control plane node.
kubeadm init --pod-network-cidr=10.244.0.0/16
On our first run we get some errors about docker not running. We need to enable and start it!
systemctl enable docker
systemctl start docker
Giving kubeadm init another run and its off! It may appear to hang for a minute and then spew out lines of actions its performing.
It will then tell you some next steps. It may seem like a lot.
Your Kubernetes control-plane has initialized successfully!

To start using your cluster, you need to run the following as a regular user:

  mkdir -p $HOME/.kube
  sudo cp -i /etc/kubernetes/admin.conf $HOME/.kube/config
  sudo chown $(id -u):$(id -g) $HOME/.kube/config

You should now deploy a pod network to the cluster.
Run "kubectl apply -f [podnetwork].yaml" with one of the options listed at:
  https://kubernetes.io/docs/concepts/cluster-administration/addons/

Then you can join any number of worker nodes by running the following on each as root:

kubeadm join 192.168.83.15:6443 --token xspmbf.kko3d24t74rpaeyo \
    --discovery-token-ca-cert-hash sha256:483e0e6ef33580b2c8f1e61210e3f50d8163dc6312b5d89940e38236cd2f04b6
For the most part these are copy and paste. The first three lines literally are so we’ll do that so we can use kubectl.
Minimal Configuration
One of the big remaining steps is to deploy a pod network, usually an overlay. As we mentioned earlier, I prefer flannel and it usually just works.
This just needs to be done via kubectl once. It instantiates a DaemonSet which essentially pushes this out to every node that attaches to the cluster.
kubectl apply -f https://raw.githubusercontent.com/coreos/flannel/master/Documentation/kube-flannel.yml
Over on kwn1 we can run the join command it listed. It will take a little bit of time and then be done. Once done it recommends doing a “kubectl get nodes”.
root@kcp1 [ ~ ]# kubectl get nodes
NAME STATUS ROLES AGE VERSION
kcp1 Ready master 6m35s v1.17.11
kwn1 Ready 32s v1.17.11
Validation
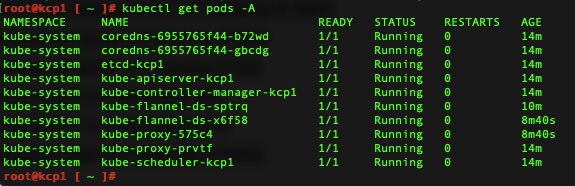
You can also check all the running pods to see the health. All is well and pretty turn key.
Final Thoughts
We have a working cluster that was fairly turn key and much easier than my earlier attempts. If you are fairly new to Kubernetes I would recommend deploying the dashboard which I outline Kubernetes Dashboard. This is mostly correct except that the version 2.0 is no longer beta and has a final release that works pretty well now.