I started my IT career in the very late 1990's as a systems administrator for a benefits company. I have always enjoyed learning new technologies and helping people fix problems which has lead me through a few different positions over the past 20+ years.
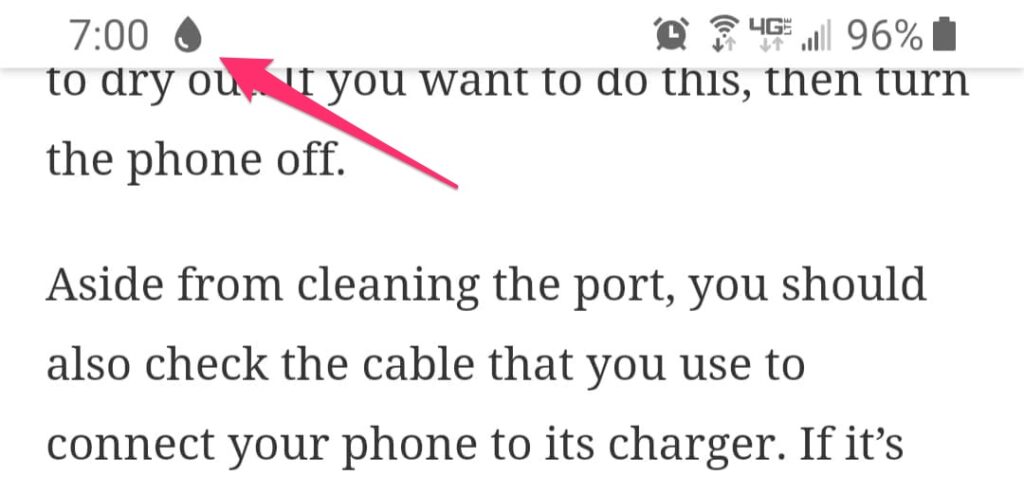
I was watching cartoons with my 4 year old when I looked down at my phone and all of a sudden saw a water droplet icon. I dragged it town to read a message that indicated moisture was detected in my charging port. This couldn’t be, because I keep my phone nowhere near water. I had no accidents with it that could cause this, even though it is IP68 certified.
What is moisture detection?
S9 – Moisture Droplet
IFIXIT has a great article on this. When reading up on this, that was the first link I clicked on. If you actually had your phone near water (which is perfectly acceptable on IP68), it has some great steps on rectifying it. In short, the phone has a sensor that can detect water/moisture and will disable the USB port while this detection is active. It helps to avoid a short or damage to the connectors. Apparently it detects this by monitoring resistance between pins.
Other issues like lint or other material could cause similar issues. The key to troubleshooting this is realizing it could be more than just water or moisture.
Other Things To Try
When I ran into this, I ran through the reboot and the hard reset without luck. I blew out with compressed air to no avail. When I did clean out my USB-C port with a toothpick I did find some debris but clearing this did not resolve the issue immediately.
What finally did it for me, which I was slightly surprised it worked was to power off the phone, plug it in and let it fully charge and then power on. I have a feeling the data for the port was cached and it just needed to clear after clearing debris out.
Here are a list of things to try, in this order.
Power off phone
Try to clean out with tissue and tooth picks
Reboot phone
Hard reset phone (power button and lower volume)
Blow out with compressed air but make sure none of the liquid comes out.
Power off and charge to 100% and then power back on
Go to Application Settings / USBSettings and clear cache and data and reboot
Factory Reset – Option of last resort because nobody likes doing this
Workarounds
If you are absolutely sure you do not have moisture or debris in there but need to charge, here are some options
Wireless charge ( this still works )
Power off the phone and try to charge powered off (if there is moisture in there this will potentially damage phone)
Sources
Here are a list of URLs I came across in my search. They may also help you further
I hope you find this article before you went ahead and factory reset or set in for repair. With that said, even if you cannot get this error to go away, wireless charging still works. You will just be mostly unable to charge via wired. On some phones you can still charge when the phone is powered off.
In this article we tackle VM orchestration. We I touched on in other articles, the desire is to dynamically spin up VMs as necessary. Some of the constructions in Google Cloud that are used are instance templates, instance groups, load balancers, health checks, salt (both state and reactor).
First Things First
In order to dynamically spin up VMs we need an instance group. For an instance group to work dynamically we need an instance template.
Instance Template
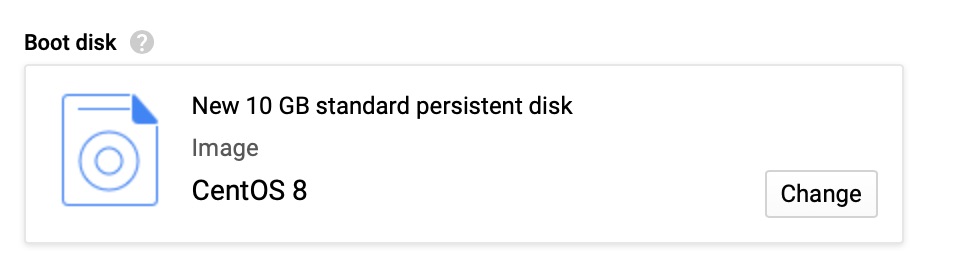
For this instance template, I will name it web-test. The name for this is important but we’ll touch on that later on.
For this demonstration we used CentOS 8. It can be any OS but our Salt state is tuned for CentOS.
GCE – Automation
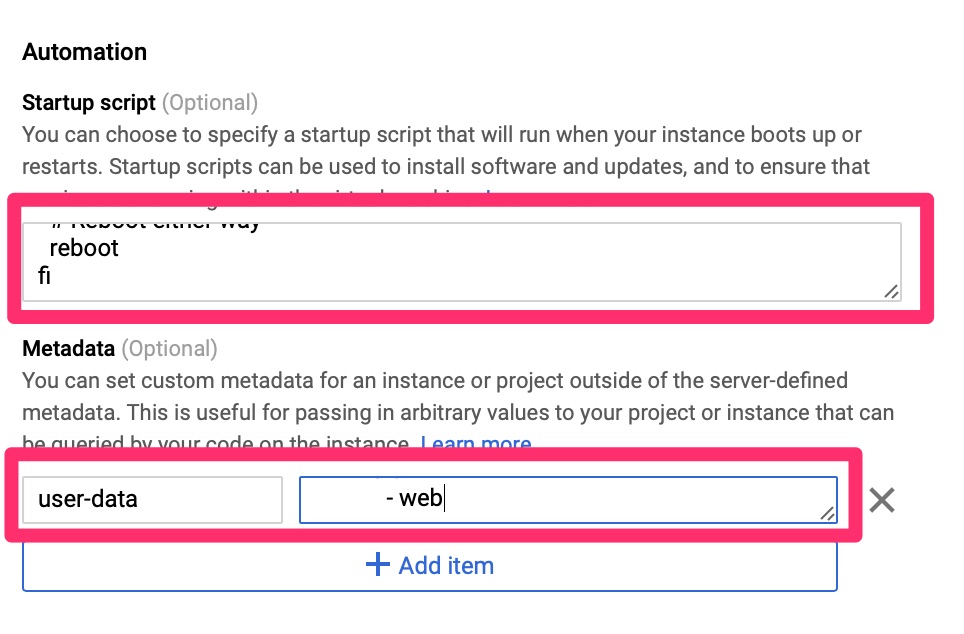
As we touched on in the Cloud-init on Google Compute Engine article, we need to automate the provisioning and configuration on this. Since Google’s CentOS image does not come with this we use the startup script to load it. Once loaded and booted, cloud-init configures the local machine as a salt-minion and points it to the master.
Startup Script below
#!/bin/bash

if ! type cloud-init > /dev/null 2>&1 ; then
  # Log startup of script
  echo "Ran - `date`" >> /root/startup
  sleep 30
  yum install -y cloud-init

  if [ $? == 0 ]; then
    echo "Ran - yum success - `date`" >> /root/startup
    systemctl enable cloud-init
    # Sometimes GCE metadata URI is inaccessible after the boot so start this up and give it a minute
    systemctl start cloud-init
    sleep 10
  else
    echo "Ran - yum fail - `date`" >> /root/startup
  fi

  # Reboot either way
  reboot
fi
The first thing is to accept new minions as this is usually manual. We then need it to apply a state. Please keep in mind there are security implications of auto accepting. These scripts do not take that into consideration as they are just a baseline to get this working.
In order to have these automatically work, we need to use Salt reactor which listens to events and acts on them. Our reactor file looks like this. We could add some validation, particularly on the accept such as validating the minion name has web in it to push the wordpress state.
{# test server is sending new key -- accept this key #}
{% if 'act' in data and data['act'] == 'pend' %}
minion_add:
  wheel.key.accept:
  - match: {{ data['id'] }}
{% endif %}
{% if data['act'] == 'accept' %}
initial_load:
  local.state.sls:
    - tgt: {{ data['id'] }}
    - arg:
      - wordpress
{% endif %}
This is fairly simple. When a minion authenticates for the first time, acknowledge it and then apply the wordpress state we worked on in our articicle on Salt State. Since we may have multiple and rotating servers that spin up and down we will use Google’s Load Balancer to point Cloudflare to.
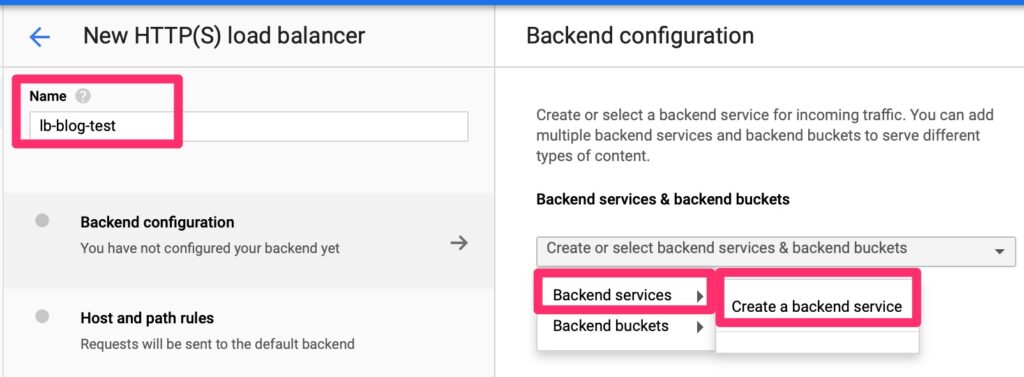
Cloudflare does offer load balancing but for the integration we want, its easier to use Google. The load balancer does require an instance group so we need to set that up first.
Instance Groups
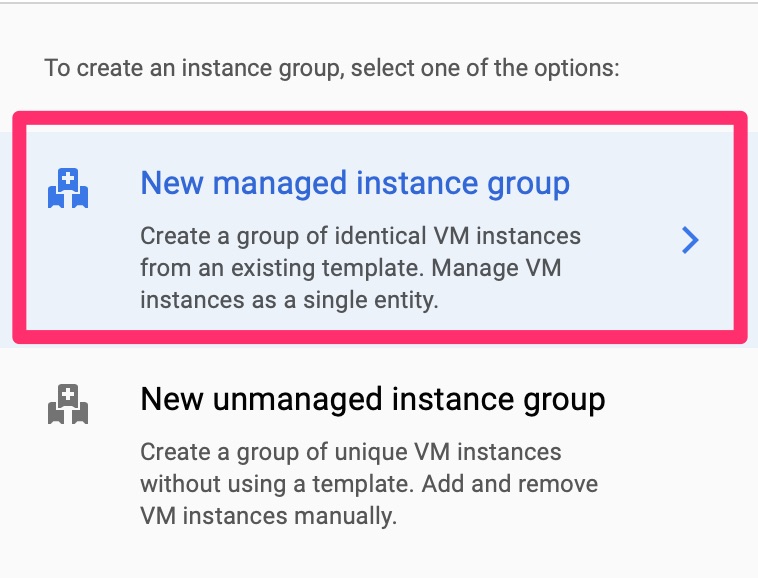
Instance groups are one of the constructions you can point a load balancer towards. Google has two types of instance groups. Managed, which it will auto scale based on health checks. There is also managed which you have to manually add VMs to. We will choose managed
GCE – New Managed Instance
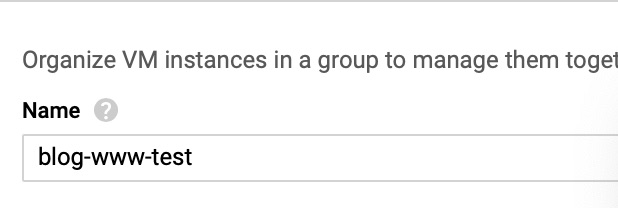
This name is not too important so it can be any one you like.
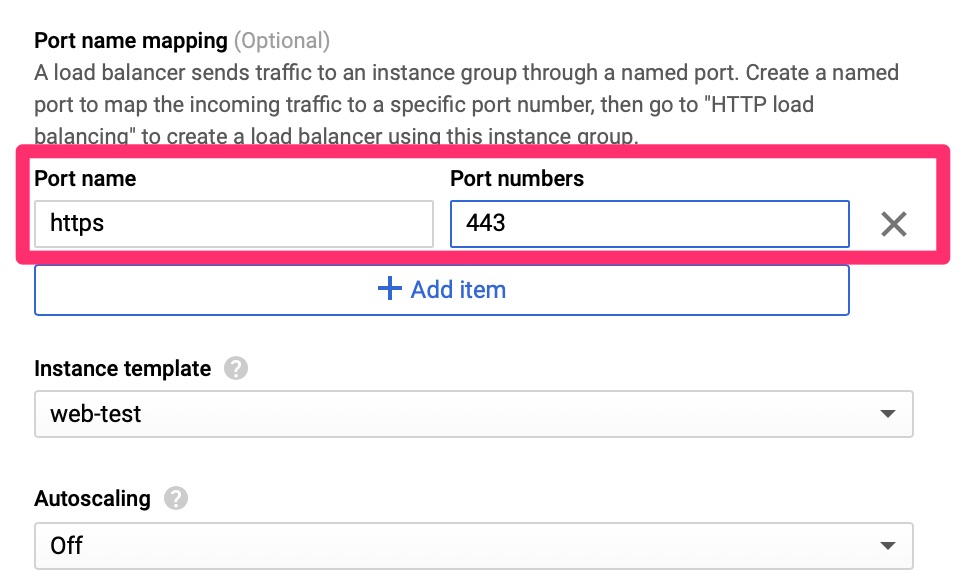
GCE – Instance Group
Here we set the port name and number, an instance template. For this lab we disabled autoscaling but in the real world this is why you want to set all of this up.
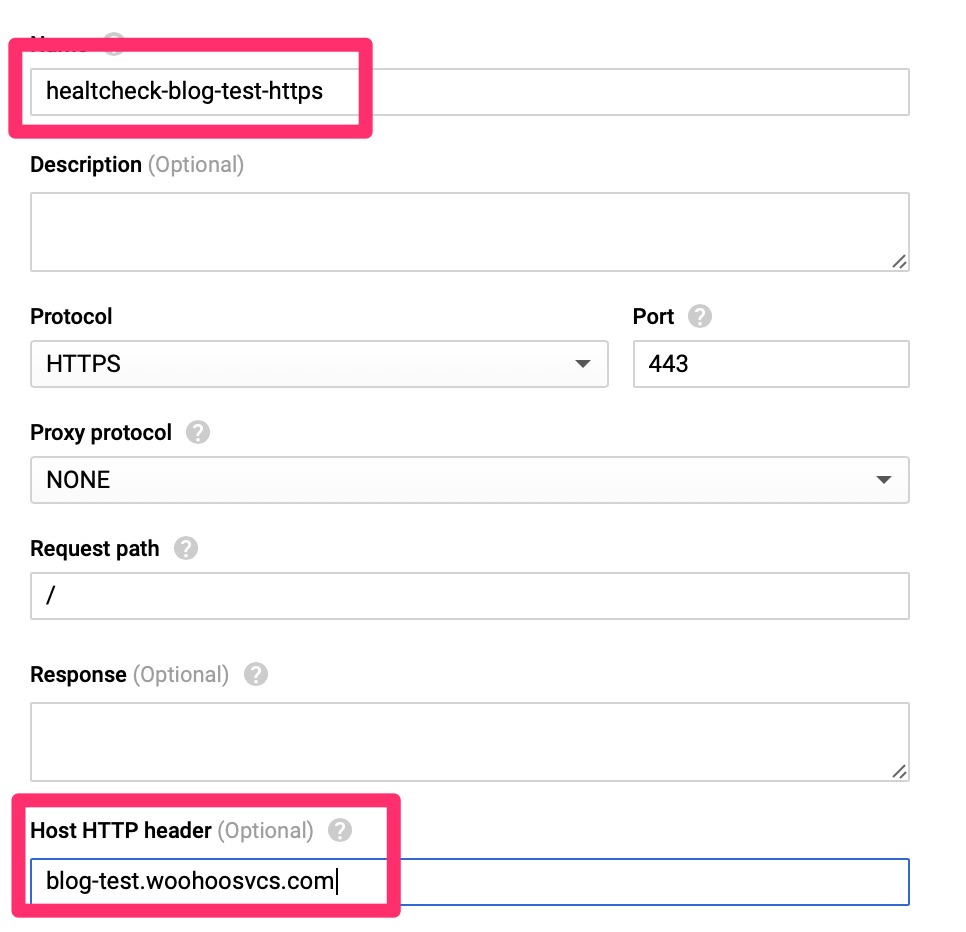
Instance Group – Health Check
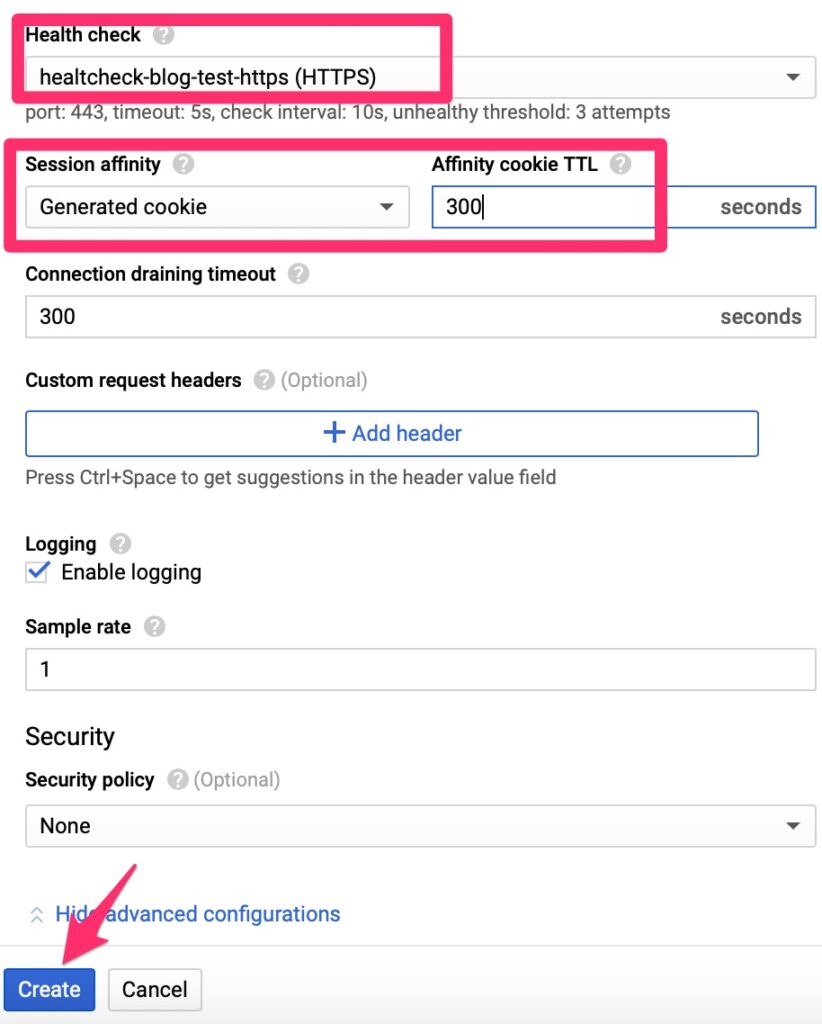
The HealthCheck expects to receive an HTTP 200 message for all clear. It is much better than a TCP check as it can validate the web server is actually responding with expected content. Since WordPress sends a 301 to redirect, we do have to set the Host HTTP Header here, otherwise the check will fail. Other load balancers only fail on 400-599 but Google does expect only a HTTP 200 per their document – https://cloud.google.com/load-balancing/docs/health-check-concepts
Instance Group Provisioning
And here you can see it is provisioning! While it does that, let’s move over to the load balancer.
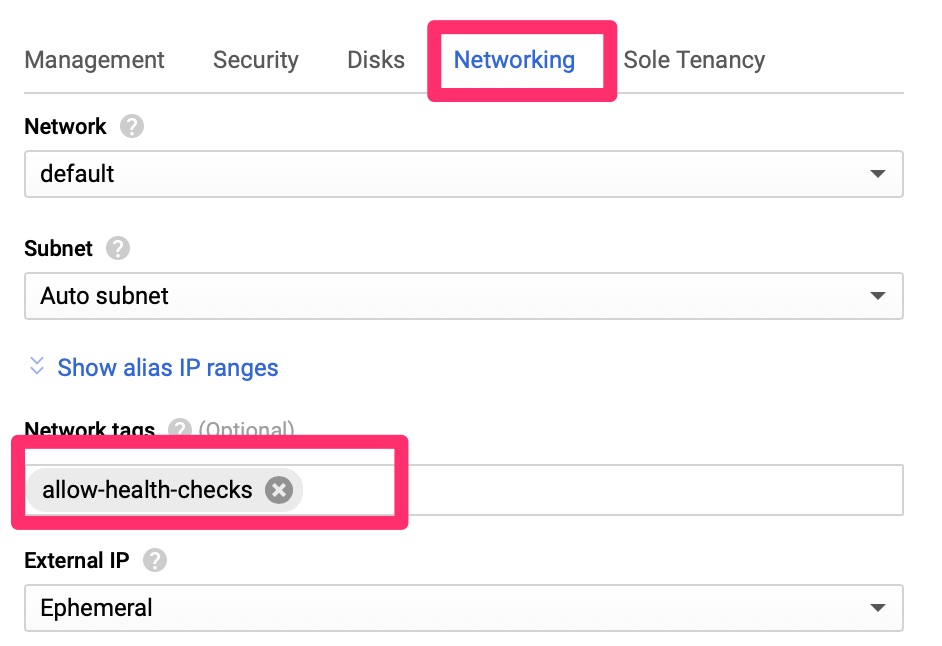
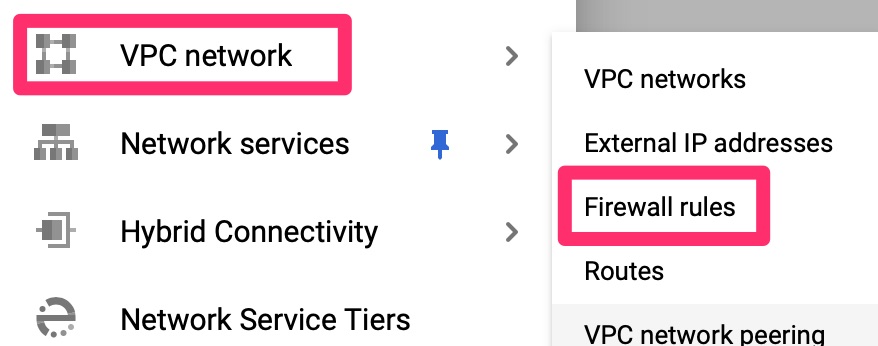
Firewall Rules
The health checks for the load balancer come from a set range of Google IPs that we need to allow. We can allow these subnets via network tags. Per Google’s Healthcheck document, the HTTP checks come from two ranges.
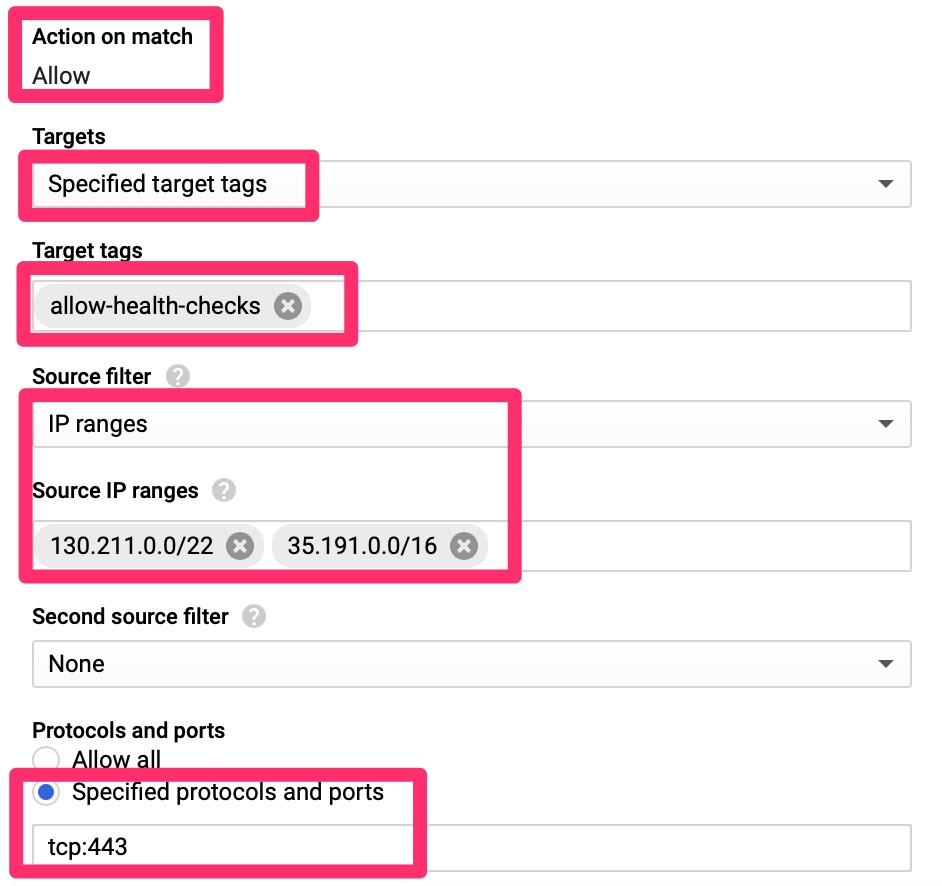
VPC – Allow Health Checks!
Here we only allow the health checks from the Google identified IP ranges to machines that are tagged with “allow-health-checks” to port 443.
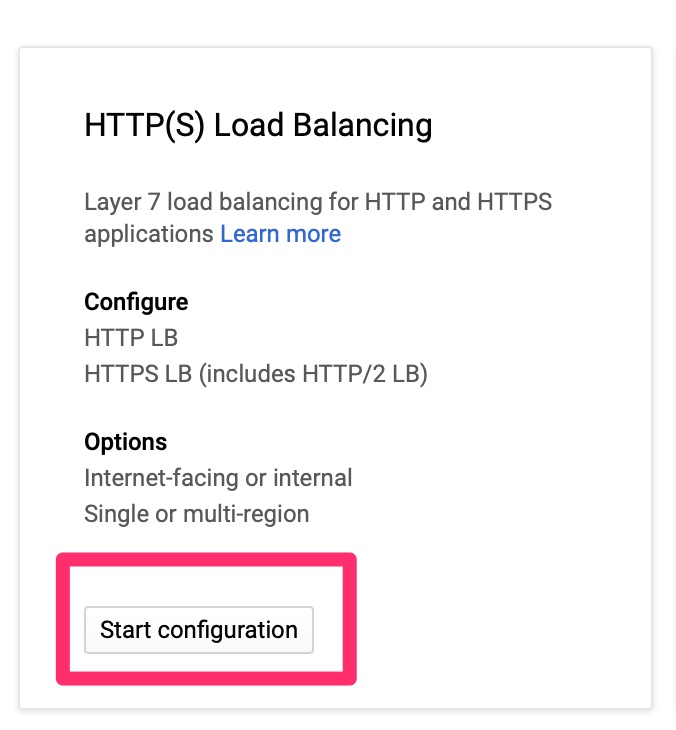
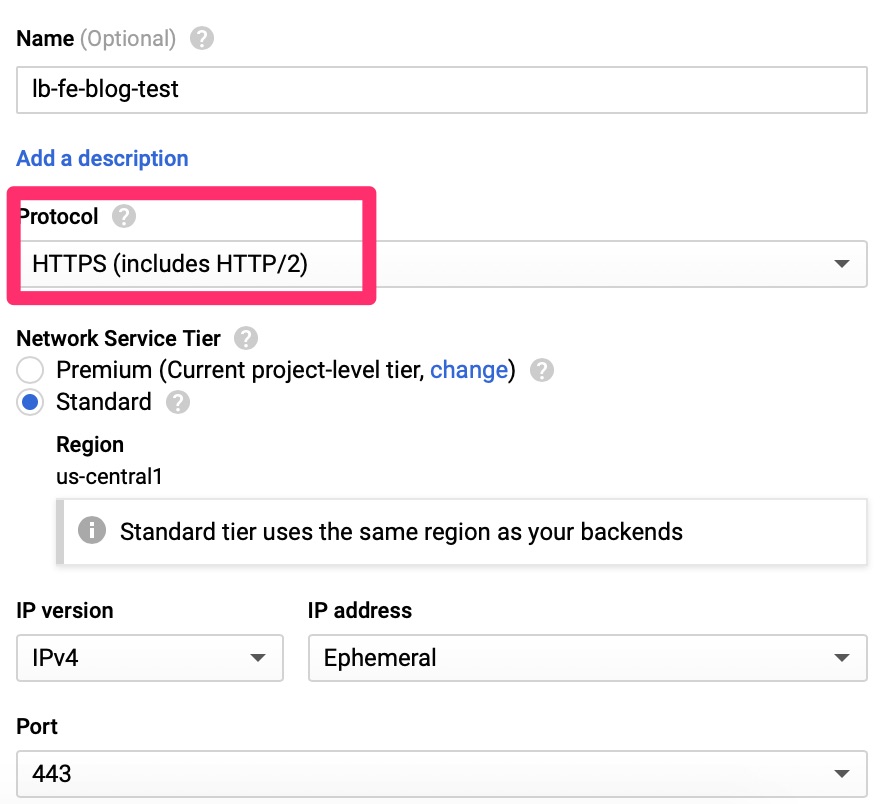
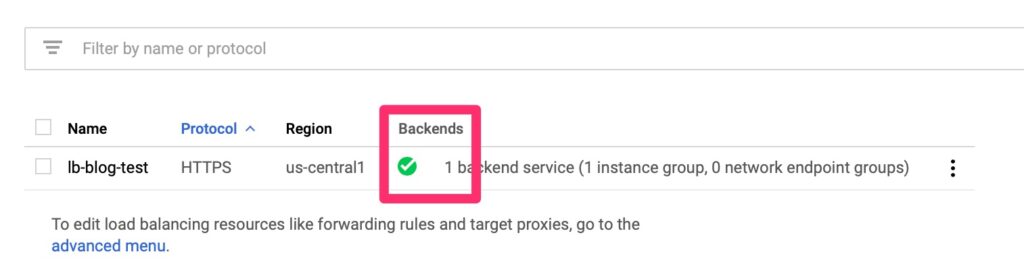
Google Load Balancer
Initial
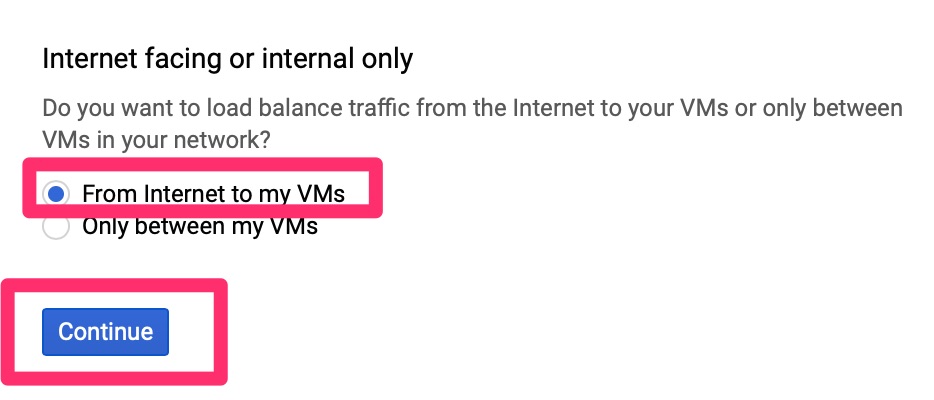
This is a crash course into load balancers if you have never set them up before. It is expected you have some understanding of front end, back end and health checks. In the VPC section we need to allow these
Google Load Balancer – Start configurationGoogle Load Balancer – Internet
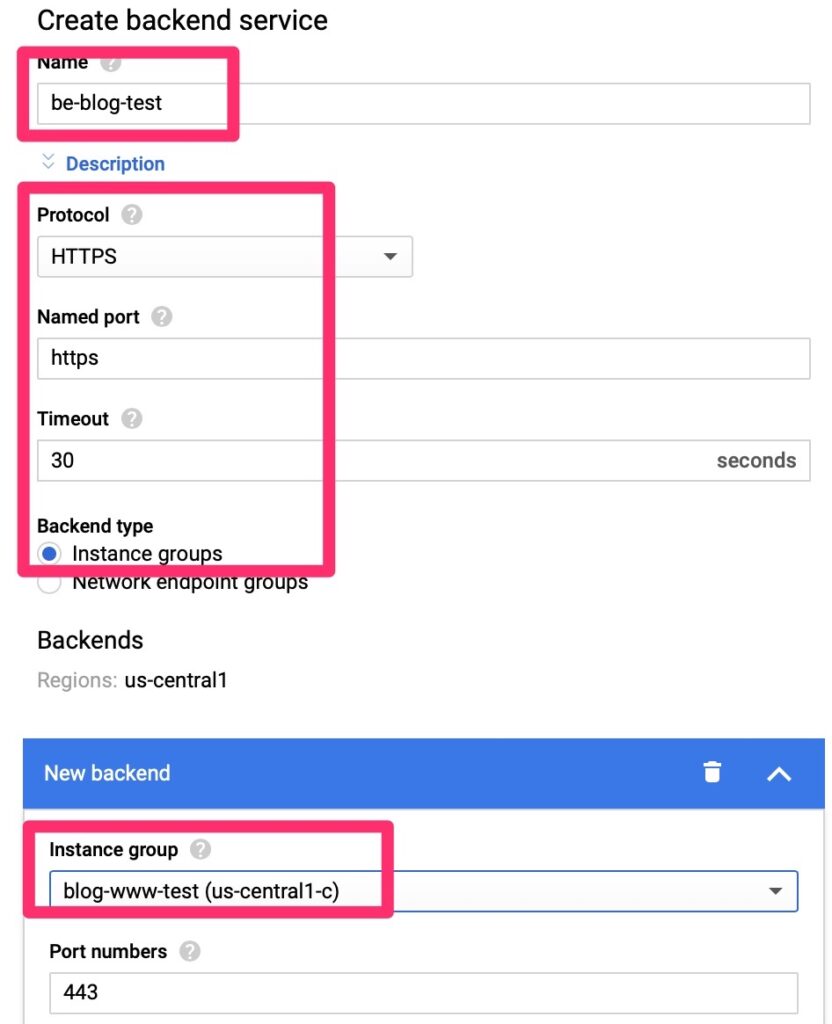
Back End Configuration
Google’s load balancers can be used for internal only or external to internal. We want to load balance external connections.
Google Load Balancer – Back End Create
We will need to create a back end endpoint.
Luckily this is simple. We point it at a few objects we already created and set session affinity so that traffic is persistent to a single web server. We do not want it hopping between servers as it may confuse the web services.
Front End Configuration
Health Check Validation
Give the load balancer provisioning a few minutes to spin up. It should then show up healthy if all is well. This never comes up the first time. Not even in a lab!
Google Load Balancer – Healthy!
Troubleshooting
The important part is to walk through the process from beginning to end when something does not work. Here’s a quick run through.
On provisioning, is the instance group provisioning the VM?
What is the status of cloud-init?
Is salt-minion installing on the VM and starting?
Does the salt-master see the minion?
Reapply the state and check for errors
Does the load balancer see health?
Final Words
If it does come up healthy, the last step is to point your DNS at the load balancer public IP and be on your way!
Since Salt is such a complex beast, I have provided most of the framework and configs here – Some of the more sensitive files are truncated but left so that you know they exist. The standard disclaimer applies in that I cannot guarantee the outcome of these files on your system or that they are best practices from a security standpoint.
Yesterday I was playing a bit with Google Load Balancers and they tend to work best when you connect them to an automated instance group. I may touch on that in another article but in short that requires some level of automation. In an instance group, it will attempt to spin up images automatically. Based on health checks, it will introduce them to the load balanced cluster.
The Problem?
How do we automate provisioning? I have been touching on SaltStack in a few articles . Salt is great for configuration management but in an automated fashion, how do you get Salt on there? This was my goal. To get Salt Installed on a newly provisioned VM.
Method
Cloud-init is a very widely known method of provisioning a machine. From my brief understanding it started with Ubuntu and then took off. In Spinning Up Rancher With Kubernetes, I was briefly exposed to it. It makes sense and is widely supported. The concept it simple. Have a one time provisioning of the server.
Google Compute Engine
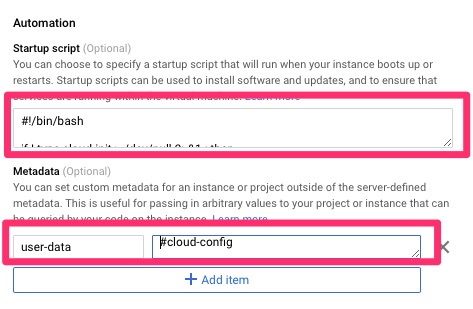
Google Compute Engine or GCE does support pushing cloud-init configuration (cloud-config) using metadata. You can set the “user-data” field and if cloud-init is installed it will be able to find this.
The problem is the only image that seems to support this out of the box is Ubuntu and my current preferred platform is CentOS although this is starting to change.
Startup Scripts
So if we don’t have cloud-init, what can we do? Google does have the functionality for startup and shutdown scripts via “startup-script” and “shutdown-script” meta fields. I do not want a script that runs every time. I also do not want to re-invent the wheel writing a failsafe script that will push salt-minion out and reconfigure it. For this reason I came up with a one time startup script.
The Solution
Startup Script
This is the startup script I came up with.
#!/bin/bash

if ! type cloud-init > /dev/null 2>&1 ; then
  echo "Ran - `date`" >> /root/startup
  sleep 30
  yum install -y cloud-init

  if [ $? == 0 ]; then
    echo "Ran - Success - `date`" >> /root/startup
    systemctl enable cloud-init
    #systemctl start cloud-init
  else
    echo "Ran - Fail - `date`" >> /root/startup
  fi

  # Reboot either way
  reboot
fi
This script checks to see if cloud-init exists. If it does, move along and don’t waste cpu. If it does not, we wait 30 seconds and install it. Upon success, we enable and either way we reboot.
Workaround
I played with this for a good part of a day, trying to get it working. Without the wait and other logging logic in the script, the following would happen.
2019-11-14T18:04:37Z DEBUG DNF version: 4.0.9
2019-11-14T18:04:37Z DDEBUG Command: dnf install -y cloud-init
2019-11-14T18:04:37Z DDEBUG Installroot: /
2019-11-14T18:04:37Z DDEBUG Releasever: 8
2019-11-14T18:04:37Z DEBUG cachedir: /var/cache/dnf
2019-11-14T18:04:37Z DDEBUG Base command: install
2019-11-14T18:04:37Z DDEBUG Extra commands: ['install', '-y', 'cloud-init']
2019-11-14T18:04:37Z DEBUG repo: downloading from remote: AppStream
2019-11-14T18:05:05Z DEBUG error: Curl error (7): Couldn't connect to server for http://mirrorlist.centos.org/?release=8&arch=x86_64&repo=AppStream&infra=stock [Failed to connect to mirrorlist.centos.org port 80: Connection timed out] (http://mirrorlist.centos.org/?release=8&arch=x86_64&repo=AppStream&infra=stock).
2019-11-14T18:05:05Z DEBUG Cannot download 'http://mirrorlist.centos.org/?release=8&arch=x86_64&repo=AppStream&infra=stock': Cannot prepare internal mirrorlist: Curl error (7): Couldn't connect to server for http://mirrorlist.centos.org/?release=8&arch=x86_64&repo=AppStream&infra=stock [Failed to connect to mirrorlist.centos.org port 80: Connection timed out].
2019-11-14T18:05:05Z DDEBUG Cleaning up.
2019-11-14T18:05:05Z SUBDEBUG
Traceback (most recent call last):
  File "/usr/lib/python3.6/site-packages/dnf/repo.py", line 566, in load
    ret = self._repo.load()
  File "/usr/lib64/python3.6/site-packages/libdnf/repo.py", line 503, in load
    return _repo.Repo_load(self)
RuntimeError: Failed to synchronize cache for repo 'AppStream'

During handling of the above exception, another exception occurred:

Traceback (most recent call last):
  File "/usr/lib/python3.6/site-packages/dnf/cli/main.py", line 64, in main
    return _main(base, args, cli_class, option_parser_class)
  File "/usr/lib/python3.6/site-packages/dnf/cli/main.py", line 99, in _main
    return cli_run(cli, base)
  File "/usr/lib/python3.6/site-packages/dnf/cli/main.py", line 115, in cli_run
    cli.run()
  File "/usr/lib/python3.6/site-packages/dnf/cli/cli.py", line 1124, in run
    self._process_demands()
  File "/usr/lib/python3.6/site-packages/dnf/cli/cli.py", line 828, in _process_demands
    load_available_repos=self.demands.available_repos)
  File "/usr/lib/python3.6/site-packages/dnf/base.py", line 400, in fill_sack
    self._add_repo_to_sack(r)
  File "/usr/lib/python3.6/site-packages/dnf/base.py", line 135, in _add_repo_to_sack
    repo.load()
  File "/usr/lib/python3.6/site-packages/dnf/repo.py", line 568, in load
    raise dnf.exceptions.RepoError(str(e))
dnf.exceptions.RepoError: Failed to synchronize cache for repo 'AppStream'
2019-11-14T18:05:05Z CRITICAL Error: Failed to synchronize cache for repo 'AppStream'
Or you can use the console and paste it in plain text.
GCE – Automation – Startup and user-data
Don’t feel bad if you can’t find these settings. They are buried here.
Finding Automation Settings
Final Words
In this article we walked through automating the provisioning. You can use cloud-init for all sorts of things such as ensuring its completely up to date before handing off as well as adding users and keys. For our need, we just wanted to get Salt on there so it could plug into config management.
Today I got to play with the Salt win_wua module. Anyone that manages Windows servers, they know all about the second Tuesday of the month. the win_wua module can help greatly. I have recently been toying with Salt as mentioned in some of my other articles like Introduction to SaltStack.
Update Methodology
In the environments I manage, we typically implement Microsoft Windows Server Update Services (WSUS) but in a manual fashion so that we can control the installation of the patches. WSUS is more of a gatekeeper against bad patches. We approve updates immediate to only test servers. This lets us burn them in for a few weeks. Then when we’re comfortable, we push them to production. This greatly helped mitigate this conflict of Windows Updates – https://community.sophos.com/kb/en-us/133945
The process to actually install though is manual since we need to trigger the install. It involved manually logging into various servers to push the install button and then reboot. In my past complaints of this I was unable to find something to easily trigger the installation of windows updates.
Win_wua to the rescue
I originally thought I would need a salt state to perform this but the command line module is so easy, I did not bother.
salt TESTSERVER win_wua.list
TESTSERVER:
    ----------
    9bc4dbf1-3cdf-4708-a004-2d6e60de2e3a:
        ----------
        Categories:
            - Security Updates
            - Windows Server 2012 R2
        Description:
            Install this update to resolve issues in Windows. For a complete listing of the issues that are included in this update, see the associated Microsoft Knowledge Base article for more information. After you install this item, you may have to restart your computer.
        Downloaded:
.....
It then spews a ton of data related to the pending updates to be installed. Luckily it has an option for a summary. Surprisingly we use the same “list” to install by setting a flag. The install function expects a list of updates you wish to install but we just want to install all pending ones.
Before we install, check out the summary output
salt TESTSERVER win_wua.list summary=True
TESTSERVER:
    ----------
    Available:
        0
    Categories:
        ----------
        Security Updates:
            4
        Windows Server 2012 R2:
            4
    Downloaded:
        4
    Installed:
        0
    Severity:
        ----------
        Critical:
            3
        Moderate:
            1
    Total:
        4
Ok so let’s install and only see the summary
salt -t 60 LV-PSCADS01 win_wua.list summary=True install=True
LV-PSCADS01:
    Passed invalid arguments to win_wua.list: 'int' object is not callable

        .. versionadded:: 2017.7.0

        Returns a detailed list of available updates or a summary. If download or
        install is True the same list will be downloaded and/or installed.
Well that’s no fun! Not quite what we expected. It appears its a known bug on 2017.7.1 and fixed. Update your salt minion or perform the manual fix it listed and run again!
salt -t 60 TESTSERVER win_wua.list summary=True install=True
TESTSERVER:
    ----------
    Download:
        ----------
        Success:
            True
        Updates:
            Nothing to download
    Install:
        ----------
        Message:
            Installation Succeeded
        NeedsReboot:
            True
        Success:
            True
        Updates:
            ----------
            9bc4dbf1-3cdf-4708-a004-2d6e60de2e3a:
                ----------
                AlreadyInstalled:
                    False
                RebootBehavior:
                    Never Reboot
                Result:
                    Installation Succeeded
                Title:
                    2019-11 Servicing Stack Update for Windows Server 2012 R2 for x64-based Systems (KB4524445)
            9d665242-c74c-4905-a6f4-24f2b12c66e6:
                ----------
                AlreadyInstalled:
                    False
                RebootBehavior:
                    Poss Reboot
                Result:
                    Installation Succeeded
                Title:
                    2019-11 Cumulative Security Update for Internet Explorer 11 for Windows Server 2012 R2 for x64-based systems (KB4525106)
            a30c9519-8359-48e1-86d4-38791ad95200:
                ----------
                AlreadyInstalled:
                    False
                RebootBehavior:
                    Poss Reboot
                Result:
                    Installation Succeeded
                Title:
                    2019-11 Security Only Quality Update for Windows Server 2012 R2 for x64-based Systems (KB4525250)
            a57cd1d3-0038-466b-9341-99f6d488d84b:
                ----------
                AlreadyInstalled:
                    False
                RebootBehavior:
                    Poss Reboot
                Result:
                    Installation Succeeded
                Title:
                    2019-11 Security Monthly Quality Rollup for Windows Server 2012 R2 for x64-based Systems (KB4525243)
Of course, this is windows so we need a reboot. By default the win_system.reboot waits 5 minutes to reboot. With the flags below we can shorten that.
salt TESTSERVER system.reboot timeout=30 in_seconds=True
Salt State
If I wanted to automate the reboot after the update install, I could make this a state and check for the updates to trigger a reboot. In my scenario, I do not need it but if you want to try, check out this section for the win_wua states. The syntax is slightly different than the module we have been working with on this article.
Updating Multiple Server
If you want to update multiple servers at once you can do something like the following. The -L flag lets you set multiple targets as a comma separated
salt -t 60 -L TESTSERVER,TESTSERVER2,TESTSERVER3 win_wua.list summary=True install=True

salt -L TESTSERVER,TESTSERVER2,TESTSERVER3 system.reboot timeout=30 in_seconds=True
We could even set a salt grain to group these
salt -L TESTSERVER,TESTSERVER2,TESTSERVER3 grains.set wua_batch testservers
salt -G wua_batch:testservers win_wua.list summary=True install=True
salt -G wua_batch:testservers system.reboot timeout=30 in_seconds=True
Throttling
If you are running this on prem or just flat out want to avoid an update and boot storm, you can throttle it using “salt -b” as mentioned in Salt’s documentation.
# This would limit the install to 2 servers at a time
salt -b 2 -G wua_batch:testservers win_wua.list summary=True install=True
Final Words
This article is likely only good if you have salt in your environment somewhere but never thought about using it on Windows. It is a great tool at configuration management on Windows but most Windows admins think of other tools like GPO, SCCM, etc to manage Windows.
This article picks up from Configuration Management – Introduction to SaltStack and dives into Salt State. It assumes you have an installed and working SaltStack. I call this intro to SaltStack configuration because this is the bulk of salt. Setting up the salt states and configuration. Understanding the configuration files, where they go and the format is the most important part of Salt.
The way I learn is a guided tour with a purpose and we will be doing just that. Our goal is first to create a salt state that installs apache.
Prepping Salt – Configuration
We need to modify “/etc/salt/master” and uncomment the following
#file_roots:
#  base:
#    - /srv/salt
#
This is where the salt states will be stored. Then we want to actually create that directory.
mkdir /srv/salt

vi /etc/srv/salt/webserver.sls
The contents of webserver.sls are as follows
httpd:
  pkg:
    - installed
This is fairly simple. We indicate a state “apache”, and define that package should be installed. We can apply it specifically as follows.
Applying Our First Salt State
# salt saltmaster1.woohoosvcs.com state.apply webserver
[WARNING ] /usr/lib/python3.6/site-packages/salt/transport/zeromq.py:42: VisibleDeprecationWarning: zmq.eventloop.minitornado is deprecated in pyzmq 14.0 and will be removed.
    Install tornado itself to use zmq with the tornado IOLoop.

  import zmq.eventloop.ioloop

saltmaster1.woohoosvcs.com:
----------
          ID: httpd
    Function: pkg.installed
      Result: True
     Comment: The following packages were installed/updated: httpd
     Started: 16:31:35.154411
    Duration: 21874.957 ms
     Changes:
              ----------
              apr:
                  ----------
                  new:
                      1.6.3-9.el8
                  old:
              apr-util:
                  ----------
                  new:
                      1.6.1-6.el8
                  old:
              apr-util-bdb:
                  ----------
                  new:
                      1.6.1-6.el8
                  old:
              apr-util-openssl:
                  ----------
                  new:
                      1.6.1-6.el8
                  old:
              centos-logos-httpd:
                  ----------
                  new:
                      80.5-2.el8
                  old:
              httpd:
                  ----------
                  new:
                      2.4.37-12.module_el8.0.0+185+5908b0db
                  old:
              httpd-filesystem:
                  ----------
                  new:
                      2.4.37-12.module_el8.0.0+185+5908b0db
                  old:
              httpd-tools:
                  ----------
                  new:
                      2.4.37-12.module_el8.0.0+185+5908b0db
                  old:
              mailcap:
                  ----------
                  new:
                      2.1.48-3.el8
                  old:
              mod_http2:
                  ----------
                  new:
                      1.11.3-3.module_el8.0.0+185+5908b0db
                  old:

Summary for saltmaster1.woohoosvcs.com
------------
Succeeded: 1 (changed=1)
Failed:    0
------------
Total states run:     1
Total run time:  21.875 s
You’ll note 1) the annoying warning which I will be truncating from further messages but 2) that it installed httpd (apache). You can see it also installed quite a few other dependencies that apache required.
Let’s validate quickly
# systemctl status httpd
● httpd.service - The Apache HTTP Server
   Loaded: loaded (/usr/lib/systemd/system/httpd.service; disabled; vendor preset: disabled)
   Active: inactive (dead)
     Docs: man:httpd.service(8)

# ls -la /etc/httpd/
total 12
drwxr-xr-x.  5 root root  105 Nov 10 16:31 .
drwxr-xr-x. 80 root root 8192 Nov 10 16:31 ..
drwxr-xr-x.  2 root root   37 Nov 10 16:31 conf
drwxr-xr-x.  2 root root   82 Nov 10 16:31 conf.d
drwxr-xr-x.  2 root root  226 Nov 10 16:31 conf.modules.d
lrwxrwxrwx.  1 root root   19 Oct  7 16:42 logs -> ../../var/log/httpd
lrwxrwxrwx.  1 root root   29 Oct  7 16:42 modules -> ../../usr/lib64/httpd/modules
lrwxrwxrwx.  1 root root   10 Oct  7 16:42 run -> /run/httpd
lrwxrwxrwx.  1 root root   19 Oct  7 16:42 state -> ../../var/lib/httpd
Looks legit to me! We just installed our first salt state. You can “yum remove” httpd and apply again and it will install. The real power in configuration management is that it knows the desired state and will repeatedly get you there. It is not just a one and done. This is the main difference between provisioning platforms and configuration management.
Installing More Dependencies
WordPress also needs “php-gd” so let’s modify the salt state to add it and then reapply.
httpd:
  pkg:
    - installed

php-gd:
  pkg:
    - installed
Here you can see it did not try to reinstall apache but did install php-gd.
The output of state.apply is rather long so we likely will not post too many more. With that said, I wanted to give you a few examples of the output and what it looks like.
Downloading Files
Next we need to download the WordPress files. The latest version is always available via https://wordpress.org/latest.tar.gz. Salt has a Salt State for managed file to download but it requires us to know the hash of the file to ensure it is correct. Since “latest” would change from time to time, we do not know what that is. We have two options. The first is to store a specific version on the salt server and provide that. The second is to use curl to download the file.
In order for salt to not download the file every time, we need to tell it what the command we are running will store. We tell it, it creates the “/tmp/wp-latest.tar.gz” so it should only download if that file does not exist.
Downloading is not all we need to do though, we also need to extract it.
The issue is the tar has the “wordpress” directory as the root and we want to strip that off. We need the options to pass to tar to strip it. We also need the enforce_toplevel to false as Salt expects a singular top level folder. I found this neat trick via https://github.com/saltstack/salt/issues/54012
# Before
# ls -la /var/www/html/wp-config*
-rw-r--r--. 1 apache apache 2898 Jan  7  2019 /var/www/html/wp-config-sample.php
# salt saltmaster1.woohoosvcs.com state.apply webserver

# After
# ls -la /var/www/html/wp-config*
-rw-r-----. 1 apache apache 2750 Nov 10 18:03 /var/www/html/wp-config.php
-rw-r--r--. 1 apache apache 2898 Jan  7  2019 /var/www/html/wp-config-sample.php
Sourcing the Config
We now have a stock WordPress install but we need to configure it to connect to the database.
For that I took a production wp-config.php and placed it in “/srv/salt/wordpress/wp-config.php” on the salt master. I then used the following salt state to push it out
# systemctl status httpd
● httpd.service - The Apache HTTP Server
   Loaded: loaded (/usr/lib/systemd/system/httpd.service; enabled; vendor preset: disabled)
   Active: active (running) since Sun 2019-11-10 18:27:24 CST; 1min 5s ago
Final Words
Through this we configured a webserver.sls salt state. We used it to install apache and a basic php module necessary as well as push out a configuration file. As you can likely tell from these instructions, it is an iterative approach to configuring the salt state for your need.
This first iteration of the webserver.sls is far from complete or best practice. It is meant as a beginner’s guide to walking through the thought process. Below is the full webserver.sls file for reference
SaltStack or Salt for short is an open source configuration management platform. It was first released in the early 2010’s as a potential replacement for Chef and Puppet. In this guide we will walk through some high level details of Salt and a basic install. If you already have Salt installed, please skip ahead to the next article when it is published.
A configuration management tool allows you to remotely configure and dictate configurations of machines. Through this multi-part series we will work through that with the use case of https://blog.woohoosvcs.com/. At some point this site may need multiple front ends. It has not been decided if that method will be Kubernetes, Google App Engine or VMs. If the VM route is chosen it will make sense to have an easy template to use.
What Configuration Management is not
Configuration management typically does not involve the original provisioning of the server. There are typically other tools for that such as Terraform.
Salt Architecture
Salt has three main components to achieve configuration management. Those are the salt master, minion and client. Salt can be configured highly available with multi master but it is not necessary to start out there. For the sake of this document and per Salt’s best practices we can add that later if necessary. – https://docs.saltstack.com/en/latest/topics/development/architecture.html
Salt Client
The salt client is a command line client that accepts commands to be issued to the salt master. It is typically on the salt master. You can use it to trigger expected states.
Salt Master
The Salt Master is the broker of all configuration management and the brains. Requests/commands received from the client make their way to the master which then get pushed to the minion.
Salt Minion
The minion is typically loaded onto each machine you wish to perform configuration management on. In our case, it will be the new front ends we spin up as we need them.
Firewall Ports
The Salt Master needs ports TCP/4505-4506 opened. The minions check in and connect to the master on those ports. No ports are needed for the minions as they do not listen on ports.
Typically you want the master to be well connected since the minions will be connecting to it. Even if you are primarily on prem, it is not a bad idea to put a salt master in the cloud.
For the installation we will be closely following Salt’s documentation on installing for RHEL 8 – https://repo.saltstack.com/#rhel
For the sake of this lab we will have the client, master and minion all on the same server but it will allow us to build out the topology.
Now to the install!
# I always like to start out with the latest up to date OS
sudo yum update

# Install the salt repo for RHEL/CentOS
sudo yum install https://repo.saltstack.com/py3/redhat/salt-py3-repo-latest.el8.noarch.rpm

# Install minion and master
sudo yum install salt-master salt-minion

# Reboot for OS updates to take effect
reboot
On the minion we need to edit “/etc/salt/minion”. The following changes need to be made. If/when you roll this out into production you can use DNS hostnames.
#master: salt
master: 192.168.116.186
We will also open up the firewall ports on the master
Wait about 5 minutes. It takes a little bit to initialize. Once it has you can run “sudo salt-key -L”. When a minion connects to the master, the master does not allow it to connect automatically. It has to be permitted/admitted. salt-key can be used to list minions and allow them.
$ sudo salt-key -L
Accepted Keys:
Denied Keys:
Unaccepted Keys:
saltmaster1.woohoosvcs.com
Rejected Keys:

$ sudo salt-key -A
The following keys are going to be accepted:
Unaccepted Keys:
saltmaster1.woohoosvcs.com
Proceed? [n/Y] Y
Key for minion saltmaster1.woohoosvcs.com accepted.
[dwcjr@saltmaster1 ~]$ sudo salt-key -L
Accepted Keys:
saltmaster1.woohoosvcs.com
Denied Keys:
Unaccepted Keys:
Rejected Keys:
We used salt-key -A to accept all unaccepted keys.
Testing
$ sudo salt saltmaster1 test.version
[WARNING ] /usr/lib/python3.6/site-packages/salt/transport/zeromq.py:42: VisibleDeprecationWarning: zmq.eventloop.minitornado is deprecated in pyzmq 14.0 and will be removed.
    Install tornado itself to use zmq with the tornado IOLoop.

  import zmq.eventloop.ioloop

No minions matched the target. No command was sent, no jid was assigned.
ERROR: No return received
[root@saltmaster1 ~]# salt '*' test.version
[WARNING ] /usr/lib/python3.6/site-packages/salt/transport/zeromq.py:42: VisibleDeprecationWarning: zmq.eventloop.minitornado is deprecated in pyzmq 14.0 and will be removed.
    Install tornado itself to use zmq with the tornado IOLoop.

  import zmq.eventloop.ioloop

saltmaster1.woohoosvcs.com:
    2019.2.2
Well that is an ugly error code. It seems to have been introduced in 2019.2.1 but not properly fixed in 2019.2.2. My guess is the next release will fix this but it seems harmless. – https://github.com/saltstack/salt/issues/54759. We do, however, get the response so this is a success.
Final Words
At this point we have a salt-master and salt-minion setup, albeit on the same host. We have accepted the minion on the master and they are communicating. The next article will start to tackle setting up Salt states and other parts of the salt configuration.
In order to help cut down on Credit Card fraud and increase convenience, gas stations have been implementing mobile fuel payment options. This allows you to pay at the pump without inserting a credit card.
Prior to this, Credit Card companies have been implementing EMV. This is the chip “dip” or NFC contactless payment that we all have seen recently. These are much more secure because they cannot easily be copied/duplicated. Credit Card fraud in Europe was terrible until they started implementing this. It was more terrible than in the United States which is why the United States later adopted it.
The Problem Mobile Fuel Payment Helps
Nearly all retailers are required to provide this option today in the United States. That is, except for Gas Stations. They received an extension. Perpetrators of fraud realize this and therefore it is not uncommon for Credit Card skimmers to be installed. Skimmers help people intending to commit fraud by capturing card information as it is inserted. It is usually combined with a camera to help capture pin entries or other values on the card.
How Does Mobile Fuel Payment actually help this?
I have yet to see a fuel pump that accepts a chip card so any card inserted with a chip has its magnetic strip read. This is susceptible to cloning. Mobile Fuel Payment saves you from having to actually insert a card.
Many of the major gas companies have their own app.
Near me, Chevron and Sunoco both accept this but many more also accept it. Since those are the two major chains near me, I will provide my thoughts on it.
Chevron’s Mobile Fuel Payment
Chevron’s app was easy to download and register. Payment methods are unfortunately scarce. It accepts only PayPal and their own branded Advantage Card or Gift cards. I had PayPal already, so I linked my account to the app. I then went to try to use it and the payment failed. In PayPal, my checking account was the only linked account. The Chevron app gave me no indication of this but PayPal did email me with a failure. The Chevron app also hung in this scenario and I had to “force stop” it to recover. I had to do some digging with PayPal and then it suggested I add my debit/credit card.
Roughly 30 minutes on hold with PayPal, I gave up. I did not want to waste any more of my Sunday. Maybe I will try again later when they’re better staffed or wait until the Chevron App supports Google Pay.
Chevron’s Mobile Fuel Payment App Features and Options
Sunoco’s Mobile Fuel Payment
Sunoco’s app has been very intuitive and it accepts Google Pay, major credit cards and their own rewards and gift cards. The process was very straight forward. It provided estimates on time to start as well as a timer that I had to complete the start fueling. The Google Pay method worked flawlessly.
Sunoco’s Mobile Fuel Payment App Features and Options
Common Features
Some of the common features between these apps are the ability to review receipts and find locations that support Mobile Fuel Payment. I like to keep a copy of my receipts, at least for a few days. In the event that I get a fill of bad gas, I want proof I went to the station. It has never happened but there will be that day.
One thing to note is just because Chevron supports Mobile Fuel Payment does not mean every station does. The stations are almost always a franchise with owners deciding when to perform upgrades. Even if they were not, it still takes time to upgrade all of the stations to support this.
Other Stations and Options
Many other gas stations offer this. I will not dive into the research for that. My hope is just to open you to the idea that your chain likely has this implemented. Feel free to test yours out and comment back with your experience.
Final Words
If you have not looked into using mobile fuel payment options and you keep getting your credit card compromised, give it a try. It is very likely to help with this situation.
The purpose of this article is to stand up a new Active Directory Domain with server 2016. The starting point for most people would be that they think they need a domain but have no domain controller. Usually it is just a few servers and workstations setup in a Workgroup.
Planning Your New Active Directory Domain
As with many projects, planning should be the majority of the work. If you plan properly, the execution is likely only 10% of the project.
A Domain Controller will be the DNS servers for all servers and workstations in the Domain. There are quite a few other roles that become a single point of failure with one Domain Controller. Typically a Domain will have at least two Domain Controllers for this reason.
Be prepared to modify the workstation and server DNS servers to use the new Domain Controller. If you use DHCP, we will need to modify the appropriate DHCP scope. If you do not, we can use the Domain Controller for that to ease the IP configuration management of those workstations.
I chose Server 2016 for this article because 2019 was just released and I prefer “tried and true” operating systems versus bleeding edge. Let others test out 2019 until quite a few patches have been released.
Requirements
Windows Server 2016 surprisingly has low requirements. It only requires 1 core and 512MB of RAM. Domain Controllers do not require a ton of RAM but you do want to ensure your entire Active Directory can be cached in memory. For a production Active Directory Domain that is relatively small, 1-2 core and 4GB of RAM is usually sufficient. I define relatively small as only a few hundred users. Monitoring RAM and CPU though will help you tweak this.
For the sake of this lab we will allocate 1 core, 1 gb ram and 20 25 gb hdd. During the course of this lab though I did increase the ram to 1.5 gb. During Windows Updates, it started to get low and complain.
Installing Windows 2016
Press any key to boot from CD or DVD..
When booting off the ISO or CD/DVD, it will prompt you to press any key. This is to help ensure that if Windows is already installed and the media is left attached, it will not automatically go through the install process again.
It will then prompt you for a few self-explanatory questions such as language/locale and then ask you to click “Install”.
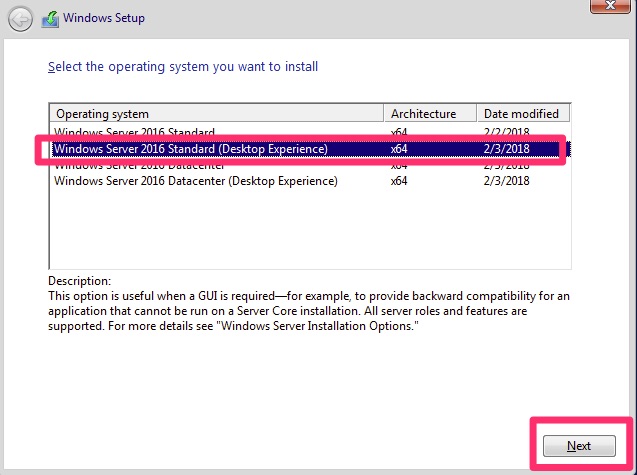
Editions
In the Windows 2008 days, there used to be Standard, Enterprise and Datacenter. Standard was the typical install. Enterprise was required for clustering servers, large amount of ram installed and a few other scenarios. Datacenter was essentially enterprise with unlimited virtualization rights and a few other limitations removed. In recent versions, many of the enterprise features were rolled into standard edition leaving us those two.
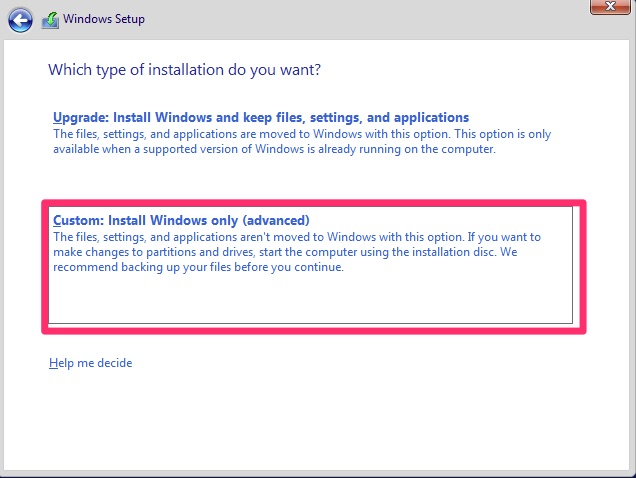
Accept the license terms on the next screen! Then choose “Custom” as we are not upgrading.
Custom: Install Windows only (advanced)
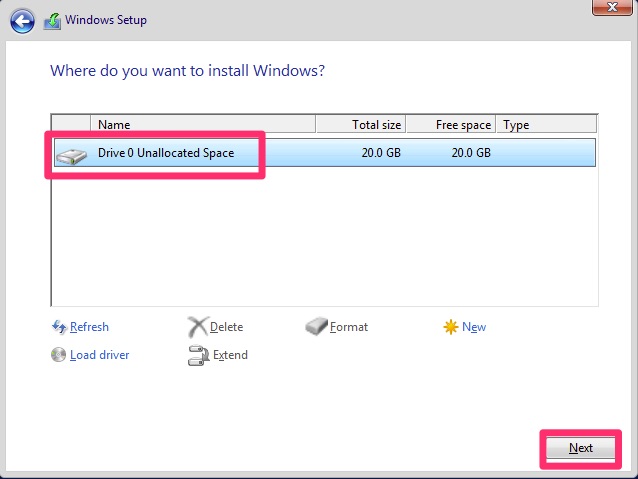
Next we will select which drive to install on. There is only one option on our server so we just click next.
Windows Drive Installation
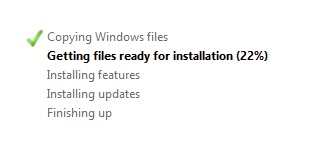
Now we are off to the races. This next step can take a while depending on the specifications of your server.
Windows Setup – Install Status
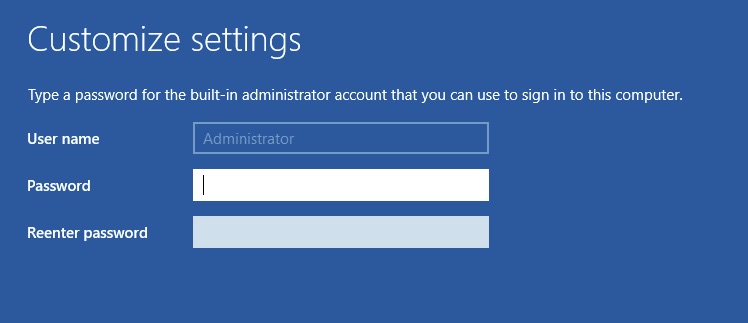
It will then automatically reboot when done if there are no issues. This will lead you into a screen to set the Administrator password. Remember this password. After we promote this Active Directory Domain Controller, it will become the Domain “Administrator” password.
Customize settings – Administrator – Password
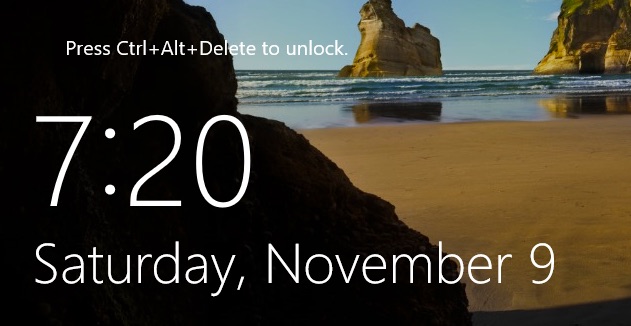
We now have a Windows 2016 Standard Server installed and ready to login.
Windows 2016 Login Screen
Running Windows Updates
Every new install I do, I like to install windows updates first. This helps ensure the security of the server before bringing it into production. It also fixes any known bugs on the RTM release installed.
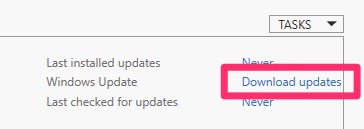
In Server Manager under Local Server / Windows Update. Click the boxed in area.
Server Manager / Local Server / Windows Update
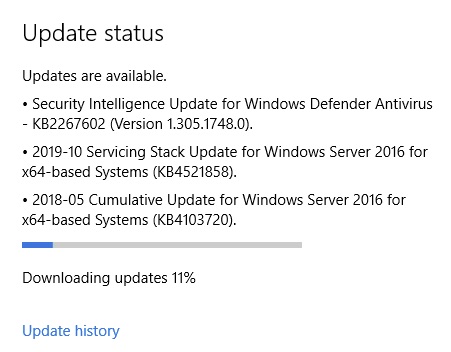
Next, Check for Updates! On a fresh install this can take some time, 20-30 minutes. The update process has to do a full inventory of installed updates, even-though this is a fresh install.
Windows Update Status – Updates are available.
After downloading, it will naturally go through the installation which is usually a bit longer than the download.
In previous versions of Windows it may take a few iterations of updates to get fully updated. After rebooting from Windows Updates, check again to make sure this is not the case. More recent versions of Windows have been better about this.
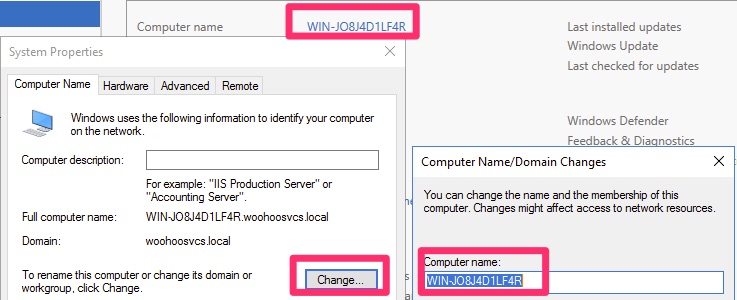
Naming the Server
Before we get too far along, we want to choose a name for the server. Once promoting it to a Domain Controller it is difficult to change. Newer versions of Windows are better at handling this but it is less than ideal. For this lab we left the server name alone. One could argue that doing so is more secure because it is random. That said, it would be a pain to manage as you could not remember which server was where.
The name change can happen in Server Manager by clicking on the existing server name and following the prompts. It will require a reboot.
Change Name if desired – Most likely yes in production!
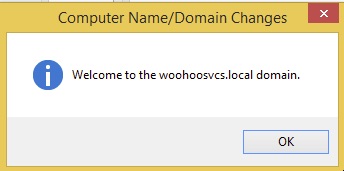
You may have caught the woohoosvcs.local in the name. It wouldn’t be here at this point but I decided to throw this in after promoting it.
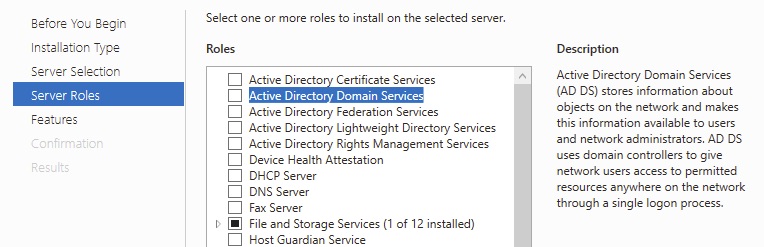
Installing Active Directory Domain Services
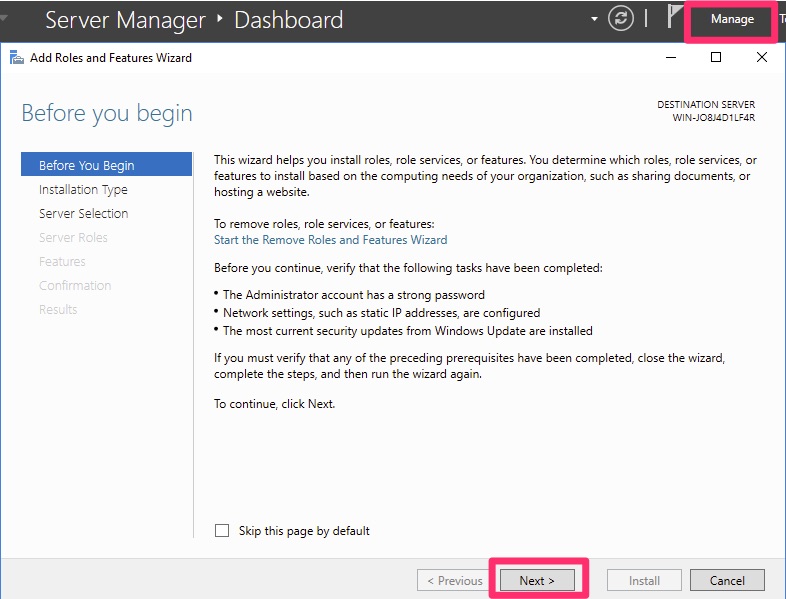
From Server Manager choose Add Roles from the Manage Menu.
Server Manager Add Roles and Features Wizard
We will then select a “Role-based or feature-based installation”. The Server Manager has the ability to mange remote servers but we will choose the singular local server. We will select “Active Directory Domain Services”
Active Directory Domain Services
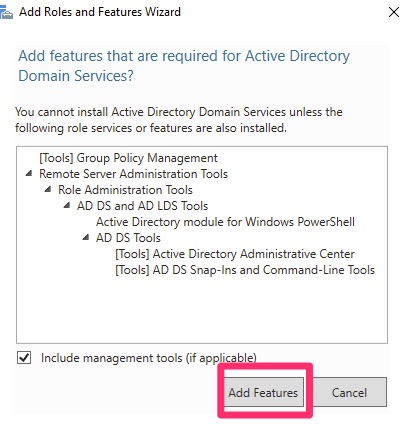
The defaults are acceptable, particularly if you want the management tools installed. Hint: You usually do unless you know you do not!
Active Directory Domain Services features
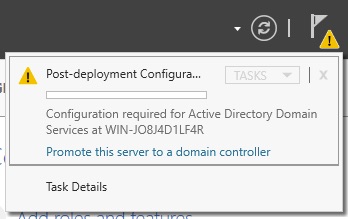
We then “next next next” though the other options and click “Install”. At the end of this we need to reboot. On the “Install” screen there is a checkbox to automatically reboot if you choose.
Finally, we have Active Directory Domain Services installed. We have not enabled them but they are there!
Promoting an Active Directory Domain Controller
Now that we have Active Directory installed, we can “promote” it. A Domain Controller before it is a Domain Controller is just a server. We then promote it to a Domain Controller. The command to do this used to be “dcpromo.exe”. It may still work although I believe it is deprecated in this version.
Promotion Wizard
In Server Manager, click the flag with the yellow warning. It is letting us know we installed Active Directory Domain Services but never promoted it. Then click “Promote this server to a domain controller”
Promote this server to a domain controller
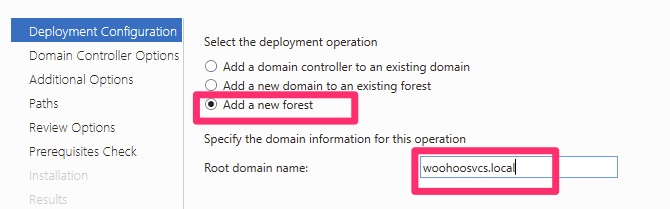
By default it wants you to add a domain controller to an existing domain. This is the most common use case as not everyone is standing up new domains on a regular basis.
Add a new forest for Active Directory Domain Services
I believe Microsoft is moving away from the “.local” prefix for domains but in order to avoid a split brained DNS scenario I created a unique root domain name.
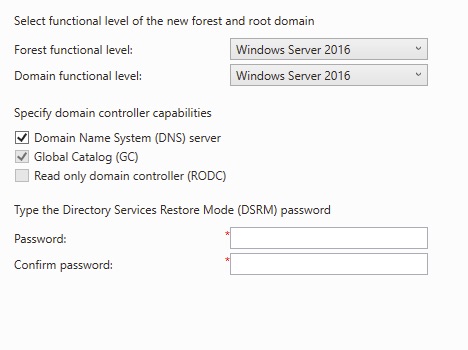
Promotion Roles and Options
The next set of questions requires some thought.
We definitely want DNS enabled. Global Catalog is required because you need at least one per domain. The DSRM password is for when you need to boot up into active directory services restore mode to help recover the Active Directory. You will notice I skipped over the functional levels.
Functional levels serve as least common denominators. A domain functional level of “Windows Server 2016” means that all domain controllers are at least at that level and you cannot promote any domain controllers from earlier versions. This allows new 2016 features to be enabled for the domain. When all of the domains are at a functional level, the forest can be increased as well.
The lowest functional level you can set with 2016 is 2008. If you do not know why you would do this, it’s best to leave this one alone. Particularly if your machines are relatively new in the past 5 years.
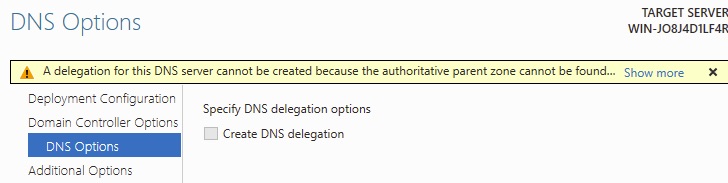
This error for DNS Delegation is normal, particularly since we have no Active Directory DNS yet!
A delegation for this DNS server cannot be created because the authoritative parent zone cannot be found.
Moving Along Our Active Directory Domain Configuration
For this document, you can accept the defaults for the next few screens but make note of the settings. On the review screen you can actually copy these and paste them into a text file somewhere.
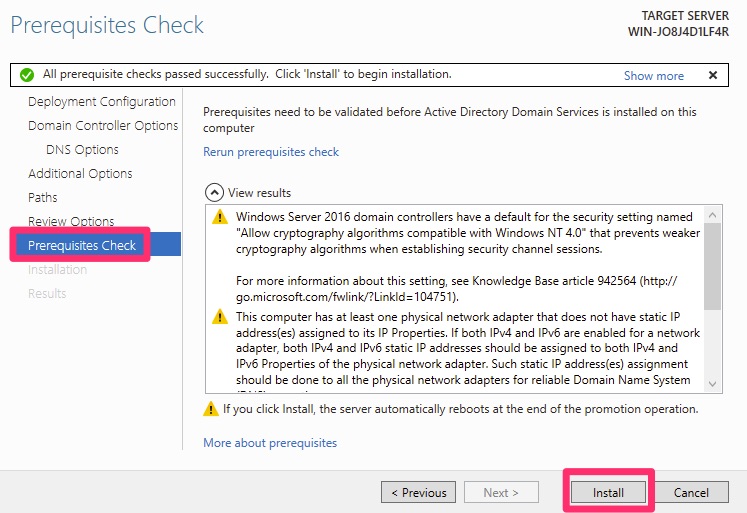
An interesting note is that this wizard creates a configuration file that notes the changes as a playbook. Below we will walk through the prerequisite checks.
Active Directory Domain Controller Promotion – Prerequisites Check
These are all normal. On a production server, the second error is correct and valid for production. In that scenario we would allocate a static IP to ensure the server keeps its up. This is particularly so, since DHCP services tend to be loaded onto a Domain Controller.
Please click install at this point. Wait a few minutes and if you are not paying attention it will automatically reboot. This is fine, you just will not see the success screen.
The next time you login to the Domain Controller you will be doing so using Active Directory Domain Services! The first boot may take a while as Group Policies and settings are applying.
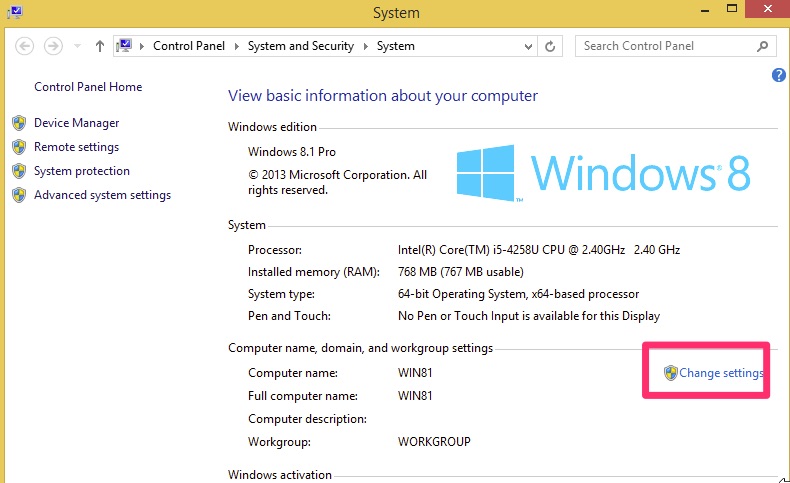
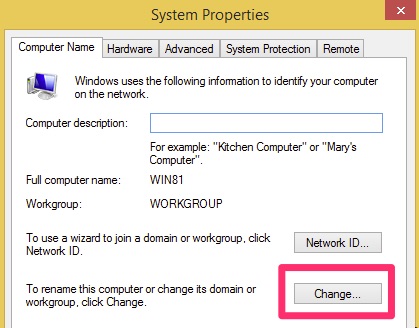
Joining a Machine to Active Directory Domain Services
What good would this document be if we left it there? We need proof it actually works!
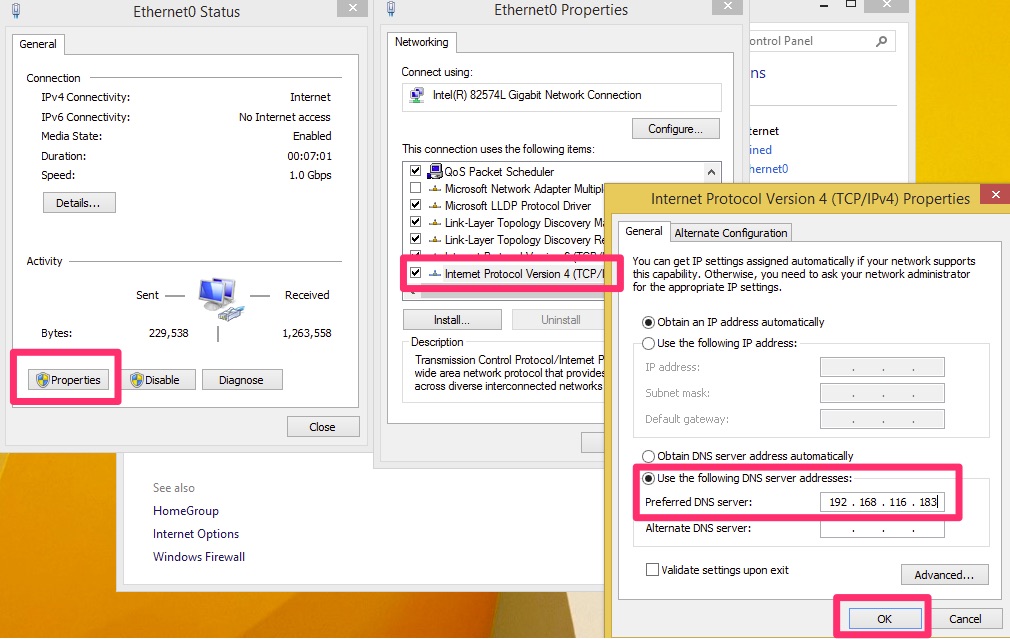
Active Directory Domain Controller IP Address
On the domain controller, let’s get it’s ip address via ipconfig command.
We need this to set the Windows 8.1 Workstation’s DNS settings. The workstations use DNS to navigate Active Directory and find the resources it needs. Typically this is done via DNS SRV records.
Workstation DNS IP
On our Windows Workstation, go to the Control Panel / Network and let’s modify the DNS settings for the interface.
Windows 8 DNS Settings
A common mistake is to add an alternate server that is a non domain controller such as Google’s 8.8.8.8. Doing so may appear to work but at some point the workstation will try to query active directory using Google and it will not quite work right.
Windows 8 – Change SettingsChange again!
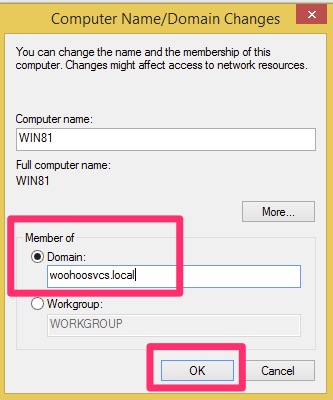
Select “Domain” and type in the domain name you chose, in this case it was “woohoosvcs.local”
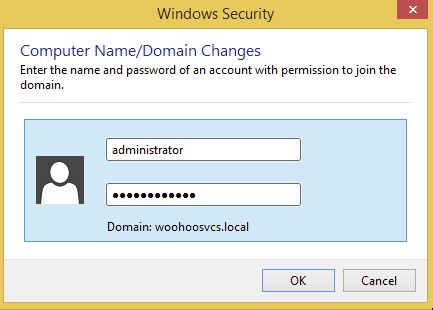
A nice tidbit is anyone can join machines to the domain but in the past regular users had a limit on the number that they could. I do not know if this is still valid but best to use a Domain Admin which “Administrator” is.
Welcome to woohoosvcs.local – Woohoo!
You will need to reboot and then the machine is joined to the domain. At this point there is only one domain user “Administrator”.
Final Words
This document walked us through installing Windows Server 2016. We then installed Active Directory Domain Servers and promoted the server to Domain Controller. Finally we joined a workstation to the domain.
This guide is designed for someone that has never performed a packet capture before or may have had to a few times but really did not understand it. Many times the packet capture can seem like a needle in a haystack.
Brief History
Wireshark has been around for quite some time. In 1998 it was called ethereal but had to change its name. You can find a full history of that on their Wikipedia page – https://en.wikipedia.org/wiki/Wireshark
On the installation, most of the defaults should work. On the machine you want to perform the capture on, make sure winpcap or now npcap are installed. That is what allows the packets to actually get captured on windows. UNIX like operating systems already come with the necessary libraries.
Capture Packets!
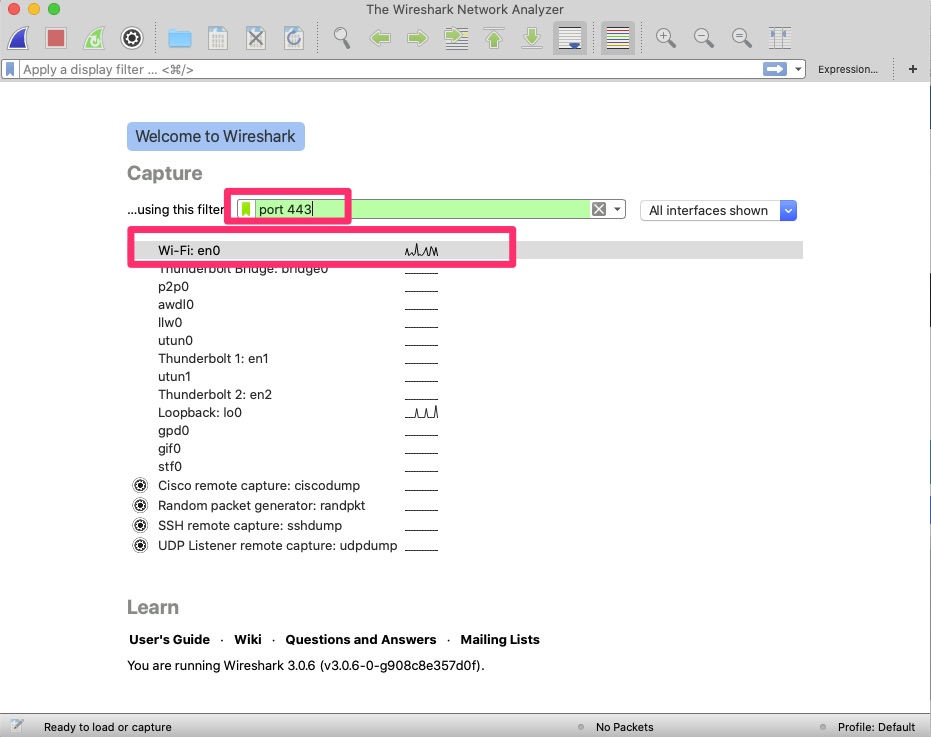
Here we will filter based on port 443 as we intend to make a connection to https://blog.woohoosvcs.com on port 443. First we need to select the adapter though. If you’re unsure of which one, you can see the traffic graph (squiggly lines). If you type the capture filter first and then change the adapter the filter will clear.
Filter based on port 443 for HTTPS and on the Wi-Fi adapter.
We want to limit the capture as much as possible because there will be a lot of traffic without a filter. Be careful though as filtering too much can lead to not capturing the intended packets.
Next I will curl or make a connection to https://blog.woohoosvcs.com
I am using curl -v so that I can see the IP address. This is an ipv6 address.
% curl -v https://blog.woohoosvcs.com0*   Trying 2606:4700:20::681a:d78...
* TCP_NODELAY set
* Connected to blog.woohoosvcs.com (2606:4700:20::681a:d78) port 443 (#0)
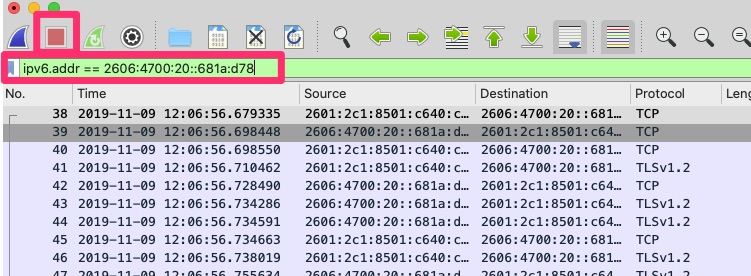
After running curl we want to click the red square button in wireshark to stop the capture. These can grow rather large.
We can then set a display filter to the ip address 2606:4700:20::681a:d78
ipv6.addr == 2606:4700:20::681a:d78
This helps us narrow down to just the packets necessary that we want to analyze. The capture filter restricts the packets that wireshark even sees coming from pcap. The display filter does just that. It filters what you are displaying but all the other packets it captured are still there.
Analyzing Packet
TCP Handshake
The first step to any TCP connection like HTTPS is a 3-way handshake. In TCP, it is a stateful connection protocol. It uses flags or options to help keep track of the connection. When making a new connection from my machine (A) to blog.woohoosvcs.com (B) the handshake looks roughly like this
A – > B (flag: SYN) – A is telling B it wants to make a new connection. B -> A (flag: SYN+ACK) – B is telling A it “ACKnowledges” the original SYN and agrees to the connection with its own SYN A -> B (flag: SYN) – A is telling B it ACKs the SYN from B
Visually we see that here
3 Way Handshake of packet capture
Many instances if the remote end does not want to accept your packet, it simply will not respond. You may see your SYN sent and nothing in return and SYN retries happening. Other times if it forcefully wants to deny the connection instead of SYN+ACK you will get an RST or RST+ACK in the response from the remote end.
Now that the connection is open and established, we can inspect the TLS handshake.
TLS Handshake
TLS Handshake from Packet Capture
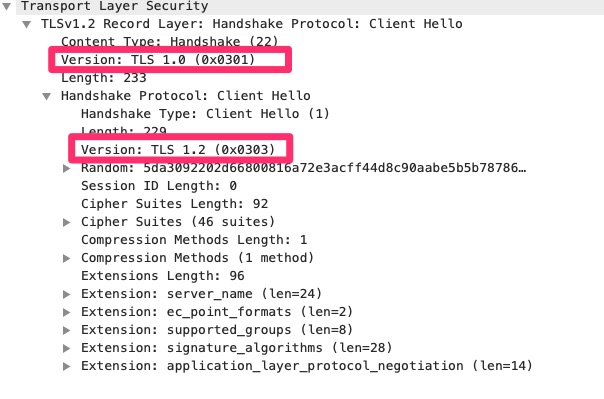
In the above, right below the 3 way handshake we can see a TLS “Client Hello”. This is similar to the 3 way handshake except for TLS. The client, in this case “curl” is trying to negotiate compatible methods of communication.
TLS Client Hello
We cannot actually see the packets captured but we can see metadata about the TLS connection. The higlighted areas above may be confusing. Why is it announcing two different TLS versions. At the record level it is announcing TLS 1.0. This is the lowest version the client is indicating it supports. At the client hello envelope it is announcing TLS 1.2 which is the highest it supports. This tells the server anywhere between TLS 1.0 and 1.2.
Looking at the screenshot you can see other proposed settings that client is recommending/offering. The other main one are the cipher suites. What encryption methods does the client support.
The client is much like a catcher in baseball. It proposes the pitches or connection parameters. The server or pitcher just says yes or no.
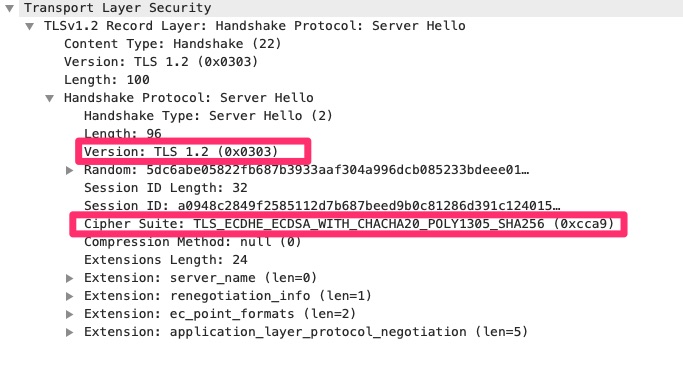
TLS Server Hello
Here we can see the TLS 1.2 protocol was selected and a singular cipher suite. Many times the Server Hello is where it fails if the server requires a TLS version the client does not support or a cipher suite the client does not support. On this blog we have it set to require tls 1.2 or higher.
Forcing to Fail TLS Handshake
I will instruct curl to connect with TLS 1.0 as the max
As you can see, the client complains but what does the capture look like?
TLS Handshake error – Fatal – Protocol Version
In the capture above you can see the client hello. It specifies a max of TLS 1.0. In the 3rd packet you can see the server responding with an Alert instead of Server Hello and the 4th packet the server is actually closing the connection due to the protocol negotiation issue.
Final Words
In this article we learned how to run Wireshark and capture packets. From there we learned how to investigate the TCP 3-way handshake and a TLS negotiation. In real world scenarios, this will at least help you weed out these two types of issues.
A few years ago, I had quite a few employees under me. They would always marvel at how I could keep track of the few hundred emails a day. I showed them how to organize them as described in “Inbox Zero“. Many of them took to it, others liked it but could not drive themselves to do it.
That about sums up my management style. I am always happy to show you what works for me. Not with the intent of forcing that methodology onto anyone. I do it to provide another way of doing things so that anyone can take that and mix it in with what works for them.
In this article, I aim to walk you through my processes. Take what you want from them and help make them your own. Write back and tell me how you have implemented them so others can learn too!
I do not think it would be appropriate to discuss organization without mentioning The 7 Habits of Highly Effective People. If you have the time, I highly recommend ordering a copy and reading it.
Keys
Some of the key themes are to set a time limit, use tools to help you organize/track and be intentional when possible.
First Thing
I usually wake up between 5-6AM. This may seem terribly early for some and late for others. We have two very active children so having some quiet time first thing in the morning is a hot commodity.
I read somewhere, quite a long time ago that the most successful people start out their day early. They are up at 5-6ish, catching relevant news to their job/business/industry, even if it is just playing in the background. It seems to have worked well for me. Wake up late and you are just playing catch up all day.
For me, I wake up to a nice cup of coffee and slowly wake my brain for the day. I follow a few subreddits on reddit. I typically limit this to 10-15 mins.
Sometimes I will have a small project or some emails that came in from overnight that I will start plugging into for about 30 mins.
The important part of this activity for myself is to lightly plug into things. It is just a warm up for the day. Otherwise, I’d just be a workaholic telling you to wake up at 5AM and start working all day!
Schedule
My schedule is very routine. I find comfort in this and it helps me stay organized. With that said, your schedule needs to be flexible enough for things that may derail it. Do not try to plan ever minute. Work “fires” happen, projects land on my desk unexpectedly. The framework I have setup for my day does not usually change though.
For example, when I arrive at the office, my first tasks are to check emails and log into our ticketing system. I also drop a line on any work chat applications to let everyone know I’m in and in front of a desk incase they need me.
I then look through my tasks and organize them based on priority. From 7 Habits of Highly Effective People, “First things, first!”. Many times things are marked “urgent” but they are not important. Those do not need your attention. Work on things that are important and urgent and then just important. Many times “urgent” issues that are not really urgent get cold fairly quickly.
Take Breaks
Taking breaks is extremely helpful. Many times when I have been spinning my wheels on difficult projects, I ultimately put it down for a bit. When I came back, I was refreshed and many times had a solution to the problem. This also works with smaller tasks. When you are able to focus, do so with intensity. Do not expect to be able to maintain that intensity for long periods of time.
Switch It Up
If you find that your returns are diminishing on a task and it is starting to slow down, start a new task. This pairs up with take a break. Many times we just need to switch away from the current task to get a breather. Finding a new task that we can meet with enthusiasm helps. Returning client calls for 20 mins and worn out? Switch over to catching up on industry/career news for a few minutes. Again, be intention and set limits. Don’t let that 5 minute switch over lead you to seven layers deep in a wikipedia article (yes I have been there!). This helps organize your time and make it efficient.
Winding Down
At the end of the day, I try to wind down a good 30-45 mins before the steam bell rings. I realize this is not always possible as some jobs are pedal to the metal from clock in to clock out. Even then clock out is a blurry line. If you can though, wind down 30-45 mins prior. Many times, trying to crank out work until the last minute causes you to run over and deter you from obligations after work. Again, be intentional! If you intend to put in another 1-2 hours for the day at work, go ahead. If you want to try to leave right on time, give this a try.
Manage Your Manager
If you know what your manager needs, try to get it to them before they ask. No need to wait until they ask, assuming you have the time to pre-empt their need. If they drop a huge project on your lap but you are already working on a large project, ask them about expectations. Something like “I can certainly do this but I am already working on X. How would you rank the importance? Is it ok to complete it 2 days from now?” You will find being genuine goes a long way. Many times your interaction with your manager and the workload they give you dictates your day.
Final Words
We made it to the bottom and hopefully you have learned a few things to help organize your day. What helps you organize your day?