Summary
I had the need of a fairly static site in my infrastructure ecosystem. I thought, why not write an article about it with the nuance of putting it behind Cloudflare. There are much easier solutions for this static site, including running it off my WordPress server. In any case, this makes a neat introduction to Google App Engine.
In all fairness, this article is derived from Hosting a static website on Google App Engine but puts a slight spin with Cloudflare.
This is also not a usual use case for static hosting.
Requirements
Having a Google Cloud account is a must but that is already assumed. Next we need to download and install the Google Cloud SDK.
For MacOS its fairly simple. It is available here – Google Cloud SDK documentation
Installing the SDK
% pwd
/Users/dwcjr

% curl -O https://dl.google.com/dl/cloudsdk/channels/rapid/downloads/google-cloud-sdk-270.0.0-darwin-x86_64.tar.gz

% tar xzf google-cloud-sdk-270.0.0-darwin-x86_64.tar.gz

% ./google-cloud-sdk/install.sh
Welcome to the Google Cloud SDK!
....

# We want to install this because our static site will be PHP based
% ./google-cloud-sdk/bin/gcloud components install app-engine-php

% ./google-cloud-sdk/bin/gcloud init
....
You are logged in as: [[email protected]].

Pick cloud project to use:
 [1] woohoo-blog-2414
 [2] Create a new project
Please enter numeric choice or text value (must exactly match list
item):  1
...
Deploying the App
Here I setup a www structure as per the Google article.
% pwd
/Users/dwcjr/Downloads/woohoosvcs.com
% find ./ -type d
./
.//www
.//www/css
.//www/images
.//www/js

% cat app.yaml
runtime: php73

handlers:
- url: /
  static_files: www/index.html
  upload: www/index.html

- url: /(.*)
  static_files: www/\1
  upload: www/(.*)
We need to make sure www/index.html exists. Make a simple hello world in it. Something like the following would suffice
<html>
  <head>
    <title>Hello, world!</title>
  </head>
  <body>
    <h1>Hello, world!</h1>
    <p>
      This is a simple static HTML file that will be served from Google App
      Engine.
    </p>
  </body>
</html>
It produces a bit of output but a few minutes later, the app is deployed
% gcloud app deploy
Services to deploy:

descriptor:      [/Users/dwcjr/Downloads/woohoosvcs.com/app.yaml]
source:          [/Users/dwcjr/Downloads/woohoosvcs.com]
target project:  [woohoo-blog-2414]
target service:  [default]
target version:  [20191107t164351]
target url:      [https://woohoo-blog-2414.appspot.com]


Do you want to continue (Y/n)?  Y

Beginning deployment of service [default]...
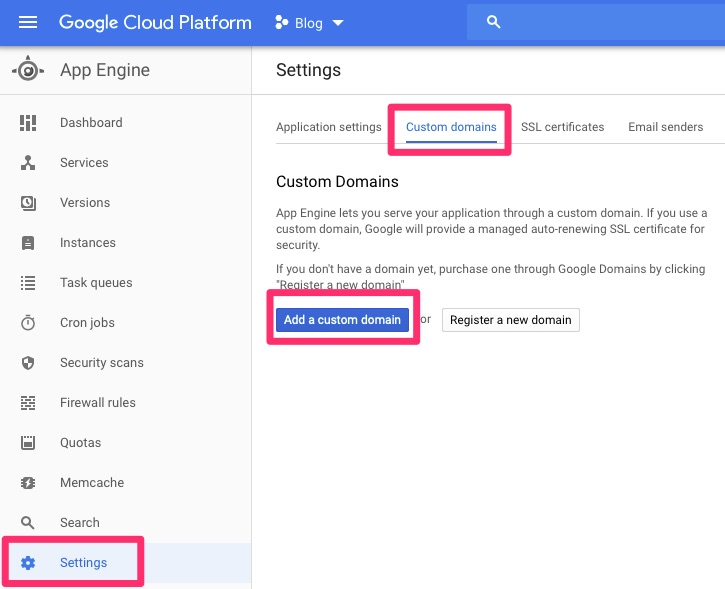
Custom Hostnames
This is where some trickery happens. Not really, it is fairly straight forward, particularly with Cloudflare. We need to navigate to Settings / Custom Domains and add one. We will use www-test.woohoosvcs.com for this demo.
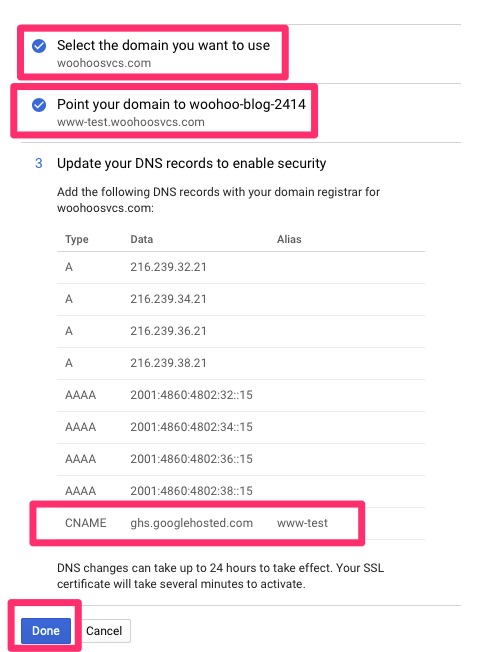
We then need to hop over to Cloudflare and add the CNAME as requested. Make sure it is setup as a “DNS only”. We do this so Google can validate the domain for its managed certificate. We do not want to use it but it will not allow us to place a custom one otherwise.

We are then going to hop on over to GAE’s Certificates section

I will then upload my stored copy from the WordPress site. After doing so an interesting issue happened.
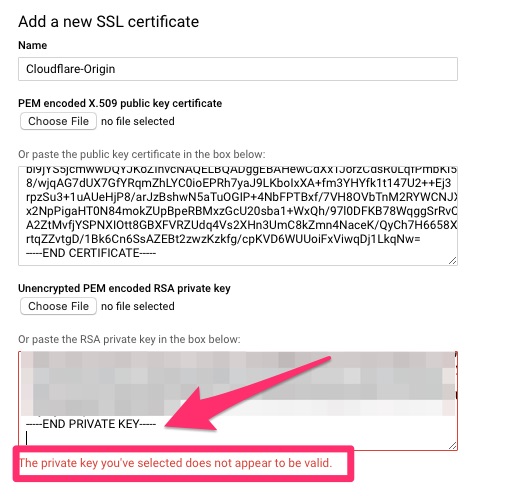
This ended up being “XXX PRIVATE KEY” not being “XXX RSA PRIVATE KEY” so I simply modified the BEGIN and END to have RSA and it went through!
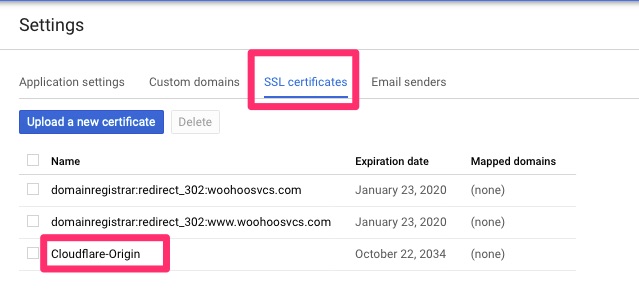
We then want to hop back over to Custom Names and disable managed security. This auto generates a certificate and we will be using the origin certificate instead.
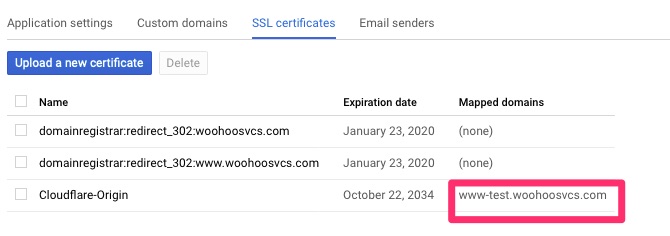
Now if we click back on SSL Certificates it will allow us to drill into Cloudflare-Origin and assign.
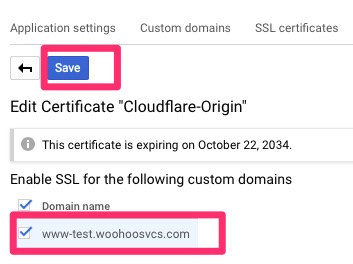
We can then set the www-test.woohoosvcs.com back to Proxy to protect it

The Test!
We can test with curl to make sure it is going through Cloudflare.
% curl -v https://www-test.woohoosvcs.com
*   Trying 2606:4700:20::681a:d78...
* TCP_NODELAY set
* Connected to www-test.woohoosvcs.com (2606:4700:20::681a:d78) port 443 (#0)
.....
*  subject: C=US; ST=CA; L=San Francisco; O=Cloudflare, Inc.; CN=sni.cloudflaressl.com
.....
*  issuer: C=US; ST=CA; L=San Francisco; O=CloudFlare, Inc.; CN=CloudFlare Inc ECC CA-2
.....
* Using Stream ID: 1 (easy handle 0x7fd338005400)
> GET / HTTP/2
> Host: www-test.woohoosvcs.com
> User-Agent: curl/7.64.1
> Accept: */*
>
* Connection state changed (MAX_CONCURRENT_STREAMS == 256)!
.....
< server: cloudflare
.....
Final Words
It may be a convoluted way but we now have a hosted static site behind Cloudflare using Strict TLS. All of that running on Google App Engine
In this article for the Custom Hostname, it should be possible to disable managed security so that www-test.woohoosvcs.com could start out as a Proxied entry and then associate the certificate. I had issues with that but it could have been me rebuilding the environment too quickly for the lab I was doing.