Using Certificate Based Authentication

Summary

Recently a client had a need for putting a web application on the internet that end users could access. They wanted to lock it down so that not everyone on the internet could access. Whitelisting IP Address was not an option because they were remote users with dynamic IPs and the overhead of maintaining this whitelist would be problematic.

The use case was a password recovery tool that their remote users could use to reset and recover passwords. Simple authentication would not suffice. For starters if the users’ passwords expired they wouldn’t be able to easily log into the site. Along with that it would be a high profile target for brute forcing.

Why Not IP Whitelisting?

IP whitelisting used to be and still us for some organizations the de-facto method of filtering traffic. It can be very problematic though. Users today are on the go, working remotely or using their mobile device on cellular data as well as home internet. Other times it involves sales staff at client sites. Keeping up with these IP whitelists can be a chore. Updating this whitelist can be time sensitive to avoid halting productivity. When not maintained, there is a chance someone unexpected could gain access due to simply having an IP previously whitelisted.

A workaround for this is VPN but that requires a bit of support overhead in user training and support. This can be clunky for users that are not used to to using VPN.

Why Certificates

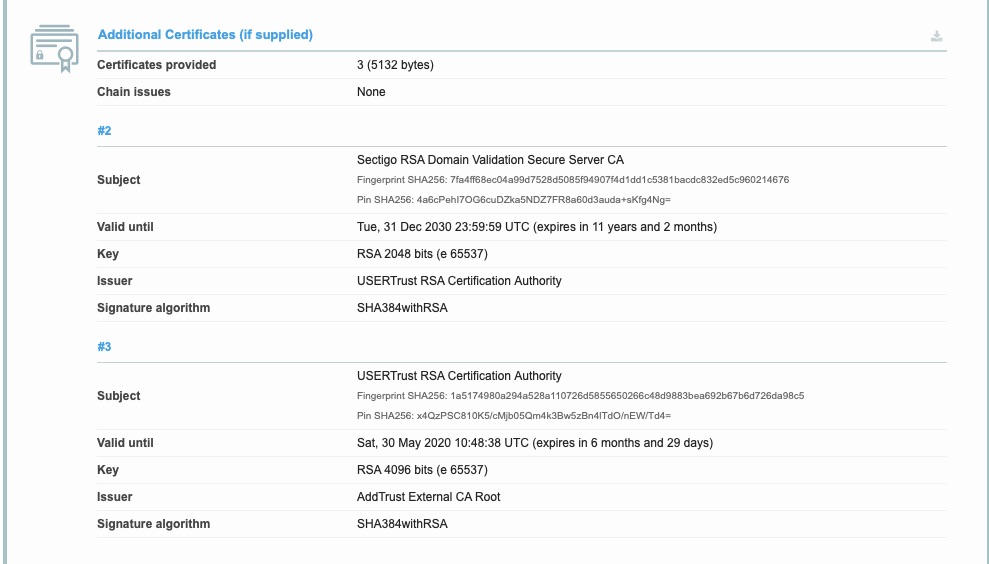
Many larger organizations already have internal Certificate Authorities in place. For Microsoft Active Directory deployments, when CA has been installed, end users are likely auto enrolling in user certificates. Domain joined workstations already have these and trust it the internal Root CA.

Certificates also have a built in expiration. In an auto enrollment environment, this expiration could be lowered substantially to below 1 year.

TLS Handshake

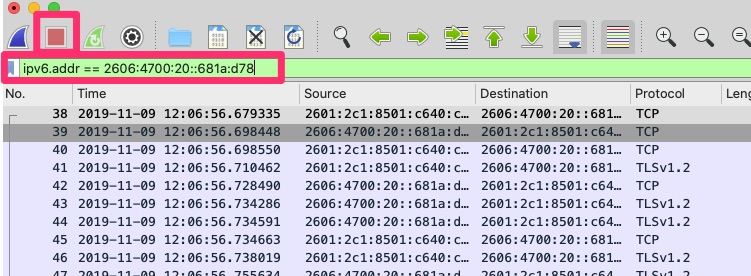
Once of the nice features of TLS is that it does include a mechanism for this. Below is an example of a TLS handshake where the server requests a certificate and the client provides it.

TLS Handshake - Certificate Authentication
TLS Handshake – Certificate Authentication

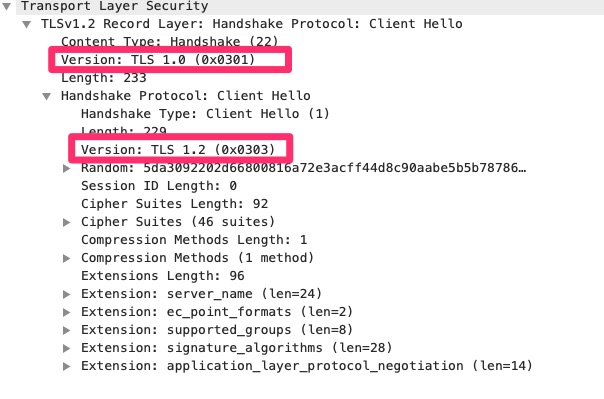
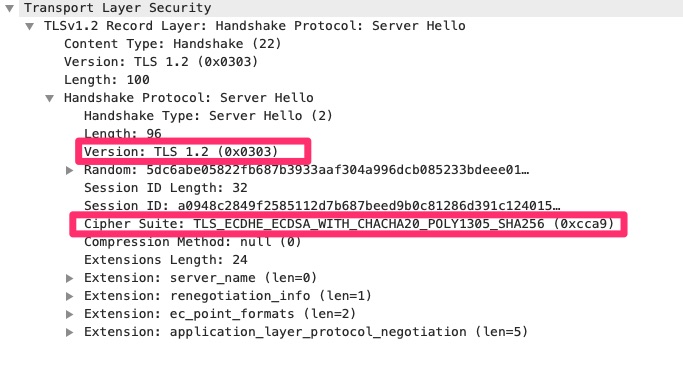
In Frame 19, the client makes the TLS request with a Client Hello. Frame 23 the Server response with a Server Hello. This is where they set parameters and negotiate things like TLS versions and encryption algorithms.

Frame 26 is part of the Server Hello but it was large and split up. Boxed in red is the “Certificate Request” where the server is requesting a certificate to authenticate.

Frame 33 is where the client actually provides it.

From here you can see this happens before the application level (HTTP) protocol communicates starting in frame 43. What this means is that before the user reaches the web application for authentication, the device requiring TLS Certificate Authentication is filtering the requests. Many times this is a reverse proxy or load balancer is not vulnerable to the same exploits as the web servers.
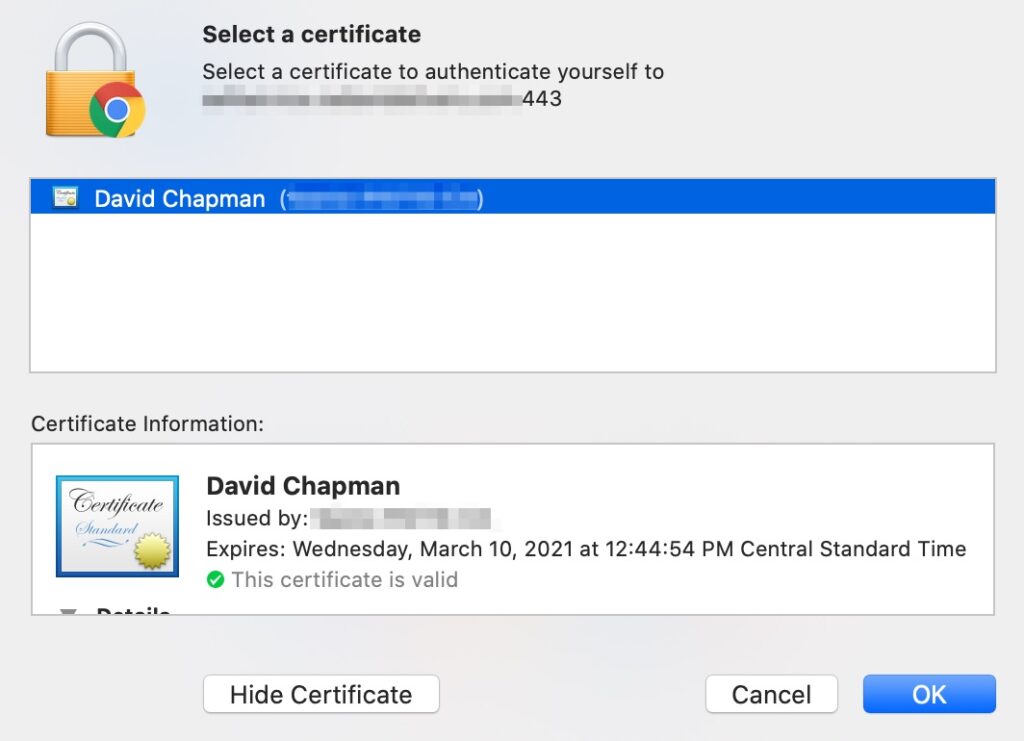
Browsers

When used properly and the client has a certificate, the browser will prompt users for a certificate to use such as pictured below.

Browser Certificate Authentication Prompt

Other Applications

A really neat application for this when you have a legacy plain text protocol in play but you want to open it up over the internet and secure similarly. Perhaps you have a legacy application that uses raw text and is not SSL/TLS capable. You can still put this on the internet through a reverse proxy like F5 LTM or stunnel.

Traditionally this type of traffic would be protected via IPSEC tunnel that is encrypted or a dedicated circuit such as MPLS. That does require specific hardware and/or monthly circuit costs to accommodate.

stunnel is extremely useful in this scenario as you can install it on the local machine that has the legacy application and configure it to connect to localhost on a random port and proxy information out over TLS and configure it to use the certificate based authentication.

Here is a graphical example of what that may look like with an stunnel server broken out. stunnel could be installed on the end user’s workstation though.

Legacy App Secured with TLS 1.2 or higher & Certificate Based Authentication

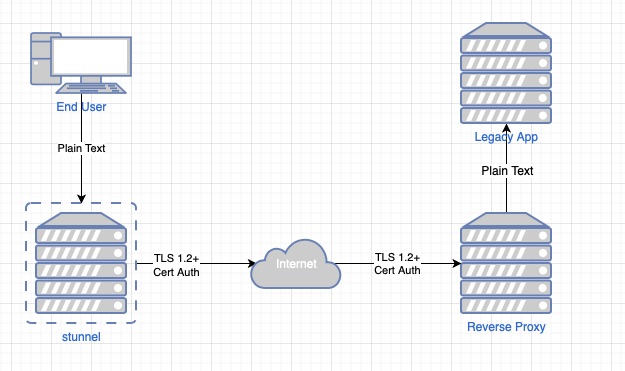
stunnel could be put on the local end user workstation to minimize that unencrypted leg. Typically on the server side the reverse proxy has a leg directly on the same VLAN/subnet as the application which minimizes exposure over that but this does help secure the application traffic over the untrusted internet.

Final Words

In this article we learned a little on Certificate Based Authentication. We also learned how it may help your organization better secure your applications and possibly avoid more costly solutions.

Packet Capture – Introduction to Wireshark

Summary

This guide is designed for someone that has never performed a packet capture before or may have had to a few times but really did not understand it. Many times the packet capture can seem like a needle in a haystack.

Brief History

Wireshark has been around for quite some time. In 1998 it was called ethereal but had to change its name. You can find a full history of that on their Wikipedia page – https://en.wikipedia.org/wiki/Wireshark

Installing Wireshark

Wireshark can be downloaded from https://www.wireshark.org/download.html

On the installation, most of the defaults should work. On the machine you want to perform the capture on, make sure winpcap or now npcap are installed. That is what allows the packets to actually get captured on windows. UNIX like operating systems already come with the necessary libraries.

Capture Packets!

Here we will filter based on port 443 as we intend to make a connection to https://blog.woohoosvcs.com on port 443. First we need to select the adapter though. If you’re unsure of which one, you can see the traffic graph (squiggly lines). If you type the capture filter first and then change the adapter the filter will clear.

Filter based on port 443 for HTTPS and on the Wi-Fi adapter.

We want to limit the capture as much as possible because there will be a lot of traffic without a filter. Be careful though as filtering too much can lead to not capturing the intended packets.

Next I will curl or make a connection to https://blog.woohoosvcs.com

I am using curl -v so that I can see the IP address. This is an ipv6 address.

% curl -v https://blog.woohoosvcs.com0*   Trying 2606:4700:20::681a:d78...
* TCP_NODELAY set
* Connected to blog.woohoosvcs.com (2606:4700:20::681a:d78) port 443 (#0)

After running curl we want to click the red square button in wireshark to stop the capture. These can grow rather large.

We can then set a display filter to the ip address 2606:4700:20::681a:d78

display filter of packet capture - ipv6.addr == 2606:4700:20::681a:d78
ipv6.addr == 2606:4700:20::681a:d78

This helps us narrow down to just the packets necessary that we want to analyze. The capture filter restricts the packets that wireshark even sees coming from pcap. The display filter does just that. It filters what you are displaying but all the other packets it captured are still there.

Analyzing Packet

TCP Handshake

The first step to any TCP connection like HTTPS is a 3-way handshake. In TCP, it is a stateful connection protocol. It uses flags or options to help keep track of the connection. When making a new connection from my machine (A) to blog.woohoosvcs.com (B) the handshake looks roughly like this

A – > B (flag: SYN) – A is telling B it wants to make a new connection.
B -> A (flag: SYN+ACK) – B is telling A it “ACKnowledges” the original SYN and agrees to the connection with its own SYN
A -> B (flag: SYN) – A is telling B it ACKs the SYN from B

Visually we see that here

3 Way Handshake of packet capture

Many instances if the remote end does not want to accept your packet, it simply will not respond. You may see your SYN sent and nothing in return and SYN retries happening. Other times if it forcefully wants to deny the connection instead of SYN+ACK you will get an RST or RST+ACK in the response from the remote end.

Now that the connection is open and established, we can inspect the TLS handshake.

TLS Handshake

TLS Handshake from Packet Capture

In the above, right below the 3 way handshake we can see a TLS “Client Hello”. This is similar to the 3 way handshake except for TLS. The client, in this case “curl” is trying to negotiate compatible methods of communication.

TLS Client Hello
TLS Client Hello

We cannot actually see the packets captured but we can see metadata about the TLS connection. The higlighted areas above may be confusing. Why is it announcing two different TLS versions. At the record level it is announcing TLS 1.0. This is the lowest version the client is indicating it supports. At the client hello envelope it is announcing TLS 1.2 which is the highest it supports. This tells the server anywhere between TLS 1.0 and 1.2.

Looking at the screenshot you can see other proposed settings that client is recommending/offering. The other main one are the cipher suites. What encryption methods does the client support.

The client is much like a catcher in baseball. It proposes the pitches or connection parameters. The server or pitcher just says yes or no.

TLS Server Hello

Here we can see the TLS 1.2 protocol was selected and a singular cipher suite. Many times the Server Hello is where it fails if the server requires a TLS version the client does not support or a cipher suite the client does not support. On this blog we have it set to require tls 1.2 or higher.

Forcing to Fail TLS Handshake

I will instruct curl to connect with TLS 1.0 as the max

% curl --tls-max 1.0 https://blog.woohoosvcs.com       
curl: (35) error:1400442E:SSL routines:CONNECT_CR_SRVR_HELLO:tlsv1 alert protocol version

As you can see, the client complains but what does the capture look like?

TLS Handshake error - Fatal - Protocol Version
TLS Handshake error – Fatal – Protocol Version

In the capture above you can see the client hello. It specifies a max of TLS 1.0. In the 3rd packet you can see the server responding with an Alert instead of Server Hello and the 4th packet the server is actually closing the connection due to the protocol negotiation issue.

Final Words

In this article we learned how to run Wireshark and capture packets. From there we learned how to investigate the TCP 3-way handshake and a TLS negotiation. In real world scenarios, this will at least help you weed out these two types of issues.

Sectigo Root CA Expiration

Summary

A few years ago Comodo CA was spun off from Comodo’s offering and rebranded as Sectigo. You can read more about it from the horse’s mouth here.

During this transition Sectigo went through rehoming their intermediaries. This was to show the Sectigo brand. Their Root CAs were due to expire in 2020.

Sectigo’s Documentation

Sectigo has a very nice document on this which does make a lot of sense. It does however seem to have some pieces that did not originally make sense. I was not quite left with enough warm fuzzies to leave it alone. You can read about it here. Their article lays a great foundation.

Cool Troubleshooting Tools

Not everyone is comfortable with using OpenSSL and inspecting certs manually. Here are a few of the cool tools I found along the way.

  • Certificate Decoder – Just plug in your PEM file contents and it will decode and give you the OpenSSL command to do so
  • crt.sh – Cool web portal to look up certificates based on thumbprint and other identifiers
  • SSL Labs – Server Test – If you want to see how your cert chain is trusted, this is one of the many things this site can do.

The Issue

Certificates issued by Sectigo are issued through “Sectigo RSA DV/OV/EV Secure Server CA”. For this example we will use “Sectigo RSA Domain Validation Secure Server CA” which is signed by “USERTrust RSA Certification Authority” which expires 30 May 2020. That is then signed by “AddTrust External CA Root” which also expires 30 May 2020.

AddTrust External CA Root has been around since 2000 and well trusted. What happens when this expires?

Digging In

Running through SSL Labs is an easy way to see the cert paths that are trusted. One good hint at this is the cert chain that the server sends. It is why it is important to include the intermediaries on whatever device is terminating the certificate.

Provided Cert Chain

Sectigo CA Certificate Trust Chain

So far this looks normal but you can see that the “Valid until” on #3 is 30 May 2020.

Trusted Cert Chain(s)

Sectigo SSL Labs Trusted Paths

Here you can see there are two trusted paths. Path #2 is in line with the cert chain we are providing with the early expiration.

Path #1 appears short circuited. One may think the same “USERTrust RSA Certification Authority” may be trusted. Upon further inspection, they have a different fingerprint.

Certificate Authority Collision?

It appears that Sectigo is signing the certificates with an Intermediary chained to a Root that expires in 2020. Due to an intentional name collision, it also matches another Root that expires in 2038.

If you inspect the Sectigo RSA Domain Validation Secure Server CA certificate you will notice the issuer is clear text with no unique identifier.

Sectigo RSA Issuer

This is the part that seems to be omitted in most documentation is that there are two “USERTrust RSA Certification Authority” CAs. One that expires in 2020 and one that expires in 2038. At the expiration of 2020, that path should no longer be valid. It is likely browsers and operating systems are already picking the shorter cert path if they trust it.

Final Words

Per Sectigo’s article I linked to we see SSL Labs do exactly what was expected. As always you should test, particularly on systems that are older and do not automatically update their Root CAs.

Trust Chain Path A:
AddTrust External CA Root [Root]
USERTrust RSA Certification Authority (Intermediate) [Intermediate 2]
Sectigo RSA DV/OV/EV Secure Server CA [Intermediate 1]
End Entity [Leaf Certificate]

Trust Chain Path B:
USERTrust RSA Certification Authority (Root CA) [Root]
Sectigo RSA DV/OV/EV Secure Server CA [Intermediate 1]
End Entity [Leaf Certificate]

They also provide a nice graphic of this

I also found these nice links

https://www.tbs-certificates.co.uk/FAQ/en/racine-USERTrustRSACertificationAuthority.html

https://www.tbs-certificates.co.uk/FAQ/en/USER-Trust-RSA-Certification-Authority.html

The interesting tidbit on the Cross Signed Intermediary is

This intermediate certificate is signed with SHA384 hash algorithm, but the root certificate it depends on – AddTrust External CA Root – is signed in SHA1. 
This historical chain presents a high compatibility rate with old systems or browsers that cannot be updated.
If you work with strict clients or systems that only accept full SHA256 (or more) certification chain, you can install the following chain on your server. It has the same name but it signed in SHA284:  USERTrust RSA Certification Authority. Then the chain will be shortened and won’t include a SHA1-signed certificate anymore.