Summary
This guide is designed for someone that has never performed a packet capture before or may have had to a few times but really did not understand it. Many times the packet capture can seem like a needle in a haystack.
Brief History
Wireshark has been around for quite some time. In 1998 it was called ethereal but had to change its name. You can find a full history of that on their Wikipedia page – https://en.wikipedia.org/wiki/Wireshark
Installing Wireshark
Wireshark can be downloaded from https://www.wireshark.org/download.html
On the installation, most of the defaults should work. On the machine you want to perform the capture on, make sure winpcap or now npcap are installed. That is what allows the packets to actually get captured on windows. UNIX like operating systems already come with the necessary libraries.
Capture Packets!
Here we will filter based on port 443 as we intend to make a connection to https://blog.woohoosvcs.com on port 443. First we need to select the adapter though. If you’re unsure of which one, you can see the traffic graph (squiggly lines). If you type the capture filter first and then change the adapter the filter will clear.
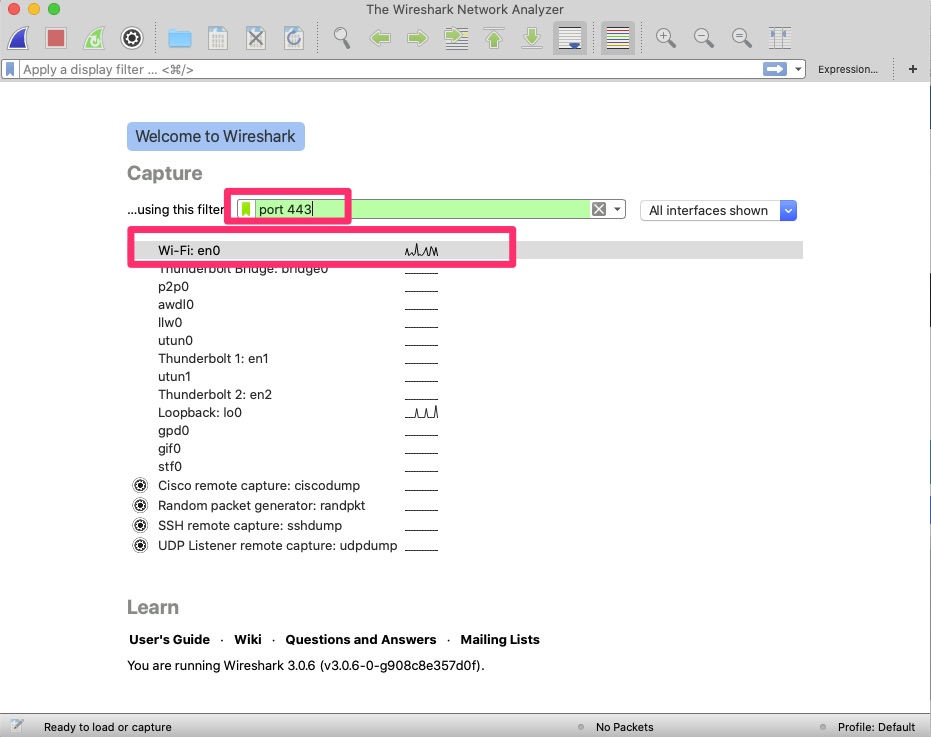
We want to limit the capture as much as possible because there will be a lot of traffic without a filter. Be careful though as filtering too much can lead to not capturing the intended packets.
Next I will curl or make a connection to https://blog.woohoosvcs.com
I am using curl -v so that I can see the IP address. This is an ipv6 address.
% curl -v https://blog.woohoosvcs.com0*   Trying 2606:4700:20::681a:d78...
* TCP_NODELAY set
* Connected to blog.woohoosvcs.com (2606:4700:20::681a:d78) port 443 (#0)
After running curl we want to click the red square button in wireshark to stop the capture. These can grow rather large.
We can then set a display filter to the ip address 2606:4700:20::681a:d78
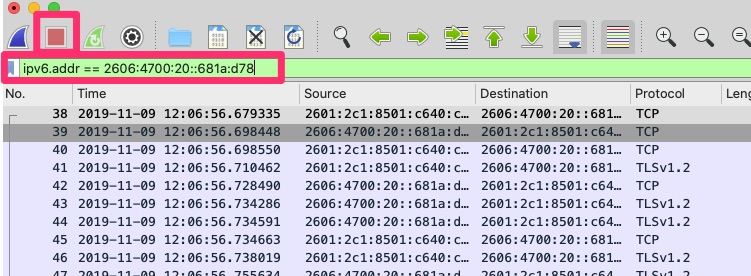
This helps us narrow down to just the packets necessary that we want to analyze. The capture filter restricts the packets that wireshark even sees coming from pcap. The display filter does just that. It filters what you are displaying but all the other packets it captured are still there.
Analyzing Packet
TCP Handshake
The first step to any TCP connection like HTTPS is a 3-way handshake. In TCP, it is a stateful connection protocol. It uses flags or options to help keep track of the connection. When making a new connection from my machine (A) to blog.woohoosvcs.com (B) the handshake looks roughly like this
A – > B (flag: SYN) – A is telling B it wants to make a new connection.
B -> A (flag: SYN+ACK) – B is telling A it “ACKnowledges” the original SYN and agrees to the connection with its own SYN
A -> B (flag: SYN) – A is telling B it ACKs the SYN from B
Visually we see that here

Many instances if the remote end does not want to accept your packet, it simply will not respond. You may see your SYN sent and nothing in return and SYN retries happening. Other times if it forcefully wants to deny the connection instead of SYN+ACK you will get an RST or RST+ACK in the response from the remote end.
Now that the connection is open and established, we can inspect the TLS handshake.
TLS Handshake

In the above, right below the 3 way handshake we can see a TLS “Client Hello”. This is similar to the 3 way handshake except for TLS. The client, in this case “curl” is trying to negotiate compatible methods of communication.
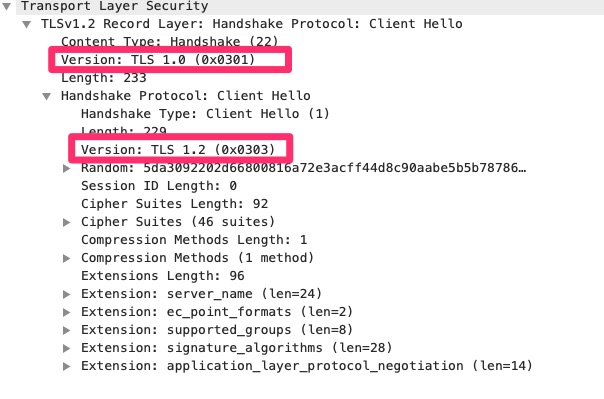
We cannot actually see the packets captured but we can see metadata about the TLS connection. The higlighted areas above may be confusing. Why is it announcing two different TLS versions. At the record level it is announcing TLS 1.0. This is the lowest version the client is indicating it supports. At the client hello envelope it is announcing TLS 1.2 which is the highest it supports. This tells the server anywhere between TLS 1.0 and 1.2.
Looking at the screenshot you can see other proposed settings that client is recommending/offering. The other main one are the cipher suites. What encryption methods does the client support.
The client is much like a catcher in baseball. It proposes the pitches or connection parameters. The server or pitcher just says yes or no.
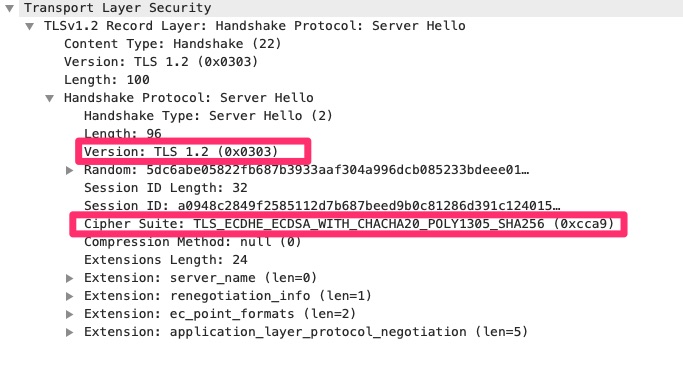
Here we can see the TLS 1.2 protocol was selected and a singular cipher suite. Many times the Server Hello is where it fails if the server requires a TLS version the client does not support or a cipher suite the client does not support. On this blog we have it set to require tls 1.2 or higher.
Forcing to Fail TLS Handshake
I will instruct curl to connect with TLS 1.0 as the max
% curl --tls-max 1.0 https://blog.woohoosvcs.com
curl: (35) error:1400442E:SSL routines:CONNECT_CR_SRVR_HELLO:tlsv1 alert protocol version
As you can see, the client complains but what does the capture look like?

In the capture above you can see the client hello. It specifies a max of TLS 1.0. In the 3rd packet you can see the server responding with an Alert instead of Server Hello and the 4th packet the server is actually closing the connection due to the protocol negotiation issue.
Final Words
In this article we learned how to run Wireshark and capture packets. From there we learned how to investigate the TCP 3-way handshake and a TLS negotiation. In real world scenarios, this will at least help you weed out these two types of issues.