Going down a reading rabbit hole, I recently read Team of Teams: New Rules of Engagement for a Complex World by General Stanley McChrystal. I was not sure what I was in for with this. Paraphrasing what General Stanley McChrystal wrote, while he was going through the events in the book, he was not sure if what he experienced was a fluke or there was something more to it.
While this article is not a review as there are plenty around, this book did start to move me. I started thinking about other applicable lenses to view this through. In the book, the automotive industry is cited a couple of times. This opened Pandora’s box for me. In it, one of the examples was the GM Ignition Recall that took nearly 10 years to have fixed for a $2 part. Ultimately it was an organizational structure failure. The low level teams had known about this months after the new ignition switches were sent out into the wild and reports had started coming back.
Why Tesla?
It is easy to get wrapped up in the politics and public displays for which Elon Musk is known. Setting that aside, what Tesla is doing is revolutionary for a few reasons. In these times, it is extremely hard to start a new automobile company. Tesla not only a new automobile company but using a fuel source that is not industry standard.
Tesla is different. They are not just an automobile manufacturing company. Elon himself in numerous interviews cites that Tesla is actually a “hardcore” engineering company. They manufacture numerous parts for the vehicle in house as well as write all of the software (Software Engineering).
Outside the scope of this article, they’re also a data mining company. They have driving details on now millions of their vehicles. This has various uses such as road mapping, driving patterns and improving their autonomous driving.
How Legacy Automotive Companies Operate
Many of the legacy automotive manufacturers are extremely siloed using the “reductionist” methodology of breaking down areas into small teams and pushing them for efficiency. There are many different vendors that make components for legacy car companies. They build them to the Original Equipment Manufacturers specifications to ensure interoperability. These vendors do not typically communicate with each other or all of them to understand the whole picture. What this means is that the Engine Control Module (ECM) may be manufactured by one company and the Transmission Control Module (TCM) may be manufactured by another. The software may then be subcontracted out by those vendors. They use interoperability standards but may have little idea of how the Battery Control Module (BCM) interacts with these two modules.
This allows scale and efficiency. Vendor management is a very strong tool to help mitigate concerns. Many, like Toyota are great at this. They many times will have supply manufacturing happen in the same plant as the cars are assembled. Contracts also tend to indicate suppliers have a certain stock of supplies to weather temporary supply chain issues.
How Tesla Operates?
Many of its key components are manufactured in house, such as its seats. This is not to say it does not outsource any manufacturing. It certainly does. One critical piece that Telsa handles in house is to write its own software. This was instrumental in its adaptability during the computer chip shortages of 2020 and onward.
Chip Shortage
During the chip shortages, OEMs could not get their hands on chips. Many of the big ones had lots filled with unfinished vehicles. They were simply waiting on chips to arrive with no end in sight. Cars were delivered without features, in many cases.
Tesla did deal with a delay in production because of this. Its adaptability in writing its software, allowed it to utilize chips that were available. Not only did it adapt its software, Tesla realized it could in some cases reduce the need for some of them. This is very well documented in https://www.utilitydive.com/news/tesla-chip-semiconductor-shortage/628150/
Wrapping it Up
Traditional car manufacturers are very siloed. They are built this way for efficiency and scalability. With this, they are very inflexible and not very adaptable. Many of them are struggling to become profitable on their Electric Vehicles (EVs). Recently even Ford has started to bring its software development in house. This allows for constant updates that are needed without ever having to go into the dealership. Many of the Tesla recalls have been corrected via OTA (Over the Air) updates to software.
Conclusion
In a modern world of complexity, teams cannot work in isolation. They need to be aware of what other teams are doing to have a shared vision. Cognitive load needs to be minimized or information overload will occur but in this new world of complexity and constant information, silos do not work.
Today I had my first Tesla Service Center visit. Rewinding a bit my Tesla journey started on 8/2/21 when I decided to downsize my Yukon and make the plunge into an EV. Fast forward a few months of constantly watching the Estimated Delivery Date and finally receiving ownership on 11/12/2021. The car has been great to drive but over the holidays I started getting a strange error.
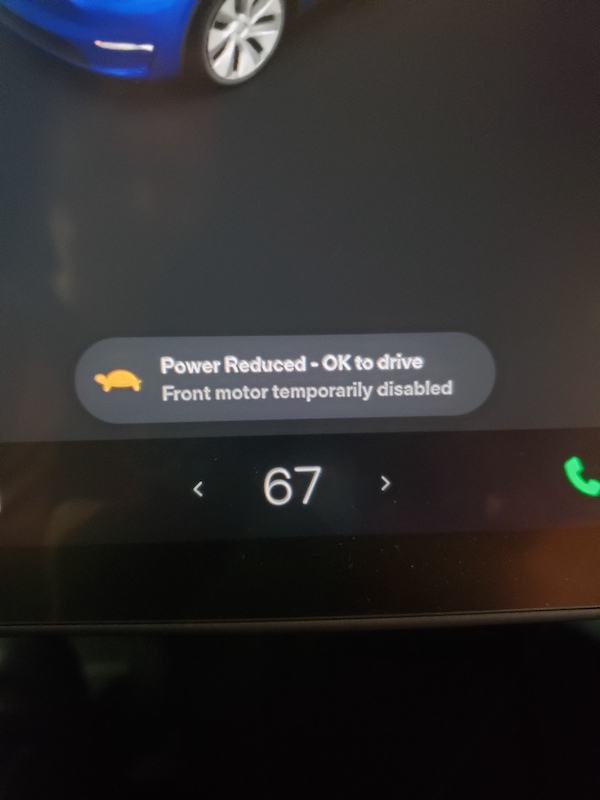
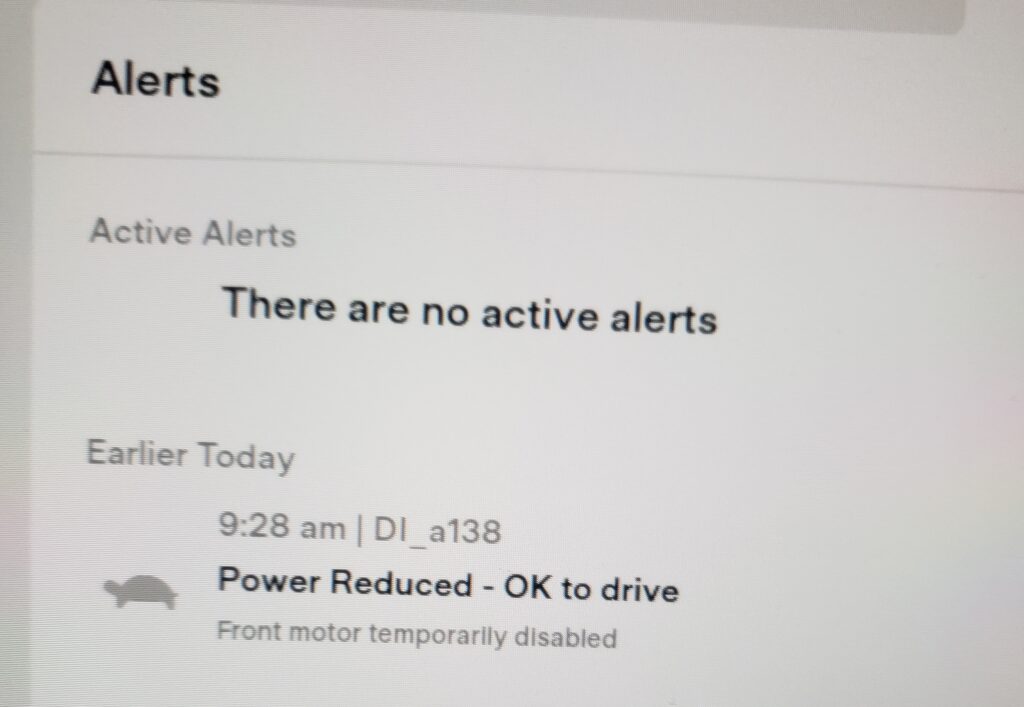
The Error – DI_a138
On 12/29/2021 I pulled my Model Y out of the garage and helped my mother in law in to take to the doctors. After getting back in and putting into park I received a strange error.
Power Reduced – OK to drive Front motor temporarily disabled DI_a138
Power Reduced – OK to drive Front motor temporarily disabledDI_a138 Power Reduced – OK to drive
I figured this was just a fluke but created a technical support case with Tesla on it via https://www.tesla.com/support. They checked and did not see anything but recommended I create a Service Appointment to request a virtual diagnostic if it persisted. It did and I did!
The Visit
After some back and forth chatting on the app, it was requested I drop off the vehicle early before the scheduled appointment for this issue to diagnose the drive unit and it would need to be there for 72-96 hours. I had hoped more could be done virtually but I got it and brought it in.
I spoke with the Service Advisor and he consulted with the lead tech. The Service Advisor then told me he had great news. They had already pulled logs and were ordering a new drive unit just incase and I was free to go with my vehicle and would not need to come back until further notice, likely when parts arrived.
This was really neat. I’ve heard the service visits being a mixed bag. Many times on the groups you only hear complaints but in the marketing materials you hear AI powering automatic parts ordering and virtual diagnosis. In this case while it would have been nice to save the drive I didn’t mind it. It also also nice for them not to need to keep my vehicle until parts arrived, particularly with the shortages happening these days.
More DI_a138 Details
So this was an interesting one. There is a higher probability of this happening when running errands sometimes and quick in and outs. This never happens on a “cold” drive where the car has sat for a bit. It appears that when some pre-drive check is done on the drive unit. It hits an error it doesn’t understand or some safety check and shuts down the front motor.
After finding some other articles in this happening in the past I realized I could just get out and back in and it goes away and drives with both motors enabled.
In some Model 3’s and Y’s from 2019 and 2020 there was a glitch where the motor needed to vent heat and it got confused. If this is the case it may just be a regression on the latest software. At this time it is 2021.44.30
Updates
As I hear more I’ll update this article but overall a great first experience with the service center.
1/19/2022 – Brought it in this morning and the short version is known firmware issue that’s now fixed.
“Performed diagnostics for front drive unit, Performed inspections of harness and all connectors and connector pins. No issues found. This was a past firmware issue that has been resolved with firmware 2021.44.30.6 and vehicle is now 1 firmware higher. test drove vehicle to verify no further issues.”
Car owners increasingly complain about road vibrations. You may get some new tires and notice a vibration you can’t explain. Over time a vibration may start or get worse. You bring it in and they can’t find anything wrong and recommend a tire balance and rotation. The issue is still there but the issue can’t be found. On the repair shop side, a customer comes in with a vibration complaint. Maybe they are being picky and its a minor vibration that is normal. Or perhaps you find the vibration and fix it but they still complain about it. How do you quantify the mitigation of the vibration?
This is what the science of Noise Vibration Harshness (NVH) aims to address. NVH “scopes” have been around for decades but many times they are difficult to read and understand. Newer scopes that make this much easier are out of budget for many people and repair shops. For repair shops they don’t tend to make money off troubleshooting these kinds of issues so it is hard to justify the expense.
My Exposure
In full disclosure, I came across this with my own vehicle vibration. I took it into the dealer and they did not find anything but recommended a road force balance. It seemed to help a little but not really.
I was researching scientific methods of identifying the vibration and came across NVH. My intent is to use this data to help provide some guidance and extra data for the dealer when asking them to use a PicoScope. I always like going in, informed and being able to provide objective and quantifiable data to the any repair shop. I don’t know that this will actually help narrow it down but understanding the science of how more professional tools works was a neat discovery.
High Level Science
The high level science to how a scope like these work is that they detect vibrations and use calculations to convert that to frequencies in hertz (Hz). That is basically a quantification of how many times per second that vibration happens. Each set of components components that rotate has a set frequency it will vibrate at. For example, an engine at 1200 Rotations Per Minute (RPM) is rotating at 20 Rotations Per Second. A hertz is a unit of measurement that represents one cycle per second. Something that cycles 20 times per second or rotations per second would be 20Hz.
It becomes a little complicated because vibrations can have an order to them. In the above example of an engine at 1200 RPM. Its first order vibration would be 20Hz. A second order vibration would be 40Hz, doubling for each subsequent order. Certain components have natural vibrations at various orders. For example an 8 cylinder engine will have a 1st order vibration and a 4th order vibration. Each engine has a Nth order vibration that is equal to half of their cylinders in a standard 4 stroke engine.
Everything in a vehicle vibrations, so how do we know what to look for? The amplitude of each vibration is the key. Many software packages measure this in meters per second squared or mg or mili-gravity. The universal constant for gravity is 9.81 meters per second squared so something traveling at 1G is accelerating or increasing speed at a rate of 9.81 meters per second every second. In the automotive world, typical vibrations are so minimal that we use mili-gravity or mg.
Understanding the Science For Automotive
The key to this is to find order vibrations that relate to major components. A vibration that relates to the engine does not mean the engine is to blame. It just means that something that spins at the same rate as the engine is the cause. This could be an engine fan, crankshaft, camshaft or other moving part at the same speed or one of the vibration orders.
The same applies to tires. Just because you found a vibration that correlates to tires doesn’t mean it is the tires. It could be a wheel bearing or other part that moves at the same speed as the tire.
The third major component that is measured is a drive shaft or prop shaft(in rear wheel drive vehicles). These typically rotate at a fixed rate that is related to tires but also by a multiplier of what your rear end ratio is. The rear end ratio is usually not a whole number like 4 to 1 or 4:1. It is usually something like 3.73:1, 4.11:1 or 3.23:1. This allows us to differentiate it from tire vibration orders fairly easily.
Dealer Tools
To combat this, the Dealers have tools at their disposal. In particular, in recent times they have a PicoScope with NVH modules – https://www.picoauto.com/products/noise-vibration-and-balancing/nvh-overview. There is a specific version for GM. It has a price point into the thousands of dollars depending on the model of unit and how many NVH modules. More NVH modules gives you different reference points for the concern and helps isolate it to the area of the vehicle.
Once nice thing about PicoScope though is the software itself is free. If you can get a dealer or someone else to run the diagnostics and send you the file, you can open it up and view/analyze it.
Lower End tools
There are other options. Since smart phones have the necessary equipment to capture many of the metrics necessary, one in particular called “NVH App” by VibrateSoftware caught my eye. These types of software use your phone’s accelerometer to detect vibrations and its GPS to detect speed. It is unfortunately out of most people’s budget @ $399.00USD. It does put it closer to budget for smaller repair shops though or hobbyists that deal with these kinds of issues frequently. Personally I think if they had a 3-4 day subscription for $50, more people would go for it or allow a yearly repair shop price of $399 it may do better. Even AC Delco’s TIS2WEB lets you have 3 day prices on their software. In any case it is very promising.
Even Cheaper!
If you really want to save a buck though, there are quite a few vibration apps not specifically geared towards this use case that you can use. I went through a few of them and came across myFrequency by APPtodate. It was fairly economical at around $9. The main feature you need is the ability to detect multiple frequencies at the same time. I won’t claim to understand the math behind it but I believe it has to do with determining velocities of the vibrations to distinguish them from each other when you’re using one accelerometer.
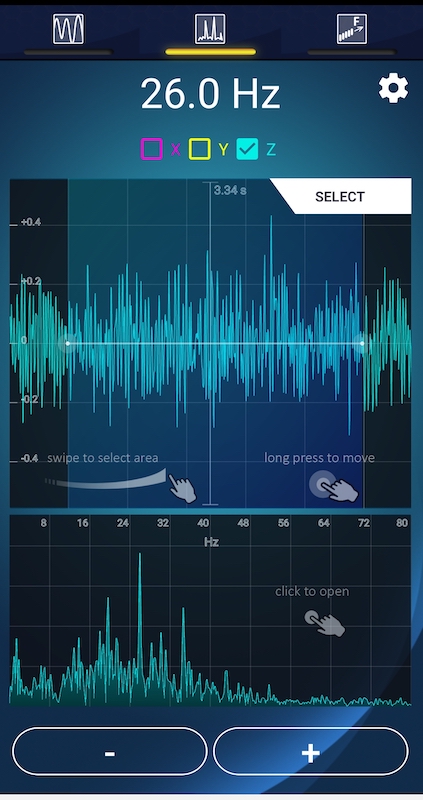
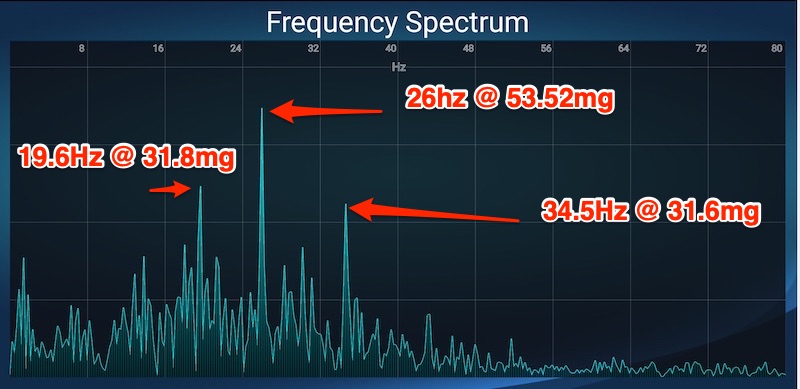
In this particular example I was driving my truck at 50mph and maintaining 1200rpm. The tires are P275/55R20 and rear end ratio is 3.23:1. We’ll get into later on what that all means. From here you can see the top frequency by amplitude is 26Hz. Drilling into the app it is at 53.52mg which is substantial.
Vibration Analysis in X axis
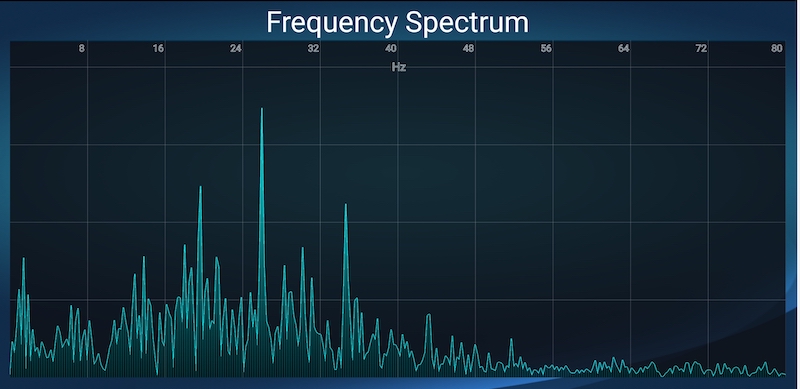
Here you can see the full frequency spectrum
Frequency Spectrum Analysis
This does however require you to do quite a few calculations and use a constant RPM and speed for the duration of the test. These tests are usually only 10-20 seconds so it is possible.
Deep Dive Into Math
As discussed, engine Hz is the easiest to calculate. Simply divide RPM by 60 to get RPS or Hz. In the above case 1200RPM / 60 = 20Hz.
At 50mph, the tire RPM becomes a little more lenghty. My tires are P275/55R20 which using a tire calculator like https://tiresize.com/calculator/ comes out to 31.9 inch diameter. 31.9 * 3.1416 (constant of PI) gives us 100.2 inch circumference. We already knew that because the calculator provides it. Divide that by 12 and we get 8.35 foot circumference. Every rotation of the tire goes 8.35 feet.
Every mile has 5280 feet in it. 50 miles per hour multiplied by 5280 gives us feet per hour. Divide that by 60 to get 4400 feet per minute. Divide that by 8.35 feet to come to 526.95 RPM. We can then divide that by 60 to get 8.78 as our first order tire vibration.
The rear end of 3.23 means that that prop shaft turns 3.23 times per one turn of the tire or every tire RPM/Hz equals 3.23 turns of the prop shaft. Multiplying 8.78 by 3.23 comes out to 28.36 Hz.
So now we have our first order vibrations of Engine 20Hz, Tire 8.78Hz and 28.36Hz of the prop shaft. We’re also looking for direct multiples of those as well.
Reading the Graph
Pointing out some of the peaks of the graph, you can see we have a 20Hz disturbance with a high amplitude and a 26Hz one as well. 20Hz matches up to the engine and 26 is fairly close. Usually it would have to be closer but I’ve not found the proper mounting point of the vehicle yet. I’m also just starting to take these measurements.
Some things could make the tire and prop shaft skew like not keeping exact speed and the fact that while tire diameters are the factory spec, when you put a vehicle on them they will not have a perfect diameter that matches. Tire wear can also play a little in the numbers.
In any case, this particular one seems to point more to engine RPM so I’ll likely take it for another run and bring up the engine RPM. This particular truck has had torque converter lockup issues and pulsates the TCC at around 1200RPM so I could be catching that pulsation on the TCC.
Final Words
If you don’t have access to a shop that has a PicoScope or similar NVH and don’t have the budget for the NVH app, you may have what you need to perform these calculations on your own. In my case I created a spreadsheet to calculate these frequencies based on engine RPM, speed and a few vehicle variables. For my test runs I just need to plus in the variables and see where the graphs line up.
Phone mounting is a huge variable in this. The more professional tools have heavy duty magnets that you adhere to the seat rail which is an excellent position to detect vibration. You can move them to various seats to find the source of the vibration as the amplitude is limited.
With a phone it is more difficult to find mounting points in various spots int he vehicle but hopefully this gives you an economical method to track down vibrations.
This is another automotive post on my journey through P0711 on my GM 8L90 transmission for my 2015 Yukon. It is on the K2XX platform. At 5 years old it is starting to get some mileage and wear as seen in GMT K2XX Magnetic Ride Control Shock Inspection.
Background
Monday morning I was out for a drive. With COVID all around us, I find I don’t get out of the house often. My truck still needs some miles on it or it would just sit for a while. All of a sudden I look down and notice the check engine light. I think this is the first time I have actually seen one on my truck. Despite being 5 years old, it only has 38k miles on it.
I’m fairly technical and like to do my own diagnostics when possible. I do it so that I can speak intelligently to the repair shop(dealer in this case). My truck was in the shop a few days on and off last week for some tire issues so I also wanted to avoid an unnecessary visit.
Diagnostic
Recently I acquired a Foxwell NT510 Elite. Its a pretty useful bidirectional scan tool. Bidirectional means it can not only read codes but it can do active tests as well and minor calibration resets. It seems to have most of the features of the more expensive ones but it is locked/licensed by the vehicle brand and usually comes with one brand free. In my case GM. You can purchase other brands and add them to the unit. On this model its a lifetime purchase which is nice.
In my case, I checked the codes starting with the ECM and had a P0700 – Transmission Control Module Requested MIL Illumination. This simply told me to check the Transmission Control Module which showed me P0711 – Transmission Fluid Temperature Sensor Performance. Here is a good link someone on www.gm-trucks.com shared with me – https://www.dtcdecode.com/GMC/P0711
The TCM wants to know transmission temp so it can make informed decisions on shift pressures. It will also do things like not lock up the torque converter clutch if it is too cold. I imagine the shift adapts require certain temperature ranges too, to learn properly.
Doing a bit of reading, seems many people have had failed Transmission Fluid Temperature (TFT) Sensors and they just fail. This was more so on the 2016 models which switched to a 1 piece hardness that encompassed the sensor.
On my dash, if in tow mode, I can tell TFT and it was showing a value. Using my scantool, it showed -40F originally but that ended up being a firmware bug and Foxwell sent me an updated code which fixed it. Cold ambient temp from letting it sit over night seemed in line with TFT. Monitoring it further though, the transmission never warms up to the recommended 195-200F. It also had a few cases where the temp dipped to 100 on the dash (lowest number).
Transmission Thermostat
On the 6L80 and 8L90 series, they introduced a thermostat to help increase the temperature to around 200 on daily driving. It is supposed to support better shifts. Others have said it also helps boil off the moisture which has been a huge problem for these transmissions. There is a small subset of people that feel this is too warm and they actually “delete” the thermostat to make it run cool constantly. They are either in much hotter climates or don’t believe the engineers at GM did it right. There is an old line of thinking that 200F will cook a transmission. They could be right but the warning temp on my dash indicates 300 and these newer fluids are supposed to easily get into the 240-250’s. Nobody on the forums with a properly working transmission seems to hit anywhere above 220 though and that’s under extreme loads. Normally the thermostat opens at 192 and any transmission cooler helps keep it down from much above that.
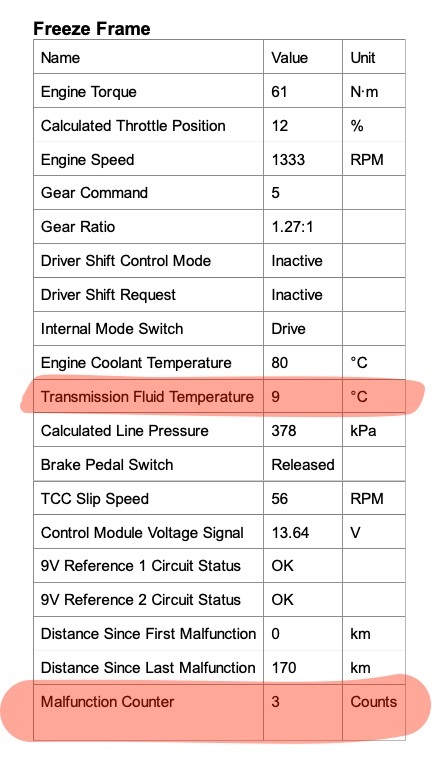
Freeze Frame
In any case, after clearing the codes one day, the next day only P0711 returned. It requires a second time to trigger before check engine shows up. I realized my Foxwell supports reading Freeze Frame. Its kind of like a black box but under less severe circumstances. In instances where certain codes are set, it will capture parameters that surrounded it. In my case I lucked out and it captured a 48F degree TFT which is definitely out of line
P0711 Freeze Frame
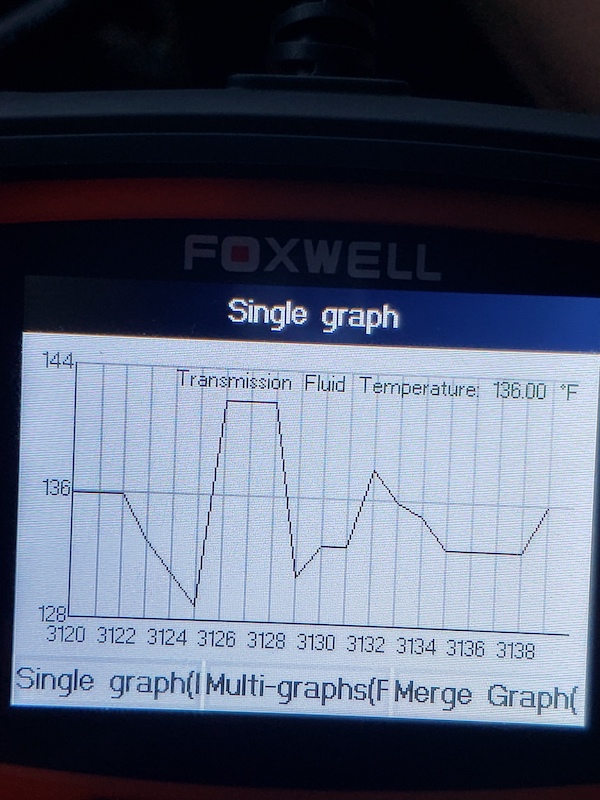
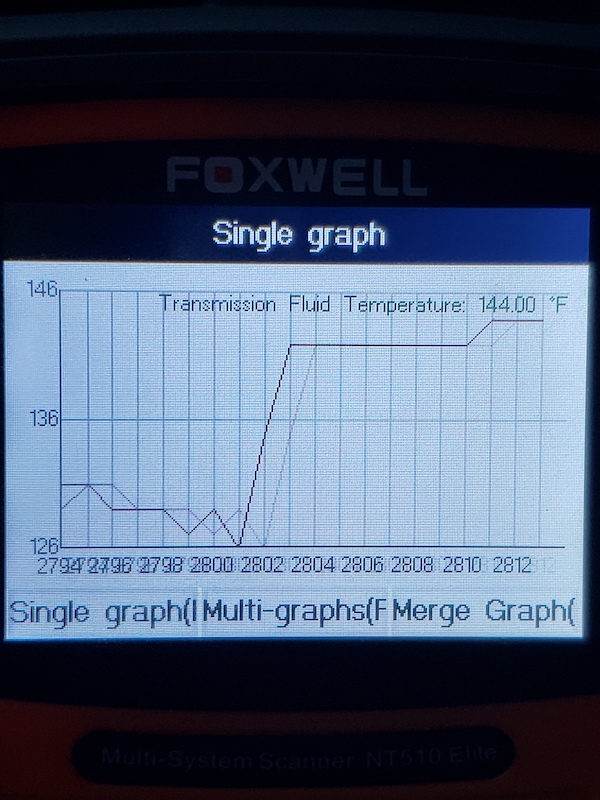
Graphing
I was even able to graph the temperature over the drive. It does seem like there is a bit of fluctuation but that could be because its not allowed to warm up with a possibly malfunctioning thermostat. Or the harness could be loose. Or the sensor could be inaccurate!
Temp over time
Replacing Transmission Fluid Temperature Sensor
There are quite a few videos on this. Here is a great one if you have the one piece harness, whereas at this time I think they switched back to the two piece which is less involved.
Conclusion
Since I have a GM Protection Plan (extended warranty), I’m not terribly interested in possibly voiding it. I also don’t have the expertise or comfort level to start toying with the transmission itself as the temperature sensor is in the pan. Appointment to the dealer made and I may update this Monday with the results. Regardless, anyone that gets a P0711 on a K2 platform on the 8L90 or even 6L80 transmission, this may help you diagnose it if you’re out of warranty. It could be an economical sensor/harness or even an easier to replace thermostat.