Articles

Sectigo Root CA Expiration

Summary

A few years ago Comodo CA was spun off from Comodo’s offering and rebranded as Sectigo. You can read more about it from the horse’s mouth here.

During this transition Sectigo went through rehoming their intermediaries. This was to show the Sectigo brand. Their Root CAs were due to expire in 2020.

Sectigo’s Documentation

Sectigo has a very nice document on this which does make a lot of sense. It does however seem to have some pieces that did not originally make sense. I was not quite left with enough warm fuzzies to leave it alone. You can read about it here. Their article lays a great foundation.

Cool Troubleshooting Tools

Not everyone is comfortable with using OpenSSL and inspecting certs manually. Here are a few of the cool tools I found along the way.

  • Certificate Decoder – Just plug in your PEM file contents and it will decode and give you the OpenSSL command to do so
  • crt.sh – Cool web portal to look up certificates based on thumbprint and other identifiers
  • SSL Labs – Server Test – If you want to see how your cert chain is trusted, this is one of the many things this site can do.

The Issue

Certificates issued by Sectigo are issued through “Sectigo RSA DV/OV/EV Secure Server CA”. For this example we will use “Sectigo RSA Domain Validation Secure Server CA” which is signed by “USERTrust RSA Certification Authority” which expires 30 May 2020. That is then signed by “AddTrust External CA Root” which also expires 30 May 2020.

AddTrust External CA Root has been around since 2000 and well trusted. What happens when this expires?

Digging In

Running through SSL Labs is an easy way to see the cert paths that are trusted. One good hint at this is the cert chain that the server sends. It is why it is important to include the intermediaries on whatever device is terminating the certificate.

Provided Cert Chain

Sectigo CA Certificate Trust Chain

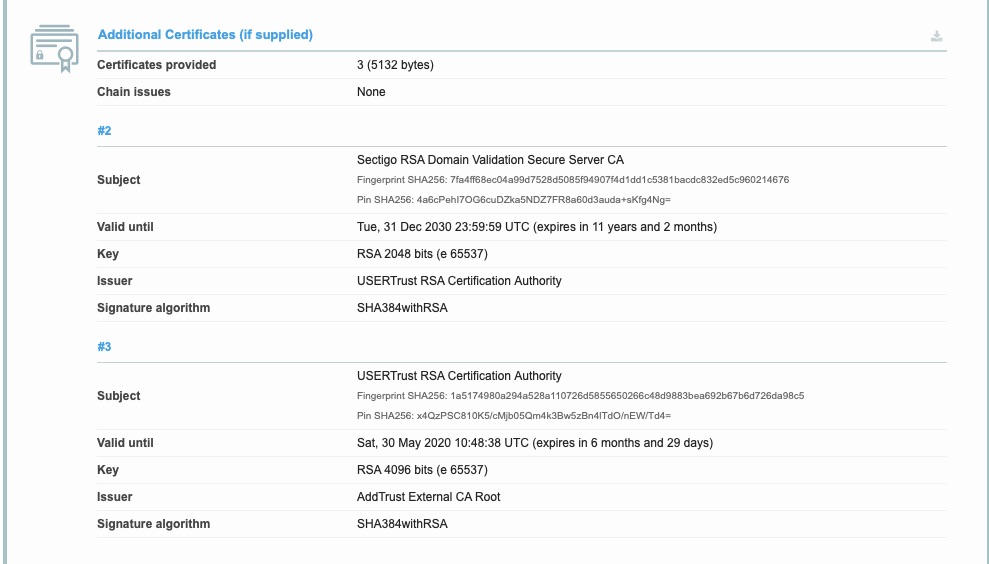
So far this looks normal but you can see that the “Valid until” on #3 is 30 May 2020.

Trusted Cert Chain(s)

Sectigo SSL Labs Trusted Paths

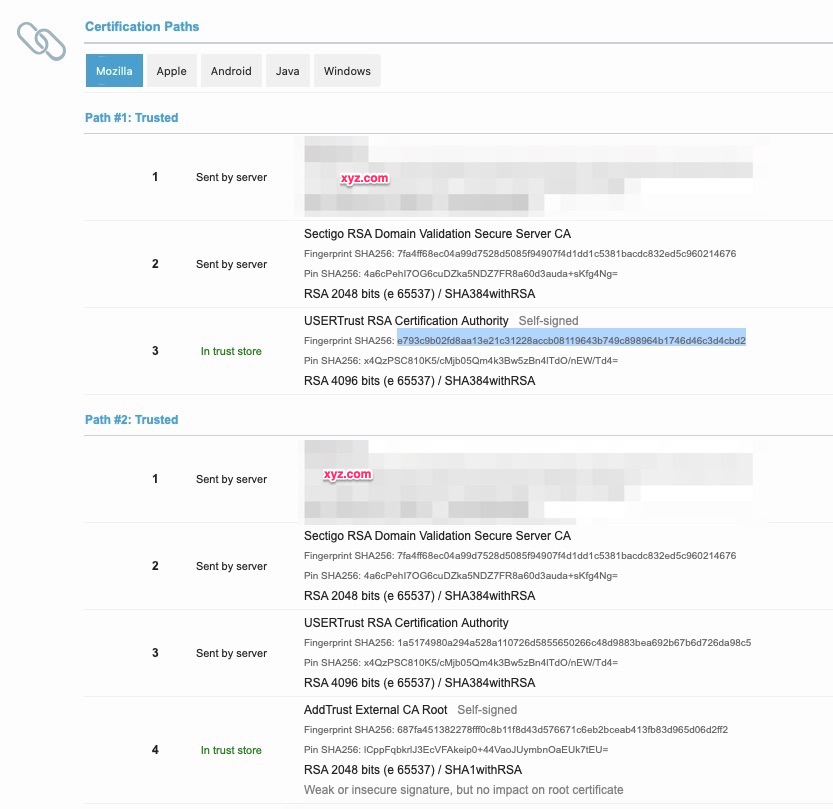
Here you can see there are two trusted paths. Path #2 is in line with the cert chain we are providing with the early expiration.

Path #1 appears short circuited. One may think the same “USERTrust RSA Certification Authority” may be trusted. Upon further inspection, they have a different fingerprint.

Certificate Authority Collision?

It appears that Sectigo is signing the certificates with an Intermediary chained to a Root that expires in 2020. Due to an intentional name collision, it also matches another Root that expires in 2038.

If you inspect the Sectigo RSA Domain Validation Secure Server CA certificate you will notice the issuer is clear text with no unique identifier.

Sectigo RSA Issuer

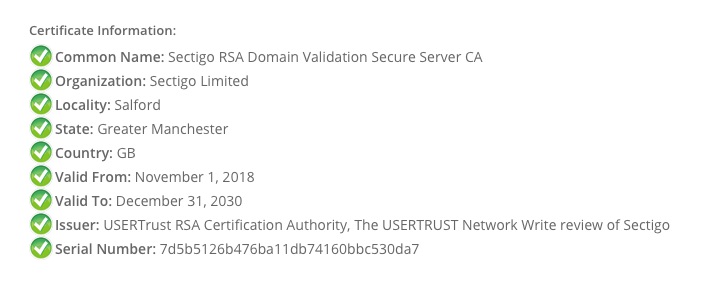
This is the part that seems to be omitted in most documentation is that there are two “USERTrust RSA Certification Authority” CAs. One that expires in 2020 and one that expires in 2038. At the expiration of 2020, that path should no longer be valid. It is likely browsers and operating systems are already picking the shorter cert path if they trust it.

Final Words

Per Sectigo’s article I linked to we see SSL Labs do exactly what was expected. As always you should test, particularly on systems that are older and do not automatically update their Root CAs.

Trust Chain Path A:
AddTrust External CA Root [Root]
USERTrust RSA Certification Authority (Intermediate) [Intermediate 2]
Sectigo RSA DV/OV/EV Secure Server CA [Intermediate 1]
End Entity [Leaf Certificate]

Trust Chain Path B:
USERTrust RSA Certification Authority (Root CA) [Root]
Sectigo RSA DV/OV/EV Secure Server CA [Intermediate 1]
End Entity [Leaf Certificate]

They also provide a nice graphic of this

I also found these nice links

https://www.tbs-certificates.co.uk/FAQ/en/racine-USERTrustRSACertificationAuthority.html

https://www.tbs-certificates.co.uk/FAQ/en/USER-Trust-RSA-Certification-Authority.html

The interesting tidbit on the Cross Signed Intermediary is

This intermediate certificate is signed with SHA384 hash algorithm, but the root certificate it depends on – AddTrust External CA Root – is signed in SHA1. 
This historical chain presents a high compatibility rate with old systems or browsers that cannot be updated.
If you work with strict clients or systems that only accept full SHA256 (or more) certification chain, you can install the following chain on your server. It has the same name but it signed in SHA284:  USERTrust RSA Certification Authority. Then the chain will be shortened and won’t include a SHA1-signed certificate anymore.

CheckPoint R80 H.323 Woes

Summary

As you may have read previously in my CheckPoint R77 to R80 article – There are some fun nuances and slight changes. I did the first policy push on a Friday since upgrading to R80.20 on the Management Server. Monday afternoon some phones started having issues. At first I thought it was coincidental. Coincidences rarely happen though. SmartConsole Logging wasn’t reporting any drops.

How can a change delay days?

In our environment, instead of having CheckPoint rematch ACLs on Policy push, we accept all previously trusted connections. This helps avoid connections resetting after a policy push.

CheckPoint Keep All Connections

With this, already trusted TCP connections were allowed but new ones were being prevented and it took a few days for some of the phones to reset/reconnect and get blocked.

Logging

We log all traffic and blocks but this one was not reporting as dropped

I was even using the “fw ctl zdebug + drop” command and it reported no drops. SmartConsole reported it even accepting the TCP/1720 packet but it simply did not get routed from the ingress interface to egress interface.

I verified this by running tcpdump on the CheckPoint as well as further down machines and I could see the CheckPoint receiving the TCP/1720 but then went into a black hole.

The Fix

I was all set to enable H.323 Debugging when I came across this article and found it. Specifically this section

Documentation - Allow an initiation of H.323 connections from server to endpoints

From all of my packet tracing this was the case. The Phones could register via UDP/1719 but when the GateKeeper would try to connect back to the phones over TCP/1720 the firewall accepted it but something else in CheckPoint was blocking it so it had to be H.323 inspection.

I went ahead and enabled this and bam, it started working!

Setting - Allow an initiation of H.323 connections from server to endpoints

Just add this to the list of fun nuances. I believe R77 was just more relaxed in this case about the inspection and in R80 they have tightened it up a bit.

How I Stood Up WordPress In a Day

Why?

The purpose of this article is just to describe how I did it. Not to imply that it is inherently difficult. For more on why check out the About page.

Where I Started From

I already had the domain woohoosvcs.com and the registrar was GoDaddy who was also hosting DNS. I decided I would host WordPress in Google Cloud due to my familiarity of it and already using G Suite. Therefore I did migrate my registrar to GoDaddy. I had thought I could do a CNAME DNS setup in CloudFlare as I walk through in my article https://blog.woohoosvcs.com/2019/10/beginners-guide-to-cloudflare/ but I was not ready for the Business Plan price tag of that and eventually moved my DNS to CloudFlare.

Why I Chose What I Chose

Due to work exposure I was very familiar with Google DNS, Google Cloud and CloudFlare so I decided to use those based on previous knowledge and price. GoDaddy was charging me $26/year whereas Google Registrar Services were $12 for the same domain. CloudFlare is between $0 and $20 depending on Free versus Professional Tier.

Google Cloud had an easy WordPress Template for a few scenarios but I chose hosted VM. Google was also offering a $300 credit on new activations which I happily opted for

To The Actual Topic!

DNS

So my first order of business was to move my DNS to CloudFlare. I was a bit reluctant as many may be. I just have one site I need protected by CloudFlare, why should I move my entire DNS there? Its a valid concern and why they have CNAME setup but on a pricier tier.

I have been doing this a while and remember when it used to take multiple days to change your nameservers. I changed registrars and then nameservers twice within a few days. The only reason it took so long is before moving to CloudFlare I decided to enable DNSSEC which I had to disable.

Cloud Flare

Once the nameservers were set to CloudFlare’s the setup nearly set it self up in CF with the exception of setting a few specifics I wanted, like requiring TLS 1.2 or higher.

Word Press on Google Cloud

This was just as easy as clicking the template and letting it deploy on a VM. I chose a VM due to the simplicity for myself to manage but I am fairly technical. I think Kubernetes or App Engine may be more difficult although they will scale much more in the long run more easily.

Cloud Flare TLS Cert

To allow it to work in TLS – Full mode though I needed to enable TLS on apache which is where it gets a bit technical.

To do this, CloudFlare will generate an origin cert for you so you do not need to purchase one or an extra one but you can certainly use one if you purchased it.

CloudFlare Origin Cert

WordPress TLS Cert

I then needed to edit a few things on the VM. The origin cert creation created a private key and certificate. Upon creation, please copy these down as you will have to re-generate if you need the private key again.

I put these in the following respective directories

/etc/ssl/certs/blog.woohoosvcs.com.crt
/etc/ssl/private/blog.woohoosvcs.com.key

Linux Trusted Roots

At the very bottom of the page to generate the origin certs it had a link to download the trusted roots. These are needed so that Linux and WordPress trust it. These were placed in the following locations

/usr/share/ca-certificates/cloudflare
/usr/share/ca-certificates/cloudflare/origin_ca_rsa_root.crt
/usr/share/ca-certificates/cloudflare/origin_ca_ecc_root.crt

Then the “/etc/ca-certificates.conf” file had entries appended to it to notate these

cloudflare/origin_ca_ecc_root.crt
cloudflare/origin_ca_rsa_root.crt

Then run “update-ca-certificates” and it should rebuild the CA Directory that the local system trusts. WordPress however has its own copy of the ca file that you must copy over.

# Take a backup!
cp /var/www/html/wp-includes/certificates/ca-bundle.crt cp /var/www/html/wp-includes/certificates/ca-bundle.crt.orig

# Copy the system CA to WP
cp /etc/ssl/certs/ca-certificates.crt /var/www/html/wp-includes/certificates/ca-bundle.crt

# Append the site name to localhost in /etc/hosts
root@wordpress-1-vm:/var/www/html# cat /etc/hosts
127.0.0.1	localhost blog.woohoosvcs.com

# Edit Apache / WordPress site config
/etc/apache2/sites-enabled/wordpress.conf

<VirtualHost *:443>
    SSLEngine On
    SSLCertificateFile /etc/ssl/certs/blog.woohoosvcs.com.crt
    SSLCertificateKeyFile /etc/ssl/private/blog.woohoosvcs.com.key
    SSLCACertificateFile /etc/ssl/certs/ca-certificates.crt

    ServerAdmin [email protected]
    ServerName blog.woohoosvcs.com
    #ServerAlias www.example2.com #If using alternate names for a host
    DocumentRoot /var/www/html/
    #ErrorLog /var/www/html/example.com/log/error.log
    #CustomLog /var/www/html/example.com/log/access.log combined
</VirtualHost>


# Restart apache
systemctl restart apache2

# It should listen on 443 now

root@wordpress-1-vm:/var/www/html# netstat -an | egrep "443.*LISTEN"
tcp6       0      0 :::443                  :::*                    LISTEN     

From here you can try to curl and see if it works – Log entry below is truncated to save space.

root@wordpress-1-vm:/var/www/html# curl -v https://blog.woohoosvcs.com
*   Trying 127.0.0.1...
* TCP_NODELAY set
* Expire in 200 ms for 4 (transfer 0x55f514505f50)
* Connected to blog.woohoosvcs.com (127.0.0.1) port 443 (#0)
* ALPN, offering h2
* ALPN, offering http/1.1
* successfully set certificate verify locations:
*   CAfile: none
  CApath: /etc/ssl/certs
* TLSv1.3 (OUT), TLS handshake, Client hello (1):
* TLSv1.3 (IN), TLS handshake, Server hello (2):
* TLSv1.3 (IN), TLS handshake, Encrypted Extensions (8):
* TLSv1.3 (IN), TLS handshake, Certificate (11):
* TLSv1.3 (IN), TLS handshake, CERT verify (15):
* TLSv1.3 (IN), TLS handshake, Finished (20):
* TLSv1.3 (OUT), TLS change cipher, Change cipher spec (1):
* TLSv1.3 (OUT), TLS handshake, Finished (20):
* SSL connection using TLSv1.3 / TLS_AES_256_GCM_SHA384
* ALPN, server accepted to use http/1.1
* Server certificate:
*  subject: O=CloudFlare, Inc.; OU=CloudFlare Origin CA; CN=CloudFlare Origin Certificate
*  start date: Oct 27 03:53:00 2019 GMT
*  expire date: Oct 23 03:53:00 2034 GMT
*  subjectAltName: host "blog.woohoosvcs.com" matched cert's "*.woohoosvcs.com"
*  issuer: C=US; O=CloudFlare, Inc.; OU=CloudFlare Origin SSL Certificate Authority; L=San Francisco; ST=California
*  SSL certificate verify ok.
> GET / HTTP/1.1
> Host: blog.woohoosvcs.com
> User-Agent: curl/7.64.0
> Accept: */*
> 
* TLSv1.3 (IN), TLS handshake, Newsession Ticket (4):
* old SSL session ID is stale, removing
< HTTP/1.1 200 OK
< Date: Mon, 28 Oct 2019 15:10:14 GMT
< Server: Apache
< Link: <https://blog.woohoosvcs.com/wp-json/>; rel="https://api.w.org/"
< Link: <https://blog.woohoosvcs.com/>; rel=shortlink
< Vary: Accept-Encoding
< Transfer-Encoding: chunked
< Content-Type: text/html; charset=UTF-8

WordPress Health Check

WordPress has a nice health check feature that can help you verify that comunication is great. This is under the Admin Page / Tools / Site Health

It took a bit to get here but I worked through the issues. One of them is the image deployed with Debian 9 which had an older PHP version (7.0) so I went through an in place upgrade to Debian 10 (not covered by this article)

Some of the problems I had while initially setting this up were loopback connections from the server itself and inaccessibility of the API when I changed the permlinks to “pretty”

I had to enable / Add the “Allow Override All” to my wordpress.conf file

<Directory /var/www/html>
  Options -Indexes
  AllowOverride All
</Directory>

Are we there yet?

At this point you should have a fairly secure and usable WordPress blog site. If you don’t want to go through all these hassles there are plenty of hosting providers but this only cost me $12/year for the registrar fees and $0-$20 a month for CloudFlare depending on whether I want the WAF enabled. Google Cloud on the $300 credit should last about a year and then be $30/month, if that for the VM hosting this.

Beginner’s Guide to CloudFlare

Summary and Overview

In fully disclosure, at least at the time of this writing, this blog uses CloudFlare but I am not compensated for mentioning it. I am really a fan of the product. In today’s world, sites and servers exposed to the internet are constantly scanned for vulnerabilities and exploits. I happen to look at such logs on a daily basis and see them constantly in a wide variety of systems.

Exploited and attacked systems can have effects that range from a site or network being brought down to sensitive data being stolen and sold to anywhere in between.

Firewalls are great but traditionally they do not inspect and potentially block traffic. Some do and are great, such as Checkpoint and Palo Alto but many times they have a high barrier to entry and require a traditional infrastructure that allows a physical or virtual appliance to exist.

Firewalls at the edge of your network are not great at dealing with Distributed Denial of Service (DDoS) attacks because everything is funneling to your firewall. If the DDoS saturates your internet connection, their goal is achieved and legitimate traffic gets dropped too.

Also with new encryption, specifically most TLS connections using Diffie Hellman – it is not enough to load the TLS key on to an intermediary device to decrypt. It must actually terminate to the device, whether that’s CloudFlare, F5, CheckPoint, etc.

Why CloudFlare?

Web Security

Appliances and services like CloudFlare are great because they are specialized to understand HTTP transactions and content and with something like CloudFlare that sees a major chunk of the internet traffic their heuristics are fairly good.

This blog for example is just a web site exposed to the internet, so I will use it as an example for setup and benefits.

Pricing and Tiers

CloudFlare has a few different tiers, ranging from free ($0/month), professional ($20/month), business ($200/month) and enterprise($much more/month). Sometimes its difficult to be knowledgeable of which features exist in each addition until you try to implement them and realize you need the next tier up. That is really my only major gripe with it but it does have a free tier so can one really complain?

Distributed Architecture

Their environment is highly distributed so that local denial or distributed denial of service attacks are typically limited to the region they originate. In a truly distributed attack, the nodes closest to the source of the DDoS tend to not get as overloaded because they catch it closer to the source.

This distributed nature combined with their build in caching also greatly increases performance as static content on your site is cached close to where requestors are requesting it. This helps your site scale and mitigates/minimizes the need to spin up more servers closer to the consumers of your web content.

In a fairly static site like this blog, it helps keep hosting costs lower! This page has some good “marketing” documentation on it – https://www.cloudflare.com/cdn/

Beginning Onboarding

Configuration is fairly straight forward. You can sign up online, indicate the domain name. It will then try to pull down your existing DNS records from the existing provider as you will ideally want CloudFlare to host your DNS. This allows it to use AnyCast to provide responses as close to the destination as possible. For those that are a bit skeptical of hosting your DNS with CloudFlare, at the Business level (currently $200/month) you can do a CNAME setup for just domains and subdomains.

Before you point your NS records to CloudFlare, export your records from the current hosting provider and make sure what CloudFlare has matches up.

All of these entries would normally be public but for proxied entries, CloudFlare will actually point it at one of its termination points and forward to this entry. Its a good idea to keep these private so potential attackers do not know the source of the content and attempt to bypass CloudFlare.

Any records that do not need to go through CloudFlare, click on the “Proxied” status and it will change to DNS only.

Once you point your DNS servers at CloudFlare’s and check, you are most of the way there!

Enabling SSL/TLS

SSL has actually be deprecated and replaced by TLS but it has been around that people still call it TLS. You will see it used interchangeably everhwere. This allows CloudFlare to terminate TLS for you. In the earlier days, all static content was plain text/unecrypted via http/80. These days though browsers start to mark that content as insecure, search engines rank those sites lower and people generally look for the lock in their browser that indicates the site is secure. This is whether the content really needs it. For this reason it is important to enable TLS so that users have a better browsing experience and any potential sensitive data is encrypted. Some examples of that are usernames and passwords when logging into a site.

TLS – Full

TLS – Full is the best compromise of all. CloudFlare will issue a certificate to its endpoint, unless you have a custom one you would like to upload. The Business plan is required for custom certificates, otherwise you will get a shared certificate with other random customers of CloudFlare.

Full also encrypts between CloudFlare and your web server/service. This allows end to end encryption. By default CloudFlare will issue a free origin certificate but unless you are in Full (strict) the origin certificate is not validated so it can be a self signed or expired certificate.

Enabling Web Application Firewall

The Web Application Firewall (WAF) is the heart of the protection of CloudFlare. It has a list of protections and vulnerabilities that are enabled based on your needs to better protect your site. In order to help prevent false positives though, it is best to only enable what you need.

You will note that it does require the Professional plan which at the time of this writing is about $20/month.

If you opt for Pro or higher, you can enable the WAF via the following option and then enable the individual managed rules that apply to your site.

The list goes on and on for a bit so this is not all inclusive.

Securing Your Origin

Once you are completely comfortable with CloudFlare, do not forget to secure your origin. By this I mean setup ACLs to restrict connections to only allow CloudFlare to connect to it. This way malicious parties do not simply bypass CloudFlare. This list is always kept up to date – https://www.cloudflare.com/ips/

CheckPoint Syslog Data to Elastic Stack

Recently I had an opportunity to get some exposure Elastic Stack (previously ELK). I had some downtime and a possible need for this and an app team was looking at replacing splunk with it. I will not be going into the install of it here but there are plenty of how-to guides on it and possibly another article.

We produce a ton of CheckPoint logs that were previously going to both the Management Server and proxied to Microsoft OMS via syslog relay. The problem with OMS is it was not indexed by field and at the time of implementation, there was not an easy way to do it. Integrating this into a stack that non infrastructure support staff may have access to was a bonus.

For those not familiar with Elastic Stack, it is primarily made up of Elastic Search (search engine), Logstash (data flow manipulator) and Kibana (web front end). The later versions also implemented beats as a light weight mechanism for pulling in syslog data, file data and a few others without having to load Logstash where the logs reside as it has some beefy memory requirements.

With Logstash, it is very easy to filter CheckPoint data that 1) gets a syslog header wrapped around it due to the proxy and 2) has embedded key value pairs.

Here is a sample of the log

29:51--7:00 1.1.1.1 CP-GW - Log [[email protected] Action="accept" UUid="{0x5da7ee3f,0x4,0x5679710a,0xc0000005}" rule="42" rule_uid="{0F0D6B41-C4CC-45E1-A059-0753CBAB43E1}" rule_name="Allowed Traffic" src="2.2.2.2" dst="3.3.3.3" proto="6" product="VPN-1 & FireWall-1" service="1234" s_port="4321" product_family="Network"]

And here is the logstash config to go with it.

  if [type] == "syslog" and "checkpoint" in [tags] {
    grok {
      match => { "message" => "<%{POSINT:priority}>%{SYSLOGTIMESTAMP:syslog_timestamp} %{IPORHOST:checkpoint.cluster}  %{DATA:checkpoint.timestamp} %{IPORHOST:checkpoint.node} %{DATA:checkpoint.product_type} - %{DATA:checkpoint.log_type} \[Fields@%{DATA:checkpoint.field_id} %{DATA:[@metadata][checkpoint.data]}\]" }
      add_field => {
         "received_at" => "%{@timestamp}"
         "received_from" => "%{host}"
      }
      remove_field => [ "host" ]
    }
    mutate {
      gsub => [ "checkpoint.timestamp", "--", "-" ]
    }
    date {
      match => [ "syslog_timestamp", "MMM  d HH:mm:ss", "MMM dd HH:mm:ss" ]
      #This is not quite ISO8601 because it has the timezone on it
      #match => [ "checkpoint.timestamp", "ISO8601" ]
    }
    kv {
        prefix => "checkpoint."
        source => "[@metadata][checkpoint.data]"
        transform_key => "lowercase"
    }
    mutate {
      rename => { "checkpoint.name" => "checkpoint.protection_name" }
      rename => { "checkpoint.type" => "checkpoint.protection_type" }
      rename => { "checkpoint.level" => "checkpoint.confidence_level" }
      rename => { "checkpoint.profile" => "checkpoint.smartdefense_profile" }
      rename => { "checkpoint.impact" => "checkpoint.performance_impact" }
      rename => { "checkpoint.info" => "checkpoint.attack_info" }
      rename => { "checkpoint.src" => "source.ip" }
      rename => { "checkpoint.s_port" => "source.port" }
      rename => { "checkpoint.dst" => "destination.ip" }
      rename => { "checkpoint.service" => "destination.port" }
      rename => { "checkpoint.node" => "hostname" }
    }
  }
}

output {
  if [type] == "syslog" and "checkpoint" in [tags] and "_grokparsefailure" in [tags] {
    file {
        path => "/var/log/logstash/checkpoint_failure.log"
#         codec => rubydebug
    }
  }

The “grok” filter seems to be a simplified regular expression where you can match data based on the type and is fairly self explanatory for those familiar with Regular Expressions

The “kv” filter is a for the Key/Values in the fields. I could do a better job of using this as the fields sometimes have spaces in them which kv doesn’t match automatically but that’s a word in progress. That’s why the mutate filter is renaming some of the fields.

CheckPoint R77.30 To R80.20 Upgrade Nuances For a n00b

I have been going through a CheckPoint R77.30 to R80.20 upgrade. I was lucky enough to have a “lab” instance to run this through as we plan for production.

In going through this upgrade, I learned a few things being fairly new to CheckPoint.

#1 – Newer Management servers can manage much older Security Gateway. I was concerned that upgrading the management server and leaving it as is for a while which would likely be the case for production would become a major issue but it is well supported by CheckPoint. It appeared that the R80.20 Management server could manage as old as R65 SGs.

#2 – When you have an R80.20 Management server pushing IPS updates to an R77.30 instances, the R80 instance translates the IPS rules since there were major changes. This was a concern because R77 is past End of Support so I wanted to ensure IPS rules could still be downloaded and supported.

#3 – When you actually upgrade the Security Gateway, some of the IPS inspection rules change or act differently. One in particular is the “Non Compliant HTTP” which appears to no longer support HTTP 0.9.

For #3 – What this means is that GET requests without a version will may get blocked by default with the reason “illegal header format detected: Malformed HTTP protocol name in request”

Interestingly enough vendors like F5 by default for http monitors use HTTP 0.9 – https://support.f5.com/csp/article/K2167

Taken from the article

http example - HTTP 0.9 GET /
HTTP 0.9 GET /

Check_MK (https://checkmk.com) when setup for distributed monitoring (remote sites) also uses an http “like” protocol that triggers this.

Options are either to add exclusions in the IPS Inspection Setting to bypass the Non Complaint for these specific cases or in the case of F5, create an HTTP 1.0 or higher compliant HTTP check.

f5 http
GET / HTTP/1.1

UPDATE: 2019-11-07 – I decided to kick a ticket around with CheckPoint Support on this one but have not heard back. I imagine since HTTP 1.0 has been around circa 1996 they decided to require it. In doing so they likely forgot many out of the box software is backward compatible to HTTP 0.9

UPDATE: 2019-11-11 – CheckPoint provided me with sk163481. The dates of this are after my ticket so my inquiry most likely triggered this.