My review of the KarbiaMobile 6L by AliveCor. It is a pretty interesting device that can help detection if you are having some strange heart rhythm issues.
Summary
Earlier in the week I had some heart irregularities that scared me. Upon visiting my Primary Care he calmed my concerns but recommended a device I had actually already been looking into to help monitor at home.
The device was KardiaMobile by AliveCor. In doing my own research, I came across it but I wasn’t sure how accurate it was. Since my doctor recommended it and said he had one I was satisfied by the quality of the results.
Options
There are two main options. A Single lead which is their original product or the new Six Lead (6L). For me, for the extra quality of the EKG I opted for the 6L as it was only marginally more expensive and why not?
In short, more leads equate to a higher quality EKG with more data points although for most of us, the single lead will do just fine for home monitoring.
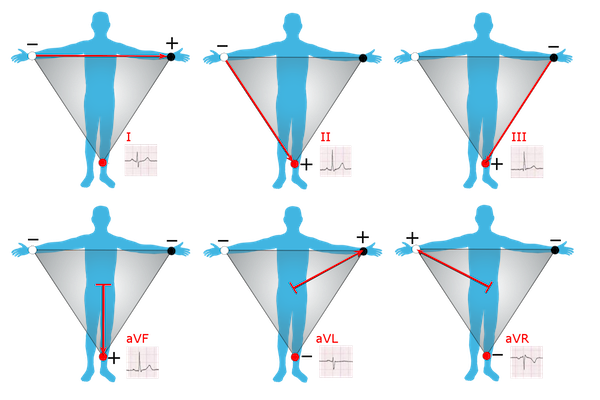
Here is a picture of the measurements of a 6 lead. A single lead is simply the first “I” listed below. Leads 4-6 (aVF, aVL and aVR) are calculated and not actual. Its fun how triangles work, isn’t it 🙂
By Npatchett – Own work, CC BY-SA 4.0, https://commons.wikimedia.org/w/index.php?curid=39235282
Detection
The natural question is exactly what can this detect? It is FDA-Cleared to detect the following
Bradycardia
Tachycardia
Possible Atrial Fibrillation
The nice part about it is Kardia only uses the first lead to detect these so you do not always have to take the 6 lead test. It can sometimes be inconvenient if you are in a public place.
Unboxing
It arrived in a small box.
Kardia Outer Package
I opted to buy the carry pod as well since I plan on throwing this in my laptop bag and carrying around.
Kardia Inner Package
Recording
The initial setup and pairing was nice but unexpectedly I did have to disable NFC. I use this for mobile payments so it may be a pain to disable and re-enable constantly. Minor inconvenience but worth mentioning.
Kardia Record
Here you can select the Single Lead or 6-Lead. The Single lead requires pointer and middle finger to touch the metal contact from each hand. The 6-Lead requires thumbs and the bottom center metal contact to touch part of your left leg.
Reviewing Results and Sharing
Simply hold for 30 seconds and it will record. when it is done it will provide this report. It will save the results locally but you can use the “Email EKG” to share. This is not limited to email, you can share it with any app on your phone such as FaceBook but it does generate a PDF file so the app needs to be able to accommodate transferring a PDF instead of an image file.
Kardia Results
Here is an example of the output I took of my first 6 lead.
Kardia Sample EKG Results
Final Words
At a first glance, I am happy with the 6 lead. It may never end up to be more than a toy I tinker with on occasion as I likely do not have any underlying heart issues but it is very convenient to have this available.
Unless you are highly proficient in reading EKG results, the intent should be to capture an event you are unsure of so that you can share with your doctor, whether it be a primary care or cardiologist. Many times you can walk into the ER having an event or even be at the doctor’s office and they not catch it on an EKG. This device gives you a better chance of catching it.
This Thanksgiving was much like many of the past Thanksgivings. We smoke a turkey and have some family over. Not much deviated except for the fact that when it came time to carve the turkey I had some difficulties. My carving skills and understanding of turkey anatomy are fairly basic so I figured I just chose the wrong knife.
I chose another one, same thing. I repeated a few times and eventually cut it up with a pair of heavy duty kitchen scissors. A bit brute force but it worked!
How Did I Get Here?
My knives over the years had dulled. They actually had never been sharpened. My wife graciously gifted a knife sharpener for Christmas and it was night and day. I couldn’t believe I had let the knives get so bad. They were all practically glorified butter knives until sharpening them. They were not always this way but now they all cut everything like hot butter.
Why are you reading a blog about sharpening your kitchen knives?
While sharpening the knives, I drew the correlation to personal growth, career growth and overall being. So many things in our life take a toll. These are not necessarily bad things but they do cause some normal wear and tear on our personal wellbeing. We give without replenishing ourselves and resharpening our knives(skills). They can become dull over time too.
What Does This Mean For Me, The Reader?
Remember, all things in life take maintenance. Friendships become stale over time when one party is constantly trying to connect but the other does not reciprocate. The vast knowledge you acquired decades earlier can seem like it was another lifetime ago. Many time we are all too busy to even notice this happening. We have a funny way of getting wrapped up in life and following it without much intention. We have kids and they become our life and all we have time for, especially during the younger and more difficult years. It can be easy to just take a back seat to life for a while and let it go where it will.
What Can I do?
Set aside some time. For some people that may be 20 mins a week. Others may need some PTO to reflect or a nice vacation. Be intentional with this but do not let it consume you. Determine how much time you are going to spend on “sharpening your knives” and stick to it. Don’t over or under do it.
For each person, “sharpening your knives” may be a something different. It may be reconnecting with a family member and building that relationship. For others it may be refreshing on technical skills for your career.
This may even involve doing a self inventory of things that are taking away from your goals and having some hard conversations with people or bosses. Many times some personal baggage needs to be let go so that you can grow. Dealing with that could be an article in and of itself.
Final Words
I hope this has helped. This time of year many of us get some downtime and it is good to reflect and set the course for the new year. Let this be a conversation starter with your friends/significant others/coworkers or even drop me a line in a comment!
I have been a remote worker for the past few years. It is not my first time but certainly the longest stint I have done. I wanted to share a few success tips as well as provide some insights for those thinking about doing it.
If you are on site full time or 100% work remote/work from home, the grass may always seem greener. With everything, sometimes it is but it isn’t always!
Remote Work Benefits
Some of the benefits of working remotely can be easily apparent for anyone that is wishing to do this. The biggest one is lack of commute which decreases wear and tear on your vehicle. It also decreases wear and tear on your body due to lack of stress from driving in traffic.
It is almost like getting a small pay raise without actually getting one.
Another benefit is potentially less distractions. Can’t get any work done because people keep coming up to your desk or cube? You’ll immediately lose that foot traffic working remote.
You can take useful breaks. Need to step away for a few minutes and do something else for a bit. If you’re working from home you can start a load of laundry or do some dishes. You’re getting the downtime from what you were working on and being productive for the home as well. It just requires strong boundaries set to avoid getting distracted by all the things going on at home.
At the end of the day when you are done with work, there is no 30-60 minute commute to finish out the day. If you work from home you are already there. If you co-work, hopefully it is near your home and its a light commute.
Remote Work Downsides
For some it can be difficult adjusting to less social interactions. Water cooler talk or impromptu meetings that randomly happen out in the hall can be missed. You can find that you are the last to know random information because of this. Sometimes out of sight, out of mind.
Without a need to go into the office, personal grooming and schedules can become a blur. Asking yourself questions like “Do I really need to shower today?”.
People can get distracted by many things at home. From door to door sales people to never ending laundry, there is a plethora of things to distract you from your work tasks.
Its a rare edge case but I actually started having issues with my transmission in my truck because of the extremely low mileage on it. It is an adaptive transmission and it was not being driven enough under enough conditions to learn properly. – Link as evidence for those non believers. – https://static.nhtsa.gov/odi/tsbs/2016/SB-10081880-5448.pdf.
Another downside I found is that sometimes my commute is too short. I didn’t have the proper time to decompress between home life to work life and then back to home life. For example if I stop at 5:30PM and the wife and kids come home a few minutes later I find that I’m frantic and still trying to unwind from a busy day. The same is true if its a hectic morning getting the kids off to school and I walk into the co-work space with emails lined up that need responding.
Surviving Remote Work
I personally go to a co-working space. This can help mitigate some of the downsides. The space I go to is fairly economical and many places have plans that start at $99/month depending on your area and needs. It is about 5 miles from my house so the commute isn’t terrible by any means.
In some of the more active ones you can find people in similar industries and chat, network and meet like minded individuals.
It gives you a reason to get up on a schedule, shower, groom and be out and about. I also use my lunch break to use the gym a couple of times a week. I find running errands or actually going out to lunch helps to increase social interactions. Even for those that are anti-social or introverts, daily social interaction is important to help keep the mind sharp! Scientists have actually linked loneliness and Alzheimers – https://www.ncbi.nlm.nih.gov/pmc/articles/PMC5764000/
Excelling At Remote Work
If you are working remotely you do not just want to survive but you want to make the best of it. Many times when it comes to coworkers that are not remote workers, you can be up against a perception issue. They imagine you are sitting around, doing laundry and watching TV. Particularly if they try to reach you and you are unavailable. One of the best ways to mitigate this can be to be overly responsive via various mediums your organization communicates. Communicate when you’re in for the day, when you take breaks and lunches and when you’re leaving for the day.
Prioritize the mediums they communicate with with. If its phone or IM/slack, make sure to respond immediately if possible even if its to say you’re busy and you’ll respond in a bit. Lean on the over-communication unless asked to dial it back.
Final Words
Working remotely can be a blessing or a curse. It is not always for everyone but hopefully I have shared a few tips to help you survive and excel at it if you find yourself pushed into it or wanting a remote work job.
I was working on Azure Client VPN with OpenVPN and in testing I had removed the passphrase on the private key for authentication but wanted to put it back on there and it would not work. Some quick searches did not turn up much other than common complaints of this.
Reason
With certificate based authentication on OpenVPN, the public key and private key are put in the ovpn file. This is not the most secure with an unencrypted private key as anyone can simply obtain the file and connect.
With a passphrase on it, there is less concern over the ovpn being disseminated and the key reused.
It seemed like it was just not prompting me to enter the passphrase and using a blank one.
Solution
I came across the following article ( https://github.com/pivpn/pivpn/issues/372 ) which had quite a few tangents on it but most recently someone indicated using OpenVPN Connect 3.1.0 and it worked. I tried that and was surprised, it actually prompts me for the passphrase!
It seems the community version of the OpenVPN GUI client supported this but the OpenVPN Connect lacked the feature until recently. As of the time of this writing 3.1.0 is Beta but seems to work great!
I had tried upgrading from 2.5 to 2.7 without luck. Finally after installing 3.1.0 it worked again.
In my article Intro To Azure Active Directory Domain Services we discussed environments with minimal infrastructure. With all of the RDP exploits it is typically best not to expose RDP over the internet. Since Bastion is not yet fully available the next best thing aside from setting up a VPN appliance is to use the Point-to-site functionality of a Virtual Network Gateway.
Prerequisites
The first pre-requisite for client VPN using a Virtual Network Gateway is to actually provision one. For OpenVPN compatibility it does require at least SKU VpnGw1 and will not work with basic.
It will require 2 subnets, one for the inside leg of the gateway and another for the client-side pool.
The Virtual Network Gateway does want an inside subnet dedicated for use to the Virtual Network Gateway and not shared amongst other devices.
Authentication is handled either via radius or certificate based. If you are reading this article for a minimized infrastructure you probably do not have radius servers.
Provisioning
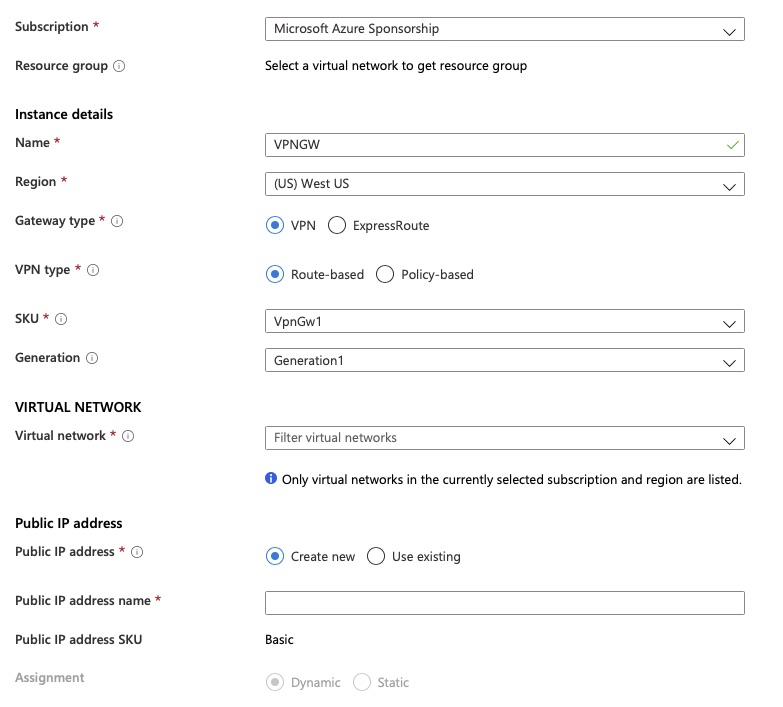
The provisioning process is fairly simple although it can take 30-60 minutes for the Virtual Network Gateway to fully provision before you can use the Point-to-site configuration. There are a few simple questions.
Virtual Network Gateway – Create
That’s really it for the initial provisioning.
Configuration
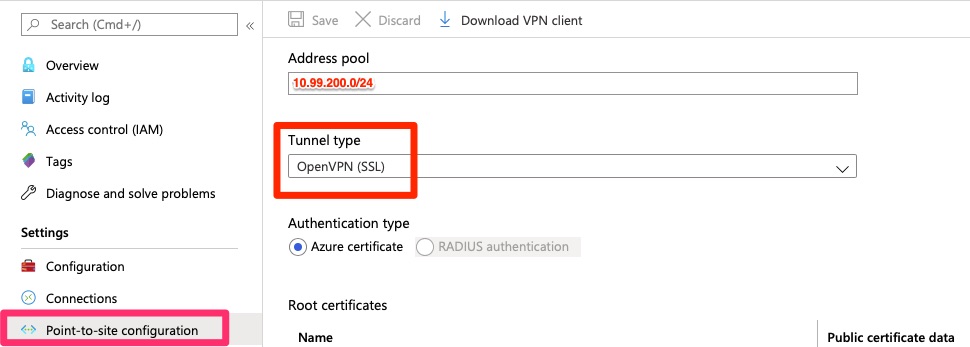
Some basic Point-to-site configurations need to be set.
Point-to-site configuration
The next part is the most difficult part of this. A root and at least one child certificate have to be provisioned. Microsoft has some good documentation on it. To do in Powershell, it does require Windows 10 or Server 2016 or higher.
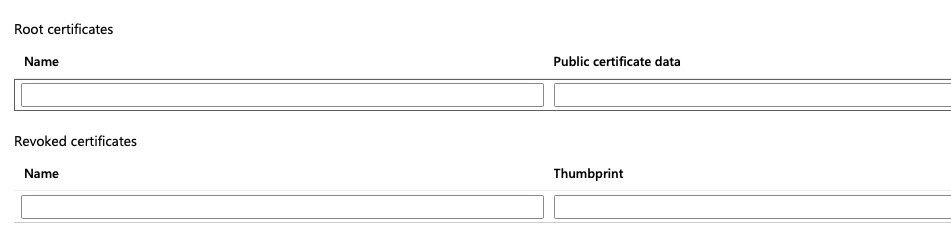
Root Certificate
The name is arbritrary but the “Public certificate data” is the area between the “—BEGIN CERTIFICATE—” section and the “—END CERTIFICATE”
It can be a pain for those of us not familiar with certificates and command line tools like openssl. The idea is that you have a root certificate authority that then issues individual certificates per user or group of users. If that key becomes compromised you can then revoke the individual certificate or untrust the entire certificate authority. I like the idea of creating a CA chain per organization you grant access to.
In this article we walked through creating the resources required and configuring. We did rely heavily upon the Microsoft documentation but it was fairly complete and well shown.
Recently I got the pleasure to stand up Azure Active Directory Domain Services (AADDS) for a client. It has some specific use cases and limitations but can be great for your environment.
This article walks you through the background, some of the limitations and also how to provision.
What is Azure Active Directory Domain Services?
This is a natural question. At a high level, let’s talk about the use case for it. In a small cloud environment with a minimal number of VMs, standing up redundant Domain Controllers can chew up a bit of your budget. From there you have to manage and monitor the domain controllers.
AADDS is a managed platform for this. On the back end it appears to be appliances that provide most of the functionality of Active Directory but with some limitations. It also offers a one way sync from Azure Active Directory (AAD) to AADDS. This allows you to use Azure Active Directory credentials to login to VMs.
Use Case
As touched on above, most administrators want a central credential repository for their cloud VMs. If they are used to Active Directory on prem but want to tie this to Azure AD, AADDS makes sense, particularly in small environments where there may not be a full budget to host, manage and maintain full domain controllers with adequate redundancy.
Limitations
There are some notable limitations so if you are looking for the full flexibility of native Domain Controllers, AADDS is not that.
One Way Replication
Replication only occurrs from AAD to AADDS. You can make changes in AADDS via normal Active Directory Users and Computers (ADUC) or other tools but they do not replicate back to AAD. AAD can however overwrite these changes.
Azure Active Directory does support AD Connect to connect to on prem domain controllers but it is not compatible with AADDS at this time.
No Custom Attributes
It does not support extending the schema or adding extra custom attributes
External Guests
While external guest accounts will replicate into AADDS, their password and hashes are inaccessible so you will not be able to login under these accounts. An AAD account local to tenant AD will have to be provisioned.
Lack of Control
When you create or change AAD attributes, you have no control over the replication interval. The initial sync may take an hour or two. The provisioning of AADDS takes quite a bit of time as well. In practice, on a smaller environment, replication does seem to happen within 5-15 minutes.
Provisioning
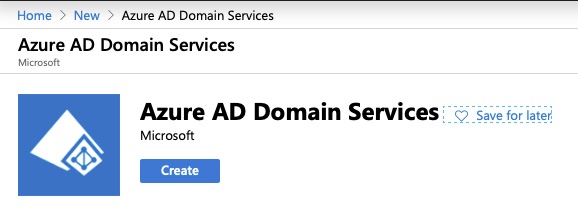
The first step is to select this from the Market and click create
Azure AD Domain Services
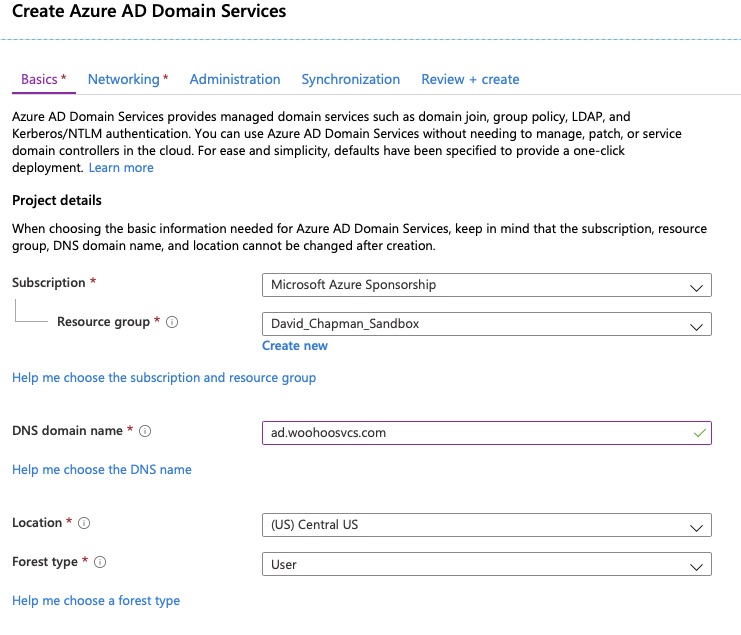
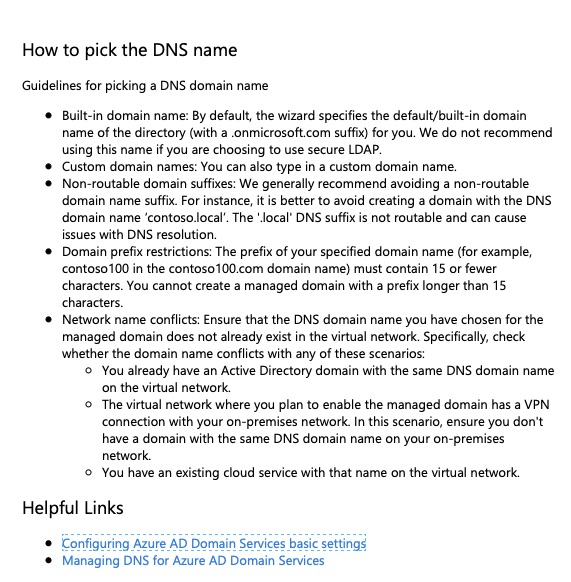
On the basics tab, pay particular attention to the DNS Domain name. Best practices for domain naming has changed over the years. These settings cannot be changed after implementing.
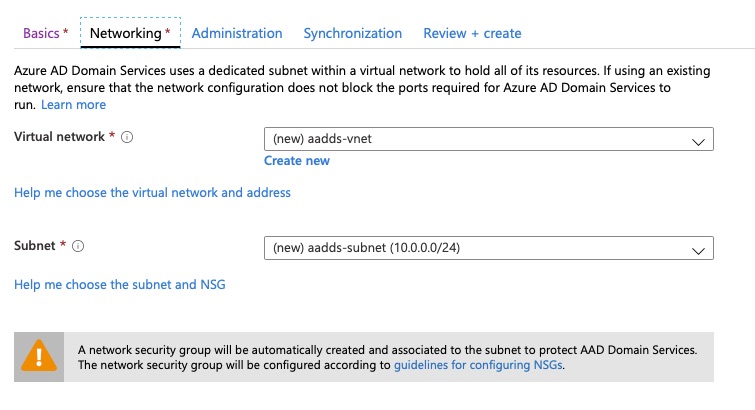
On the networking tab it will by default create a new Virtual Network and Subnet. You can choose an existing virtual network which is highly likely. It does however, indicate you should use a not in use subnet for this. I have not found much information on that but it may have to do with the Network Security Group it creates and applies.
Azure AD Domain Services – Networking
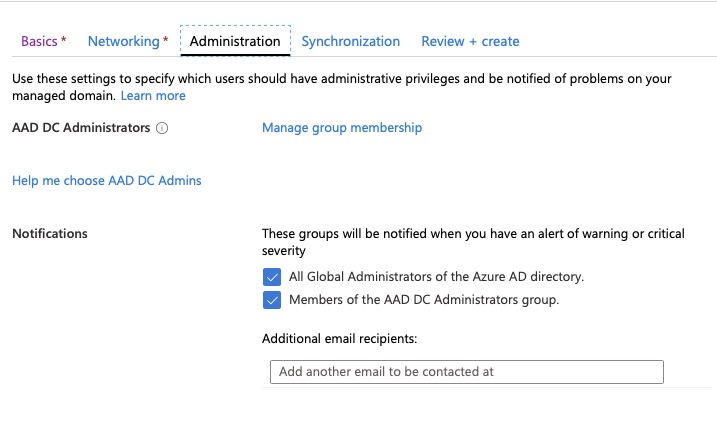
On the next screen you will elect who can manage this environment. Users in this group will function as the “Domain Admins” you are used to in Active Directory.
Azure AD Domain Services – Administration
Next we can choose which objects to synchronize but typically it will be all objects. If you think you may want to scope it though, choose that first as you can go from scoped to all but have to recreate to reverse.
Azure AD Domain Services – Synchronization
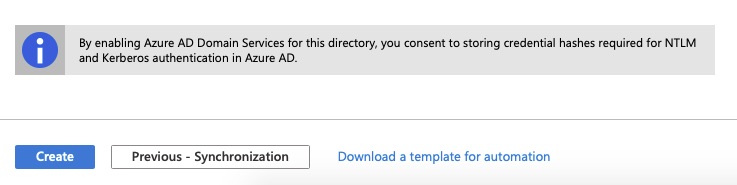
Finally, we review the config but pay note to this. In order for this all to work, your AAD hashes have to be stored in the AADDS.
Azure AD Domain Services – Review & Create
Final Words
In this article we gave a brief overview of Azure Active Directory Domain Services and some use cases. We also went over some limitations and cases where it would not be a good fit. Finally we walked through the actual deployment.
Earlier this year, my wife decided to start her own hair salon and do booth rental (Pretty Hare Salon). We set up square for appointment setting and credit cards. It has nice reporting features but there is literally no forecasting. Forecasting helps us determine pricing and when to increase or decrease marketing/advertisement.
Parameters of the Problem
To work around this lack of forecasting, I found an export feature that exports appointments in csv. Unfortunately it does not list the pricing associated with it. At the time, I implemented something in perl but decided to rewrite in Golang. The application inputs two CSV files (1 – appointments and 2 – pricing) and calculates weekly totals based on that.
Helper Function
Error checking and reporting requirements are fairly minimal for this so I use a helper function that is fairly basic.
In order to load the CSV into a variable, I opted to use os.Open() which takes the file path. I pass these in through command-line arguments using os.Args. os.Open returns a pointer to a file.
The Appointment file is the full history and we do not need all the data in it. It can get very large over time so it is best not to completely load it into memory. We also will have logic to ignore anything older than 2 weeks as this is a forecast and we do not care about historicals.
for {
	appointment, err := appointments.Read()
	if err == io.EOF {
		break
	}
	// Business logic in here
}
The appointment array in this can then be read as a single dimension. Something similar to what is below exists in the for loop previously shown.
if appointment[2] == "accepted" {
	// More business logic here
}
Looking Up Data
The pricing information which we fully loaded into the two dimensional slice can be iterated as follows
for _, price := range priceRecords {
	if price[0] == service {
		return strconv.ParseFloat(price[8][1:], 64)
	}
}

return 0, errors.New("Could not find service - " + service)
The “service” variable is the service we are looking up. In the price slice, the first or 0 position is the actual service name we are looking up and position 8 is the actual price.
The price field (8) has a dollar sign so I just used string slicing to omit the first character which is the dollar sign so I could parse the float like this
price[8][1:]
The pricing file is highly controlled so I have very little error checking here.
Final Words
In this article we discussed opening and iterating through CSV files using two methods. One involves fully loading the file into memory and the other involves iterating line by line. At this point you should have a good idea of which method to use and when.
I was writing an SSL Certificate Decoder ( https://tools.woohoosvcs.com/certdecoder/ ) and came across an interesting problem. I wanted to validate a certificate chain but had some difficulty figuring it out. The problem was that I needed to find the most child certificate in a seemingly random list of certificates. What I am calling the most child certificate is the one at the bottom of the chain that is issued but does not issue one of its own. Users can provide the cert chain in any order so we cannot relay on the order they are submitted for this tool.
SSL Certificate Chains
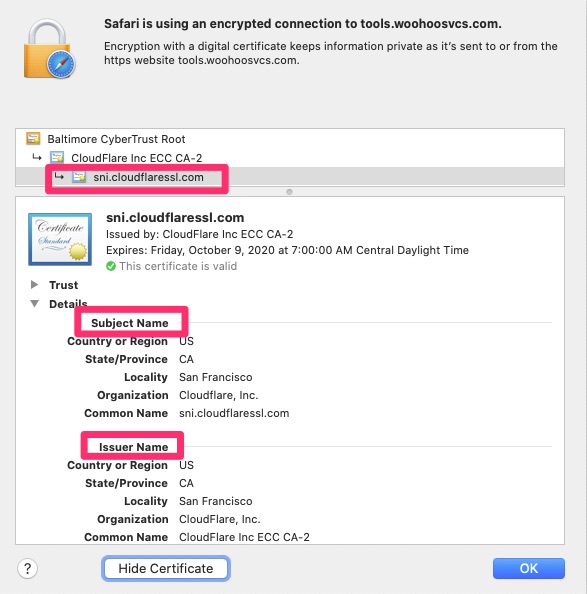
To understand the problem, one needs to understand an SSL Certificate Chain. When traversing a chain, each certificate is an individual certificate. How they are linked is by their issuer. There is a subject section about the certificate itself and then an issuer section which indicates the certificate authority certificate that issued that. It goes all the way up until you hit a root certificate. The root certificates sign themselves.
Here you can see the cert chain for this site. The SAN or alternate names that allow tools.woohoosvcs.com be valid are further down below this screenshot.
SSL Certificate Chain
Recursion
It had been a few decades since I sat in a Computer Science class but I do remember a few control structures. One of which was recursion. Recursion can be a difficult concept to grasp and an even more difficult concept to implement. Golang has an example of this here. At a high level a recursive function is one that calls itself. The call stack gets nested in each layer. In the case that you do not know how many certificates and iterations you need to go through to find the chain, recursive functions help with this. Alternatively you would have to use multiple layers of “for” loops to iterate through, matching the current cert against one that may be a child. In a past life I may have implemented a few layers of “for” loops to statically account for the most common scenarios.
Recursion can be tricky and if you do not use it right, it can involve stack overflows if the function indefinitely calls it self. The key to a good recursive function is a way out. It needs to be able to exit without continuing to call itself forever. There are also limits based on the platform as to how deep you can go in this recursion. Your platform will have a limit at which point an exception or error is thrown.
It is still a work in progress but after iterations of playing with linked lists, multiple for loops, this is what I landed on.
func findChildOfCert(certs []x509.Certificate, cert x509.Certificate) x509.Certificate {
	if len(certs) <= 1 {
		return cert
	}
	result := cert
	for _, item := range certs {
		if item.Issuer.CommonName == cert.Subject.CommonName {
			return findChildOfCert(certs, item)
		}
	}

	return result
}
It is kicked off in a parent function via
childCert := findChildOfCert(cs, cs[0])
Where cs is a slice (Golang speak for array) of certificates much like “certs” in the recursive function. We pass it the list of certificates and the very first one.
On the first call it checks to see if this certificate issued any others in the list. If so, it calls the function again with the issued certificate( more child than the current ) and does the process over again.
When it cannot find a certificate issued by the currently iterated certificate (most child record), the for loop exits and it simply passes the original cert that the function was called with. At that point, the stack completely unwinds, passing the “answer” certificate all the way down. That result is provided to the childCert variable.
Validating the Cert
Golang provides a few options for validating the cert. Once you have the most child certificate, you can do something like the below.
for i := range cs {
	if !cs[i].Equal(&childCert) {
		roots.AddCert(&cs[i])
	}
}

opts := x509.VerifyOptions{
	Intermediates: roots,
}

opts2 := x509.VerifyOptions{
	Roots: roots,
}

if _, err := childCert.Verify(opts); err != nil {
	status = append(status, "Not Trusted By Root - failed to verify certificate: "+err.Error())
} else {
	status = append(status, "Trusted Chain")
}

if _, err := childCert.Verify(opts2); err != nil {
	status = append(status, "Not Valid(contiguous) - failed to verify certificate: "+err.Error())
} else {
	status = append(status, "Valid Chain")
}
I load up a “roots” slice of the roots provided. I also exclude the child certificate from this. From there I perform two validations. One that the chain is trusted, meaning it rolls up to one that is trusted by the source used. The other validation is that the chain is valid. Is there continuity in the chain or is it broken. A chain can be valid but un trusted. Knowing the difference may help you in a rare case.
Stack Overflow
I actually found a stack overflow doing a regression test with a self signed certificate. The code above actually ended up comparing the certificate to itself over and over again and trying to keep going down the rabit hole. It ended up with the following
Luckily my unit testing caught this and this would have never gone to production due to that unit testing. If you’re not sure what unit testing is check out my article Unit Testing Golang on App Engine. The fix was simple though in that to make sure my recursive function doesn’t compare a cert to itself using the .IsEquals() function
Final Words
In this we walked through a useful use case for recursion and the background of the technology that needed it. I even provided some of the errors that happen when you fail to use recursion properly as I accidentally did!
If you have landed here, it is most likely because you attempted to implement the subject and ran into errors. In my use case, I ran into errors when splitting up my Golang app into packages and added unit testing to it. To compound it, I was automatically deploying via triggers with CloudBuild.
This article is not a “How To” on actual unit testing but getting it to work under this unique combination of tools. A great unit testing article I found is here – https://blog.alexellis.io/golang-writing-unit-tests/
How To Setup
Before we talk about what might have gone wrong, let’s talk about how to set this up properly. There has been a lot of confusion since Golang went to version 1.11 and started supporting modules. After supporting modules it appears using GOPATH is a less of a supported method. With that said some tools still look for it.
Directory Structure
To get a final state visual of my directory structure, it ended up as follows
Modules help with the dependency needs of Golang applications. Previously, private packages were difficult to manage as well as specific versioned public packages. Modules helps many of these issues. Here is a good article on modules – https://blog.golang.org/using-go-modules
The key to my issues seemed to be involving modules. Google App Engine’s migrating to 1.11 guide recommends the following.
The preferred method is to manually move all http.HandleFunc() calls from your packages to your main()function in your main package.
Alternatively, import your application’s packages into your main package, ensuring each init() function that contains calls to http.HandleFunc() gets run on startup.
My app’s directory is “tools.woohoosvcs.com” so I named the root, the same. Run “go mod init”
$ go mod init tools.woohoosvcs.com
go: creating new go.mod: module tools.woohoosvcs.com
dwcjr@Davids-MacBook-Pro tools.woohoosvcs.com % cat go.mod
module tools.woohoosvcs.com

go 1.13
Importing Private Packages
This then lets us to refer to packages and modules under it via something similar.
steps:
  - id: subnetcalculator_test
    name: "gcr.io/cloud-builders/go"
    args: ["test","tools.woohoosvcs.com/subnetcalculator"]
    #We use modules but this docker wants GOPATH set and they are not compatible.
    env: ["GOPATH=/fakepath"]
  - name: "gcr.io/cloud-builders/gcloud"
    args: ["app", "deploy"]
Interesting tidbit is the “name” is a docker image from Google Cloud Repository or gcr.io
The first id runs the “go” image and runs “go test tools.woohoosvcs.com/subnetcalculator”. It seems the go image wants GOPATH but go test fails with it set so I had to set it to something fake.
It then uses the gcloud deployer which consumes app.yaml
Before implementing modules I could get it to run locally by importing ./subnetcalculator but then “gcloud app deploy” would fail.
2019/11/22 01:39:13 Failed to build app: Your app is not on your GOPATH, please move it there and try again.
building app with command '[go build -o /tmp/staging/usr/local/bin/start ./...]', env '[PATH=/go/bin:/usr/local/go/bin:/builder/google-cloud-sdk/bin/:/usr/local/sbin:/usr/local/bin:/usr/sbin:/usr/bin:/sbin:/bin HOSTNAME=ace17fcba136 HOME=/builder/home BUILDER_OUTPUT=/builder/outputs DEBIAN_FRONTEND=noninteractive GOROOT=/usr/local/go/ GOPATH=/go GOPATH=/tmp/staging/srv/gopath]': err=exit status 1, out=go build: cannot write multiple packages to non-directory /tmp/staging/usr/local/bin/start.
The error was vague but I noticed it was related to the import path. I tried moving the folder to $GOPATH/src and it seemed to deploy via “gcloud app deploy” but then failed via CloudBuild automated trigger.
------------------------------------ STDERR ------------------------------------
2019/11/21 21:31:39 staging for go1.13
2019/11/21 21:31:39 GO111MODULE=auto, but no go.mod found, so building with dependencies from GOPATH
2019/11/21 21:31:39 Staging second-gen Standard app (GOPATH mode): failed analyzing /workspace: cannot find package "tools.woohoosvcs.com/subnetcalculator" in any of:
	($GOROOT not set)
	/builder/home/go/src/tools.woohoosvcs.com/subnetcalculator (from $GOPATH)
GOPATH: /builder/home/go
--------------------------------------------------------------------------------

ERROR
ERROR: build step 0 "gcr.io/cloud-builders/gcloud" failed: exit status 1
It was like a balancing act with a 3 legged chair! Once I initialized the module though and adjusted the imports it worked great
Final Worlds
Here we worked through a best practice of using modules and an internal package to do automated build deploy on Google App Engine. Unit testing with automated deploys are important so that broken builds do not get pushed to production.
Over the past few days I put a few hours towards writing a web app to perform some basic CIDR subnet calculations. I wanted to both share the link to it ( https://tools.woohoosvcs.com/subnetcalculator/ ). I also wanted to walk through how I deployed it to Google App Engine.
What is a Subnet Calculator?
When provisioning subnets you typically need to determine your requirements. Determining the size of the subnet based on the number of hosts or what the mask will be can take a little bit of time. This is particularly so when you do not calculate this often. Subnet calculators help save some time on this.
Why did I do it?
I have written a few over the years. My early ones were written in C. Golang has a few libraries though in the new package to help with this. I had to use one the other day and figured why not quite my own. While doing this, why not share how to deploy your own app?
I have a main.go file and a static view.html file. Since I already have a default service I am calling this one service. That requires I use a dispatch for my custom domain name.
Don’t forget to add the custom domain to the Settings section!
The easiest way to get a Golang app running is as follow. The Google App Engine will run the main function in the main package. Google App Engine sets the PORT environment variable.
package main

func main() {
        port := os.Getenv("PORT")
        if port == "" {
                port = "8080"
                log.Printf("Defaulting to port %s", port)
        }

        http.HandleFunc("/subnetcalculator/", viewSubnetCalculator)

        log.Printf("Listening on port %s", port)
        if err := http.ListenAndServe(":"+port, nil); err != nil {
                log.Fatal(err)
        }
}

// This is the main page to view the Subnet Calculator
func viewSubnetCalculator(w http.ResponseWriter, r *http.Request) {
        http.ServeFile(w, r, "./view.html")
}
The best practice for this would dictate a separate main.go importing your own package but if you were familiar enough with that, you may not need this article.
It is out of scope for this article but “http.HandleFunc(“/subnetcalculator/”, viewSubnetCalculator)” tells Golang that the “/subnetcalculator/” URI be directed to the “viewSubnetCalculator” function. That function simply displays the view.html file
From there we simply run the following. I have tools.woohoosvcs.com under the same parent as dispatch.yaml
cd tools.woohoosvcs.com
gcloud app deploy

cd ..
gcloud app deploy dispatch/dispatch.yaml
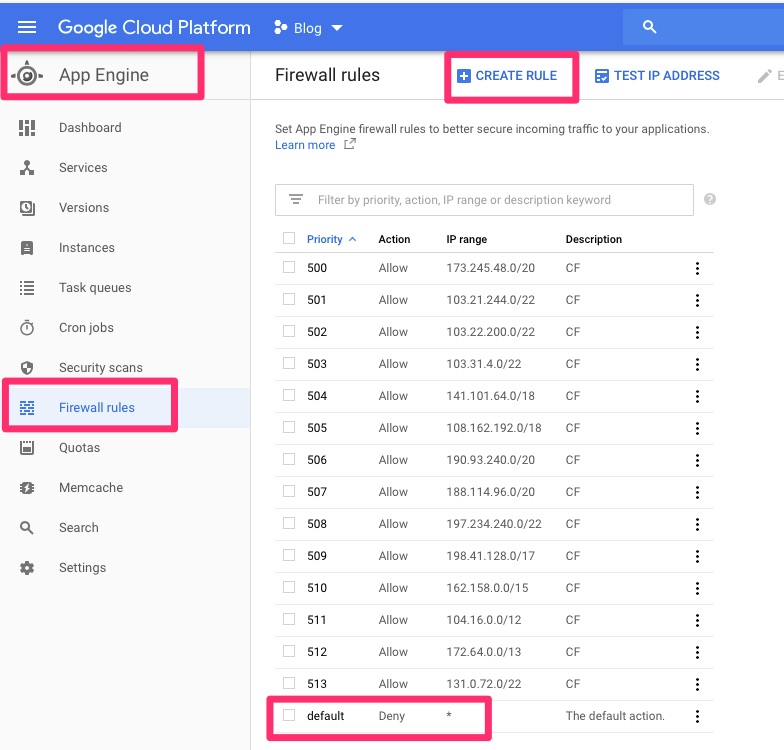
Securing Google App Engine
If you use a Web Application Firewall like Cloudflare, don’t forget to ACL GAE to only allow connections from it. Otherwise, it can be completely bypassed
Google App Engine – Firewall
Final Words
This was just a quick and dirty deploy of a golang app to Google App Engine. As with all the apps though, I run them through Cloudflare or at least some sort of Web Application Firewall.