Moving WordPress Images To Google Storage

Summary

In my article Running Google App Engine Behind Cloudflare, the goal is to get to a point where horizontal scaling can happen. One of the final barriers is the location of the images. WordPress stores the images in wp-content on the local machine.

Horizontal Scaling

Once this is separated the WordPress site can be somewhat easily horizontally scaled. There are a few methods that can be used to achieve this, particularly in Google Cloud.

  1. We could spin up more VMs and point them to the database
  2. Load the WordPress Docker image into a Kubernetes Cluster
  3. Run WordPress in Google App Engine

The actual method of horizontal scaling is out of scope for this document but this is the last barrier to get you to that decision.

References

I am going to give credit where it is due up front. Google’s tutorial on running WordPress on Google App Engine was a good starting point but not the first article I came across on this.

I came across this article from Kinsta which has some pretty good directions on a tool that looks extremely promising.

Storage Plugins

With anything WordPress, there is a plugin for it! Here are some options. We will choose one of these for this article.

  1. Google Cloud Storage Plugin – I have not seen much on this one.
  2. WP Offload Media – This one seems to have been around the longest but it will cost you to migrate existing content
  3. WP-Stateless – Seems extremely promising. This shows up 3rd on the list but is the one we will implement in this article.

Preparation

For this article I decided it probably is not a good idea to make intrusive changes to this blog in order to generate more content. For this reason I decided to clone the production into staging.

Also, make sure to kick off a snapshot and backup of the database and VM beforehand.

Install WP-Stateless

We need to install and activate the WP-Stateless plugin.

Create Storage Bucket

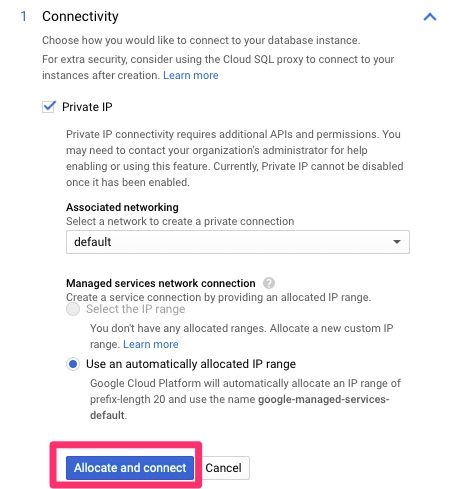
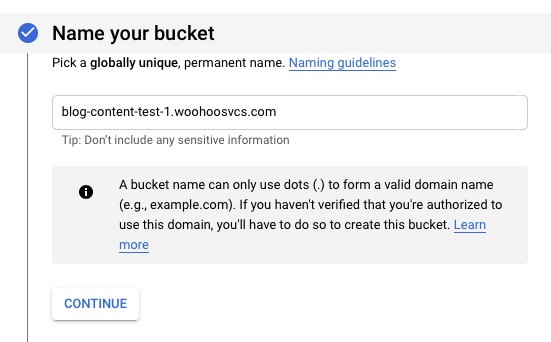
WP-Stateless will guide you through creating the bucket but I wanted to do that manually to walk through the options. In the Storage / Browser section click “Create Bucket”. I had every intention of using a custom domain name but it does not appears to be supported according to Google.

With Cloudflare since I have it set to strict, it is expecting an origin cert. If I were to downgrade the site to flexible it would connect over 80 and likely work. This is a little bit concerning because Cloudflare’s CDN is great and this now bypasses it.

Note: You can use a CNAME redirect only with HTTP, not with HTTPS. To serve your content through a custom domain over SSL, you can set up a load balancer.”

https://cloud.google.com/storage/docs/request-endpoints#cname
Name Bucket - use fully qualified domain name to help future proof but not required.
Name Bucket – use fully qualified domain name to help future proof but not required.

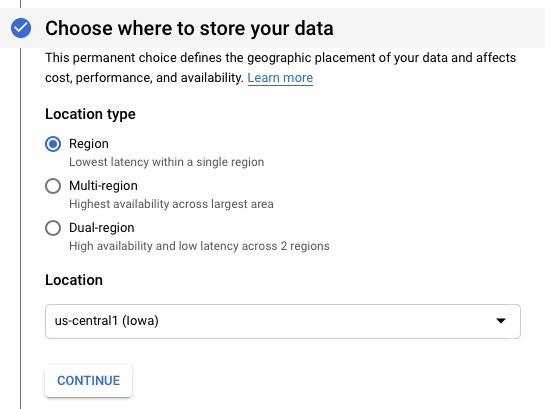
This is my lab so I chose the cheapest option but since we cannot use behind a secure CloudFlare, you may opt for multi-region. Google Storage is not a full CDN but there are tools you can layer on top of it for that.

Select Region
Select Region

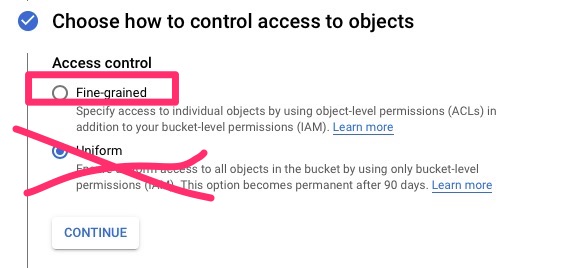
Next we will set up the ACLs. This is a mistake I made during the initial setup assuming there were no ACLs. The result was that the sync would claim to work but nothing would actually happen. I left this to show the config mistake.

Select Fine-grained
Select Fine-grained

Configure WP-Stateless

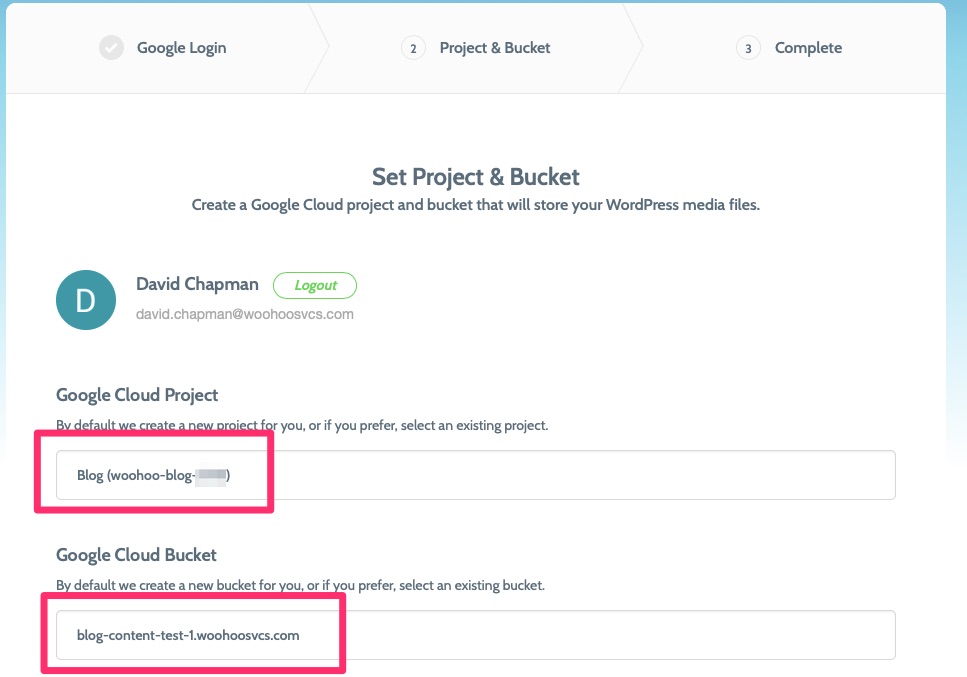
It then runs you through a nice wizard. You can do a manual run as well. If you go that route, WP-Stateless’s instructions are fairly complete.

the first step asks you to login and it generates a json file for you so that it can authenticate.

Select your Project and Bucket

In the configuration we need to set a few options. Namely stateless.

Settings / General / Stateless

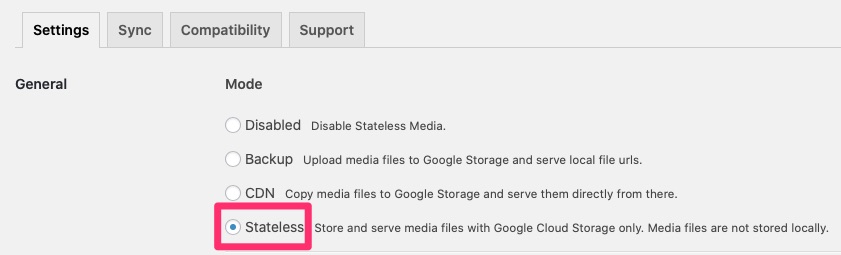
Due to the SSL issue we will leave domain blank. There is currently nowhere to upload the origin cert so a CNAME uses the A record’s SSL cert and would cause a cert mismatch. Being in strict mode, this won’t work but it may work in “full” or “flexible” since Cloudflare does not validate the cert in one case or use it in the other. If you are in “Full” or lower, give it a shot though!

Run a sync and you’re off!

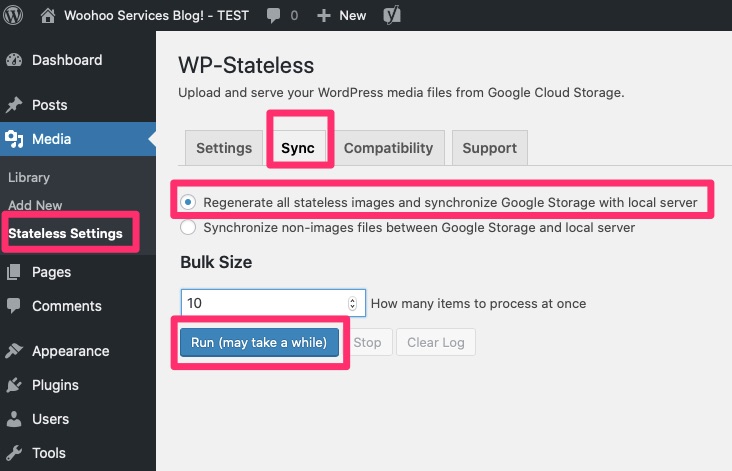
Initially I was running on a micro instance with under 1GB RAM and it locked up and ran out of RAM. The default Bulk size is 1, you may need to go closer to 1. I re-ran this on a 1.7GB instance and ran with 1 and had no issues.

On the VM itself I validated images were removed.

$ find /var/www/html/wp-content/uploads/ | wc -l
441

$ find /var/www/html/wp-content/uploads/ | wc -l
42

There are still 42 images. We’ll track that down!

Some of these images did not have proper permissions. Since I manually synced the filesystems for this staging environment some of the newer images had incorrect permissions.

$ find /var/www/html/wp-content/uploads/ -ls
   131221      4 drwxr-xr-x   3 www-data www-data     4096 Oct 25 19:22 /var/www/html/wp-content/uploads/
   131223      4 drwxr-xr-x   4 www-data www-data     4096 Nov  1 08:38 /var/www/html/wp-content/uploads/2019
   131224      4 drwxr-xr-x   2 www-data www-data     4096 Nov  8 14:40 /var/www/html/wp-content/uploads/2019/10
   131891     12 -rw-r--r--   1 www-data www-data     9512 Nov  8 03:46 /var/www/html/wp-content/uploads/2019/10/http_1_1-100x100.png
   131849      4 -rw-r--r--   1 www-data www-data     2835 Nov  8 03:46 /var/www/html/wp-content/uploads/2019/10/logo-100x100.jpg
   131866     12 -rw-r--r--   1 www-data www-data     9200 Nov  8 03:46 /var/www/html/wp-content/uploads/2019/10/K2167-100x100.png
   131682      4 -rw-r--r--   1 www-data www-data     3324 Nov  8 03:46 /var/www/html/wp-content/uploads/2019/10/wh_header-100x100.jpg
   131229     20 drwxr-xr-x   2 www-data www-data    20480 Nov  8 14:40 /var/www/html/wp-content/uploads/2019/11
   147546     12 -rw-r--r--   1 root     root         8442 Nov  8 03:46 /var/www/html/wp-content/uploads/2019/11/GAE-Default-768x117.jpg
   147574      4 -rw-r--r--   1 root     root         3173 Nov  8 03:46 /var/www/html/wp-content/uploads/2019/11/GAE-Cert-300x52.jpg
   147550      8 -rw-r--r--   1 root     root         7206 Nov  8 03:46 /var/www/html/wp-content/uploads/2019/11/CF-DNS-Only-1024x48.jpg
   136683      8 -rw-r--r--   1 root     root         6938 Nov  8 03:46 /var/www/html/wp-content/uploads/2019/11/SSL-CF-Origin-300x140.jpg
   131918      4 -rw-r--r--   1 root     root         1604 Nov  8 03:46 /var/www/html/wp-content/uploads/2019/11/CF-DNS-Only-150x49.jpg
   147575     32 -rw-r--r--   1 root     root        31759 Nov  8 03:46 /var/www/html/wp-content/uploads/2019/11/mysql-purge-1024x186.jpg

Chown to the rescue

$ chown -R www-data:www-data /var/www/html/wp-content/uploads/*

Now we’re down to 8 after running again and these are actually unused images.

$ find /var/www/html/wp-content/uploads/ | wc -l
8

Final Words

Here we have used a free plugin to move our images to a shared and central repository. Due to my configuration and desire to keep it, it does not leverage Cloudflare’s CDN but you are able to make your own decision on that.

UPDATE: 20191109 – I can confirm lowering Cloudflare security to Full and adding the CNAME to c.storage.googleapis.com does allow this to work. It would be a decision point at the time of needing this whether I go that route.

At this point, at least in this test environment, I could spin up multiple front ends now to handle any excess of traffic.

Another benefit of this is it helps keep your VM light without having to store all of your images on it.

Upsizing WordPress MySQL to Google Cloud SQL

Summary

From my previous article How I Stood Up WordPress In a Day, we stood up a “Quick and Dirty” version. It was a fast and easy setup but an all in one. What happens if your WordPress site really takes off? This is not highly scalable as it is limited to the resources of the box. Perhaps your hosting provider lets you increase the size of the VM.

Scaling WordPress

Eventually you will get to a point where you reach the max. This is called vertical scaling. It is one of the easier methods but only gets so far and leads to monolithic infrastructures.

We need to be able to horizontally scale but adding highly redundant nodes. The database is the first piece of this. Since we implemented in Google Cloud, we will be using their managed SQL instance. In AWS this is called RDS.

Another issue we do not yet address is the fact that images are stored locally on the WordPress server itself. We will address that later on and provide a link to that article. Here is our article on that – Moving WordPress Images To Google Storage.

With that said, removing MySQL server from the WordPress server does leave more resources for the WordPress server itself.

Backup

Always run a backup before a major change. In this case we use Google Disk Snapshots for our Google VM and took one before.

Provisioning Google MySQL

For this, we opted the “create” method. Google does have the “migrate” option which involves adding the new instance as a read replica. This is a small WordPress site so we will simply create a backup and restore it and go from there.

Create Instance
Create Instance
Choose MySQL
Choose MySQL
Set instance information, passwords, etc.
Enable Private IP and API
Allocate and connect
We are provisioning
We are provisioning
Tutorial if you wish.  This is a tutorial only.
Tutorial if you wish. This is a tutorial only.

Connecting to Google MySQL Instance

Here we will connect from the VM to the instance as root. You can see the Server version includes “Google”. We will then create the wordpress database and access. This is not the most secure of GRANT but we are copying what was there. It can be locked down based on best practices. The CREATE options will be highly dependent on your existing setup and we’ll talk about it further in the troubleshooting options

$ mysql -h 10.30.128.3 -u root -p
Enter password: 
Welcome to the MySQL monitor.  Commands end with ; or \g.
Your MySQL connection id is 50
Server version: 5.7.14-google-log (Google)

Copyright (c) 2000, 2019, Oracle and/or its affiliates. All rights reserved.

Oracle is a registered trademark of Oracle Corporation and/or its
affiliates. Other names may be trademarks of their respective
owners.

Type 'help;' or '\h' for help. Type '\c' to clear the current input statement.

mysql> CREATE DATABASE wordpress CHARACTER SET latin1 COLLATE latin1_swedish_ci;
mysql> GRANT ALL PRIVILEGES ON wordpress.* TO "wordpress"@"%" IDENTIFIED BY "XXXXXXXXXX";

mysql> FLUSH PRIVILEGES;

mysql> quit;

Now we need to backup the existing wordpress database

$ mysqladmin -u wordpress -p wordpress > 20191107-wordpress.sql

And then import it

$ mysql -h 10.30.128.3 -u wordpress -p wordpress < 20191107-wordpress.sql
Enter password: 
$ 

Validation

In the Google console we can then validate this.

wordpress database
wordpress database
wordpress user
wordpress user

WordPress Config

We need to modify wp-config.php as follows. If your user and password changed, those need to be updated as well.

// ** MySQL settings - You can get this info from your web host ** //
/** The name of the database for WordPress */
define( 'DB_NAME', 'wordpress' );

/** MySQL database username */
define( 'DB_USER', 'wordpress' );

/** MySQL database password */
define( 'DB_PASSWORD', 'XXXXXX' );

/** MySQL hostname */
#define( 'DB_HOST', 'localhost' );
define( 'DB_HOST', '10.30.128.3' );

Testing

Once you save the changes go to your WordPress site and test. If you get an install.php page, stop right there and back out the change. We have some troubleshooting steps below.

Backup Again!

If validation is successful, run a backup again, both in for the Google disk snapshot for the VM and in the Google MySQL instance. This way we have a known good immediately following the migration.

It is highly recommended to backup before you perform any of the short or long term decommission.

Troubleshooting

There are a few causes to get redirected to the install.php page

  • Incorrect database settings, including host, user, password, database name and table prefixes
  • Collation/Characterset – case insensitive versus sensitive
  • Not actually importing the database
  • Improper wordpress user permissions

Collation

This can be checked using the following commands. It is best to keep the same settings when creating. It is also described here – https://stackoverflow.com/questions/9827164/wordpress-keeps-redirecting-to-install-php-after-migration

mysql> SELECT @@character_set_database, @@collation_database;
+--------------------------+----------------------+
| @@character_set_database | @@collation_database |
+--------------------------+----------------------+
| latin1                   | latin1_swedish_ci    |
+--------------------------+----------------------+
1 row in set (0.00 sec)

Database Connectivity

The others can be wrapped up into database connectivity. We tested this by connecting as the wordpress user and importing as that user after the database was connected.

Decomissioning old database

At each of these steps it is important to test the site to ensure it doesn’t break. If you are still somehow pointing to your local mysql instance, it can break. You will definitely find that out during these steps.

Short Term

We do not want old mysql data laying around so the first steps to complete afterwards are to disable and shutdown mysql. This also helps us confirm we are using the new MySQL instance.

$ sudo systemctl stop mysql
$ sudo systemctl disable mysql
Synchronizing state of mysql.service with SysV service script with /lib/systemd/systemd-sysv-install.
Executing: /lib/systemd/systemd-sysv-install disable mysql
Removed /etc/systemd/system/multi-user.target.wants/mysql.service.

Long Term

Long term we want to delete the backup so we don’t have extra data laying around and remove mysql and its database files.

$ sudo apt-get remove --purge mysql-server mysql-community-server
Yes to purge file structures.

Now let’s remove our backup.

$ rm 20191107-wordpress.sql 

Final Words

At this point we have accomplished scaling to a potentially highly available database. This database also can be dynamically sized to accommodate extra load. For the sake of this article, we chose the smallest size possible due to the current load. Should this go viral though, the database can easily be scaled.