Why?
The purpose of this article is just to describe how I did it. Not to imply that it is inherently difficult. For more on why check out the About page.
Where I Started From
I already had the domain woohoosvcs.com and the registrar was GoDaddy who was also hosting DNS. I decided I would host WordPress in Google Cloud due to my familiarity of it and already using G Suite. Therefore I did migrate my registrar to GoDaddy. I had thought I could do a CNAME DNS setup in CloudFlare as I walk through in my article https://blog.woohoosvcs.com/2019/10/beginners-guide-to-cloudflare/ but I was not ready for the Business Plan price tag of that and eventually moved my DNS to CloudFlare.
Why I Chose What I Chose
Due to work exposure I was very familiar with Google DNS, Google Cloud and CloudFlare so I decided to use those based on previous knowledge and price. GoDaddy was charging me $26/year whereas Google Registrar Services were $12 for the same domain. CloudFlare is between $0 and $20 depending on Free versus Professional Tier.
Google Cloud had an easy WordPress Template for a few scenarios but I chose hosted VM. Google was also offering a $300 credit on new activations which I happily opted for
To The Actual Topic!
DNS
So my first order of business was to move my DNS to CloudFlare. I was a bit reluctant as many may be. I just have one site I need protected by CloudFlare, why should I move my entire DNS there? Its a valid concern and why they have CNAME setup but on a pricier tier.
I have been doing this a while and remember when it used to take multiple days to change your nameservers. I changed registrars and then nameservers twice within a few days. The only reason it took so long is before moving to CloudFlare I decided to enable DNSSEC which I had to disable.
Cloud Flare
Once the nameservers were set to CloudFlare’s the setup nearly set it self up in CF with the exception of setting a few specifics I wanted, like requiring TLS 1.2 or higher.
Word Press on Google Cloud
This was just as easy as clicking the template and letting it deploy on a VM. I chose a VM due to the simplicity for myself to manage but I am fairly technical. I think Kubernetes or App Engine may be more difficult although they will scale much more in the long run more easily.
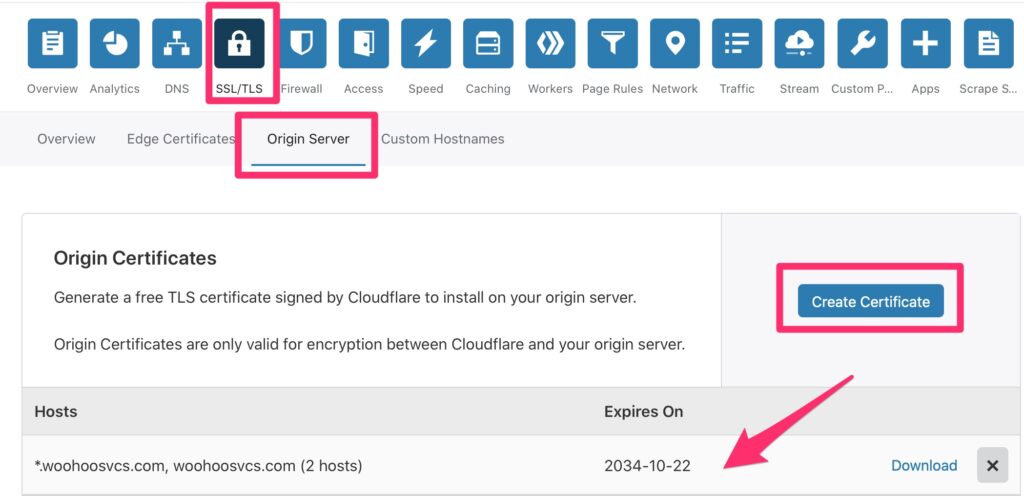
Cloud Flare TLS Cert
To allow it to work in TLS – Full mode though I needed to enable TLS on apache which is where it gets a bit technical.
To do this, CloudFlare will generate an origin cert for you so you do not need to purchase one or an extra one but you can certainly use one if you purchased it.
WordPress TLS Cert
I then needed to edit a few things on the VM. The origin cert creation created a private key and certificate. Upon creation, please copy these down as you will have to re-generate if you need the private key again.
I put these in the following respective directories
/etc/ssl/certs/blog.woohoosvcs.com.crt
/etc/ssl/private/blog.woohoosvcs.com.key
Linux Trusted Roots
At the very bottom of the page to generate the origin certs it had a link to download the trusted roots. These are needed so that Linux and WordPress trust it. These were placed in the following locations
/usr/share/ca-certificates/cloudflare
/usr/share/ca-certificates/cloudflare/origin_ca_rsa_root.crt
/usr/share/ca-certificates/cloudflare/origin_ca_ecc_root.crt
Then the “/etc/ca-certificates.conf” file had entries appended to it to notate these
cloudflare/origin_ca_ecc_root.crt
cloudflare/origin_ca_rsa_root.crt
Then run “update-ca-certificates” and it should rebuild the CA Directory that the local system trusts. WordPress however has its own copy of the ca file that you must copy over.
# Take a backup!
cp /var/www/html/wp-includes/certificates/ca-bundle.crt cp /var/www/html/wp-includes/certificates/ca-bundle.crt.orig

# Copy the system CA to WP
cp /etc/ssl/certs/ca-certificates.crt /var/www/html/wp-includes/certificates/ca-bundle.crt

# Append the site name to localhost in /etc/hosts
root@wordpress-1-vm:/var/www/html# cat /etc/hosts
127.0.0.1	localhost blog.woohoosvcs.com

# Edit Apache / WordPress site config
/etc/apache2/sites-enabled/wordpress.conf

<VirtualHost *:443>
    SSLEngine On
    SSLCertificateFile /etc/ssl/certs/blog.woohoosvcs.com.crt
    SSLCertificateKeyFile /etc/ssl/private/blog.woohoosvcs.com.key
    SSLCACertificateFile /etc/ssl/certs/ca-certificates.crt

    ServerAdmin [email protected]
    ServerName blog.woohoosvcs.com
    #ServerAlias www.example2.com #If using alternate names for a host
    DocumentRoot /var/www/html/
    #ErrorLog /var/www/html/example.com/log/error.log
    #CustomLog /var/www/html/example.com/log/access.log combined
</VirtualHost>


# Restart apache
systemctl restart apache2

# It should listen on 443 now

root@wordpress-1-vm:/var/www/html# netstat -an | egrep "443.*LISTEN"
tcp6       0      0 :::443                  :::*                    LISTEN
From here you can try to curl and see if it works – Log entry below is truncated to save space.
root@wordpress-1-vm:/var/www/html# curl -v https://blog.woohoosvcs.com
*   Trying 127.0.0.1...
* TCP_NODELAY set
* Expire in 200 ms for 4 (transfer 0x55f514505f50)
* Connected to blog.woohoosvcs.com (127.0.0.1) port 443 (#0)
* ALPN, offering h2
* ALPN, offering http/1.1
* successfully set certificate verify locations:
*   CAfile: none
  CApath: /etc/ssl/certs
* TLSv1.3 (OUT), TLS handshake, Client hello (1):
* TLSv1.3 (IN), TLS handshake, Server hello (2):
* TLSv1.3 (IN), TLS handshake, Encrypted Extensions (8):
* TLSv1.3 (IN), TLS handshake, Certificate (11):
* TLSv1.3 (IN), TLS handshake, CERT verify (15):
* TLSv1.3 (IN), TLS handshake, Finished (20):
* TLSv1.3 (OUT), TLS change cipher, Change cipher spec (1):
* TLSv1.3 (OUT), TLS handshake, Finished (20):
* SSL connection using TLSv1.3 / TLS_AES_256_GCM_SHA384
* ALPN, server accepted to use http/1.1
* Server certificate:
*  subject: O=CloudFlare, Inc.; OU=CloudFlare Origin CA; CN=CloudFlare Origin Certificate
*  start date: Oct 27 03:53:00 2019 GMT
*  expire date: Oct 23 03:53:00 2034 GMT
*  subjectAltName: host "blog.woohoosvcs.com" matched cert's "*.woohoosvcs.com"
*  issuer: C=US; O=CloudFlare, Inc.; OU=CloudFlare Origin SSL Certificate Authority; L=San Francisco; ST=California
*  SSL certificate verify ok.
> GET / HTTP/1.1
> Host: blog.woohoosvcs.com
> User-Agent: curl/7.64.0
> Accept: */*
>
* TLSv1.3 (IN), TLS handshake, Newsession Ticket (4):
* TLSv1.3 (IN), TLS handshake, Newsession Ticket (4):
* old SSL session ID is stale, removing
< HTTP/1.1 200 OK
< Date: Mon, 28 Oct 2019 15:10:14 GMT
< Server: Apache
< Link: <https://blog.woohoosvcs.com/wp-json/>; rel="https://api.w.org/"
< Link: <https://blog.woohoosvcs.com/>; rel=shortlink
< Vary: Accept-Encoding
< Transfer-Encoding: chunked
< Content-Type: text/html; charset=UTF-8
WordPress Health Check
WordPress has a nice health check feature that can help you verify that comunication is great. This is under the Admin Page / Tools / Site Health

It took a bit to get here but I worked through the issues. One of them is the image deployed with Debian 9 which had an older PHP version (7.0) so I went through an in place upgrade to Debian 10 (not covered by this article)
Some of the problems I had while initially setting this up were loopback connections from the server itself and inaccessibility of the API when I changed the permlinks to “pretty”
I had to enable / Add the “Allow Override All” to my wordpress.conf file
<Directory /var/www/html>
  Options -Indexes
  AllowOverride All
</Directory>
Are we there yet?
At this point you should have a fairly secure and usable WordPress blog site. If you don’t want to go through all these hassles there are plenty of hosting providers but this only cost me $12/year for the registrar fees and $0-$20 a month for CloudFlare depending on whether I want the WAF enabled. Google Cloud on the $300 credit should last about a year and then be $30/month, if that for the VM hosting this.